Restore scenarios are as
varied as the backup scenarios that drive them. The number of scenarios
is directly related to the types of backups taken and frequency of those
backups. If a database is in simple recovery mode and full database
backups are taken each night, your restore options are limited.
Conversely, full recovery databases that have multiple filegroups and
take a variety of different types of backups have a greater number of
options that can be used to restore the database.
The
following sections describe a number of restore scenarios to give you a
taste of the types of restores you may encounter. The scenarios include
some restores performed with T-SQL and others performed with SSMS.
Restoring to a Different Database
You can restore a database
backup to a different database. The database you’re restoring to can be
on the same server or a different server, and the database can be
restored to a different name, if needed. These types of restores are
common in development environments where a production backup is
recovered on a development server or multiple copies of the same
development database are restored to different database names for use by
different groups.
Listing 7 shows the T-SQL RESTORE command you can use to create a new database named AdventureWorks2008_COPY from the backup of the AdventureWorks2008 database. Take note of the MOVE options that specify where the database files for the new AdventureWorks2008_COPY database will exist. Each MOVE
option must refer to the logical name for the file and include a
physical file location that is a valid location on the server. In
addition, the referenced file cannot be used by another database. The
only exception is when you are restoring to the database that is using
the files and the REPLACE option is used.
Listing 7. Restore to a Different Database
RESTORE DATABASE [AdventureWorks2008_COPY]
 FROM  DISK = N'C:\mssql2008\backup\AdventureWorks2008.bak'
 WITH  FILE = 1,
 MOVE N'AdventureWorks2008_Data' TO
N'C:\mssql2008\data\AdventureWorks2008_Copy.mdf',
 MOVE N'AdventureWorks2008_Log' TO
N'C:\mssql2008\data\AdventureWorks2008_Copy_log.ldf',
  NOUNLOAD, STATS = 10
|
Tip
A restore of a database
backup taken from another server can cause problems after the restore
completes. The problems are caused by broken relationships between the
database users captured in the backup file and the associated logins on
the server to which the backup is restored. The relationships are broken
because each login receives a unique ID assigned to it when it is
added. These unique IDs can and will be different across servers, even
though the logins may have the same name. The unique ID from the login
is stored with each database user in order to identify the login that
the user is associated with. When the unique ID for the login is
different or not found, you get spurious errors when trying to connect
to the database with these users or when trying to administer these
users in SSMS.
The sp_change_users_login system stored procedure is designed to correct these broken relationships. You can run this procedure with the "report" option in the database in question to help identify any problems (that is, sp_change_users_login "report"). The stored procedure also has options to fix the broken relationships. For example, sp_change_users_login "autofix", "myuser" fixes the relationship for the "myuser" database user.
Another
quick-and-dirty means for fixing orphaned database users is to delete
the users from the database and then re-create them. Of course, the
login must exist on the server, and all the permissions associated with
the database user must be reestablished. Permissions can be overlooked
or missed with this method, so it is safer to stick with the sp_change_users_login procedure.
Restoring a Snapshot
Database
snapshots, which were introduced in SQL Server 2005, provide a fast
method for capturing a transactionally consistent view of a database.
The snapshot is created as another read-only database linked to the
original database from which the snapshot was taken. As changes are made
to the original database, the database engine uses a copy-on-write
method to keep the snapshot consistent.
After a snapshot is taken, you
can revert back to the snapshot at a later time and restore the original
database to the state it was in when the snapshot was taken. You do not
create the snapshot by backing up a database, but you can restore it
using methods similar to restoring a backup. The following examples
shows the syntax to revert a database back to a database snapshot:
RESTORE DATABASE { database_name | @database_name_var }
FROM DATABASE_SNAPSHOT database_snapshot_name
Restoring a Transaction Log
Transaction log
restores deserve special attention because of their dependency on other
backup types. Typical transaction log restores occur after a full or
differential database restore has occurred. After this base is
established, the transaction log restores must be done in the same
sequential order as the backups that were taken.
Fortunately, SSMS does a good
job of presenting the available backups in the order in which they must
be applied. You can do the entire restore sequence with SSMS, including a
full restore followed by a restore of any other backups, including
transaction log backups. To restore transaction log backups (independent
of other backups), you can select the Transaction Log option. Figure 9 shows a sample screen for restoring transaction logs in the AdventureWorks2008 database.
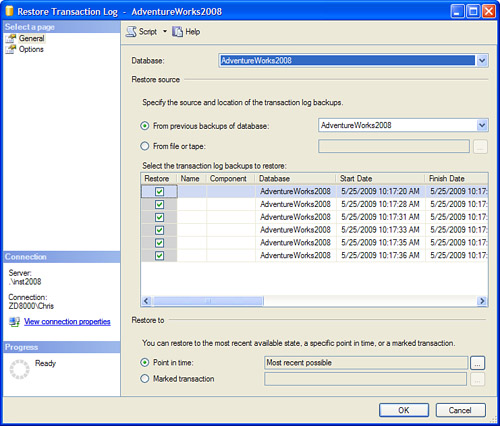
The transaction logs shown in Figure 9
are listed in the order in which they were taken and the order in which
they need to be applied. You can uncheck some of the available backups,
but you are not allowed to select backups that are not in the correct
sequence. In other words, you can uncheck backups from the bottom of the
list, but if you uncheck backups toward the top of the list, all
backups found below that item are unchecked as well.
It is important to remember that you can restore transaction log backups only to a database that is in the NORECOVERY or STANDBY
state. Make sure that every restore prior to the last one uses one of
these options. When you restore the last transaction log, you should use
the RECOVERY option so that the database is available for use.
Restoring to the Point of Failure
A
disk failure on a drive that houses database files is a reality that
some database administrators must deal with. This situation can give
pause to the most seasoned administrators, but it is a situation that
can be addressed with little or no data loss. Don’t panic! You need to
first identify the available backups.
Note
It is hoped the disk that
experienced a failure is not the same disk that houses your backups.
Database backups should always be stored on separate media. One of the
best approaches is to write the backups to a drive that does not contain
any other SQL Server files and write the contents of that drive to
tape. This minimizes the possibility of losing one of those
all-important backups.
The backup components that you need to restore to the point of failure include the following:
A backup of the tail of the transaction log
A full database backup or file/filegroup backup to establish a base
The full sequence of transaction log backups created since the full database backup
The following sections describe the detailed steps for recovery that relate to these backup components.
Backing Up the Tail of the Transaction Log
The first thing you should do
in the event of a damaged database is to back up the tail of the
transaction log. The tail of the transaction log is found in the active
SQL Server transaction log file(s). This tail is available only for
databases that are in full or bulk-logged recovery mode. This tail
contains transactions not backed up yet. The following example shows how
to back up the tail of the log for the AdventureWorks2008 database using T-SQL:
BACKUP LOG [AdventureWorks2008]
 TO  DISK = N'C:\mssql2008\backup\log\AdventureWorks2008_Tail.trn'
 WITH NO_TRUNCATE
NO_TRUNCATE prevents
the transactions in the log from being removed and allows the
transaction log to be backed up, even if the database is inaccessible.
This type of backup is possible only if the transaction log file is
accessible and was not on the disk that had the failure.
Recovering the Full Database Recovery
After you back up the
tail of the transaction log, you are ready to perform a full database
restore. This restore, which is based on a full database backup or a
file/filegroup backup, overwrites the existing database. It is
imperative that the full database restore be done with the NORECOVERY
option so that the transaction log backups and tail of the log can be
applied to the database as well. The following example restores a full
backup of the AdventureWorks2008 database, using the T-SQL RESTORE command:
RESTORE DATABASE [AdventureWorks2008]
 FROM  DISK = N'C:\mssql2008\backup\AdventureWorks2008.bak'
 WITH  FILE = 1,  NORECOVERY,  NOUNLOAD,  REPLACE,  STATS = 10
Upon completion of this type of restore, the database appears in the SSMS Object Explorer with "(Restoring...)" appended to the end of the database name. The database is now ready for transaction log backups to be applied.
Restoring the Transaction Log Backup
The
final step in recovery is to apply the transaction log backups. These
backups include all the transaction log backups since the last full
backup plus the tail of the log you backed up after the media failure.
If differential backups were taken since the last full backup, you can
apply the last differential backup and apply only those transaction log
backups that have occurred since the last differential backup.
You can restore transaction log
backups by using T-SQL or SSMS. To restore with SSMS, you can
right-click the database in the restoring state and select the
Transaction Log Restore option. The Restore Transaction Log screen lists
the available transaction log backups, including the backup of the
transaction log tail. You need to select all the transaction logs,
including the tail. You should make sure to go to the Options tab and
select the Recovery option so that your database is available after the
restore completes.
Alternatively, you can use
T-SQL to perform the transaction log backup restores. The following
example shows a series of transaction log restores. The first two
restores are done with the NORECOVERY option. The last command restores the tail of the log and uses the RECOVERY option to make the database available for use:
RESTORE LOG [AdventureWorks2008]
 FROM  DISK =
N'C:\mssql2008\backup\AdventureWorks2008_backup_200906180922.trn'
 WITH  FILE = 1,  NORECOVERY,  NOUNLOAD,  STATS = 10
GO
RESTORE LOG [AdventureWorks2008]
 FROM  DISK =
  N'C:\mssql2008\backup\AdventureWorks2008_backup_200906180923.trn'
 WITH  FILE = 1,  NORECOVERY,  NOUNLOAD,  STATS = 10
GO
RESTORE LOG [AdventureWorks2008]
 FROM  DISK =
  N'C:\mssql2008\backup\log\AdventureWorks2008_Tail.trn'
 WITH  FILE = 3,  NOUNLOAD,  STATS = 10
GO
When many transaction log
backups are involved, using T-SQL to perform the restores can be
challenging. The restores must occur in the proper order and refer to
the proper location of the backup file(s). Restores done with SSMS are
typically less prone to error.
Restoring to a Point in Time
Databases in the full or
bulk-logged recovery models can be restored to a point in time. This
type of restore is similar to the point-of-failure scenario covered
previously, but it allows for a more precise restore operation. These
restores allow the database to be recovered to a time prior to a
particular event. Malicious attacks or erroneous updates are some
examples of events that would justify a point-in-time restore.
Note
There are some limitations
on point-in-time restores of databases set to the bulk-logged recovery
model. Point-in-time restores are not possible on transaction log
backups that contain bulk load operations. Point-in-time restores can
occur using transaction log backups that occurred prior to the bulk load
operation, as long as a bulk load did not occur during the time of
these backups.
A point-in-time restore can be done using one of the following:
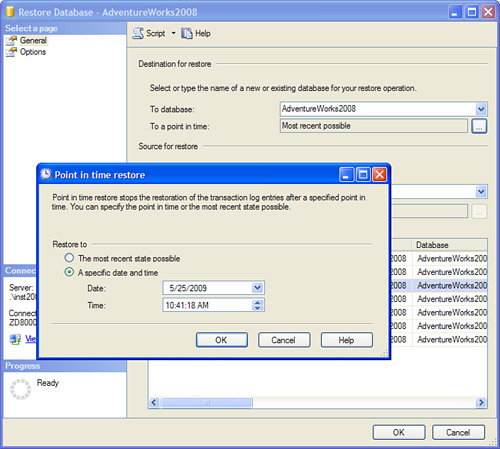
Point-in-time restores can be done with T-SQL or SSMS. Figure 10
shows the General page that allows you to specify the Point in Time
option. The default is to restore to the most recent time possible, but
you can click on the ellipsis to display the Point in Time Restore
dialog box, which is shown in the middle of Figure 10. You can select the date to restore to by using the date drop-down and enter the time to restore to as well.
Online Restores
Online
restores were new to SQL Server 2005 and continue to be supported in
SQL Server 2008. They allow a filegroup, file, or specific page within a
file to be restored while the rest of the database is online. The file
or filegroup that is being restored to must be offline during the
duration of the online restore.
Tip
You should take a full backup of
a database immediately before taking a read-only file offline. This
simplifies the online restore process and eliminates the need to apply a
bunch of transaction log backups prior to the online restore. This
applies only to databases in full or bulk-logged recovery.
The following example demonstrates how to take a read-only file offline:
ALTER DATABASE AdventureWorks2008
MODIFY FILE (NAME = 'AdventureWorks2008_ReadOnlyData', OFFLINE)
When the file is offline, you
can perform a restore to that file without affecting the rest of the
database. The following example shows an example of an online restore of
a read-only file to the AdventureWorks2008 database:
RESTORE DATABASE [AdventureWorks2008]
 FILE = N'AdventureWorks2008_ReadOnlyData'
 FROM  DISK = N'C:\mssql2008\backup\AdventureWorks2008_ReadOnlyData.bak'
 WITH  FILE = 1,  NOUNLOAD,  STATS = 10, RECOVERY
Restoring the System Databases
The SQL Server 2008 system databases that can be restored are the master, msdb, model, and distribution
databases. Each of these databases performs an essential role in the
operation of SQL Server. If these databases are damaged or lost, they
can be restored from database backup files in a similar fashion to user
databases.
The master
database, which contains information about other databases and is
required to start SQL Server, has some special restore considerations.
It must be operational before restores of other system databases can be
considered. When you are restoring the master database, there are two basic scenarios. The first scenario involves a restore of the master database when the master database currently used by SQL Server is operational. In the second scenario, the master database is unavailable, and SQL Server is unable to start.
The first master
database restore scenario is less involved and typically less stressful
than the second. In the first scenario, your SQL Server can be up and
running until the time you want to do the restore. When you are ready to
do the restore, the SQL Server instance must be running in single-user
mode. The server can be started in single-user mode via a command prompt
window. You stop the currently running SQL Server service, open a
command prompt window, navigate to the directory where the sqlservr.exe file exists (typically C:\Program Files\Microsoft SQL Server\MSSQL.1\MSSQL\Binn\), and run the following command:
When this command is executed,
the SQL Server instance is running in the command prompt window. This
window must be kept open for the SQL Server instance to keep running.
The service for SQL Server appears as stopped, but the database engine
is truly running.
The –m parameter
places the server in single-user mode and allows a single administrator
connection to the server. You can use that one connection to connect to
the server to use the Object Explorer, a database query window in SSMS,
SQLCMD, or any other tool that allows you to establish a connection and
run commands against the database server. If you use the SSMS Object
Explorer connection, you can right-click on the master database and select the Restore option. You need to enter master for the database to restore and select the overwrite option. You can instead run a T-SQL RESTORE command to achieve the same result.
When the restore of the master
database is complete, SQL Server is automatically shut down. If you
performed the restore using Object Explorer, you can expect to get an
error message at the end of the restore process because SQL Server was
shut down. You can simply close the command prompt window you used
earlier and establish a new connection to the database server. All the
databases, logins, and so on that were present prior to the backup are
reestablished.
In the second scenario, the master
database is damaged or unavailable, and SQL Server cannot start. If SQL
Server is unable to start, you must reestablish a base environment like
that which existed when SQL Server was initially installed. Using the REBUILDDATABASE option in setup.exe is one way to re-create all the system databases and reestablish this base environment. The REBUILDDATABASE
parameter is part of a SQL Server installation that is done from the
command prompt. You need the installation media for the edition of SQL
Server installed on the machine. After you insert the disk and when you
have access to the installation files, you can use the following syntax
to launch the Setup program from a command prompt window:
start /wait <CD or DVD Drive>\setup.exe /qn
INSTANCENAME=<InstanceName> REINSTALL=SQL_Engine
REBUILDDATABASE=1 SAPWD=<NewStrongPassword>
InstanceName should be set to MSSQLSERVER for a default instance of SQL Server or the name of the instance, if it is not the default. In addition, a new SA password needs to be supplied for the SAPWD parameter. The /qn
parameter suppresses all the setup dialog boxes and error messages and
causes the installation to run silently. If you want to receive more
information during the installation, you can specify the /qb parameter.
Note
If you get a message about a missing Windows Installer, you can find that software on the SQL Server media in the Redist folder. You may also find that the setup.exe
file is not found on the root of your installation media. If this is
the case, you need to change the directory in the command prompt window
to the location of the setup.exe
file on the installation media prior to executing the command to launch
the setup program. Finally, remember to reinstall any service packs or
patches you may have installed. The execution of the command prompt
setup reverts the server back to the original software release.
At the end of the installation,
all the system database files are installed to their original locations.
This includes the original master.mdf, mastlog.ldf, msdbdata.mdf, and msdblog.ldf
files, as well as the related database files for the other system
databases. Any of the user databases you may have added to the server
are no longer known by the master database and in turn are not available in the Object Explorer or other database tools.
If you have a backup of the master
database, you can restore it after the command prompt installation is
complete. You follow the procedures outlined in the first scenario,
earlier in this section, to restore the master database from a backup. At the completion of the restore, any user databases present at the time of the master database backup are now available. You can also run restores for other system databases at this time, including the msdb database, which contains all your scheduled jobs and history.
If you do not have a backup of the master
database, this is not the end of the world. You still have the option
of manually attaching your user databases or restoring them from backup
files. Attaching the database is typically much faster than restores
from backup files and is the preferred method. You must also reestablish
logins, backup devices, server triggers, and any other server-level
objects stored in the master
database. Depending on your environment, this can be a lengthy
operation, but you can easily avoid it by making those all-important
system database backups.