Dramatic Lighting
If you’re working with a
daring cinematographer shooting in available light, or heed the advice
in the Foreword, you’ll be happy to know that this matching technique is
even more impressive with strong lighting.
The composite in Figure 6
clearly does not work; the foreground element does not contain the
scene’s dominant color and is white-lit. That’s fine; it will better
demonstrate the effectiveness of the following technique.
(Plate courtesy of Shuets Udono via Creative Commons license.)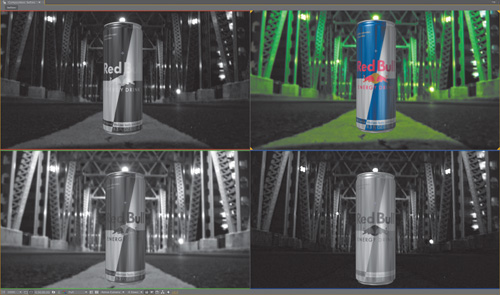
It helps that both the
foreground and the background elements have some areas that you can
logically assume to be flat gray. The bridge has concrete footings for
the steel girders along the edges of the road, while the can has areas
of bare exposed aluminum.
Notes
This
section discusses colors expressed as percentages; to see the same
values in your Levels effect, use the wing menu of the Info palette to
choose Percent for the Color Display. |
The steps to color-match a scene like this are as follows:
1. | Apply Levels to the foreground layer.
|
2. | Switch the view in the Composition panel to Green (Alt+2/Opt+2).
Not only is this the dominant color in this particular scene, but it is
dominant in human vision, so green-matching is the first step in most
scenes, not just this one.
|
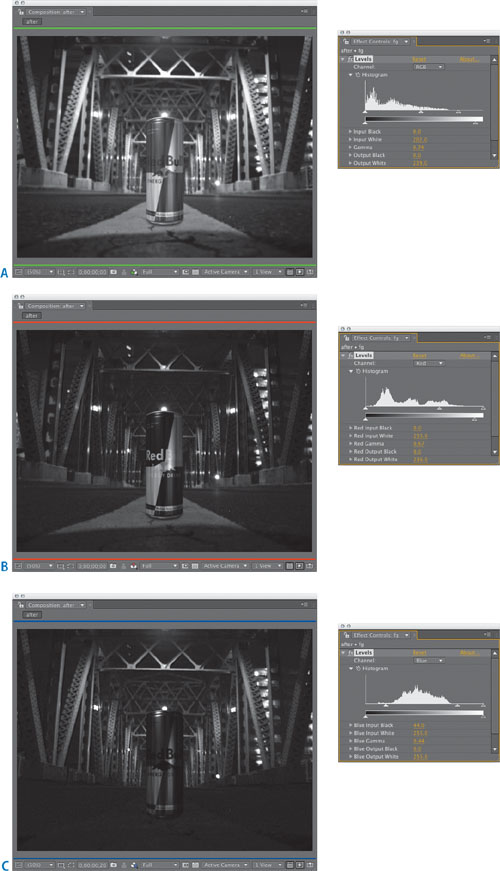
3. | Begin
as if you are looking at a black-and-white photograph, and match the
element to this dark contrasty scene using Levels in the RGB channel. If
the element needs more contrast in the shadows and highlights, as this
one does, raise Input Black and lower Input White; if it needs less,
adjust the Output controls instead. Finally, adjust the gamma; in this
scene, should it come down to match the darkness of the scene or up so
the element stands out more? The result should look like a monochrome
photo whose elements match believably (Figure 7, part A).
|
4. | Switch the view (Alt+1/Opt+1)
and the Levels control to the Red channel and repeat the grayscale
matching process. Clearly, the foreground element is far too bright for
the scene. Specifically, the darkest silver areas of the can are much
brighter than the brightest areas of the concrete in the background.
Therefore, adjust the gamma down (to the right) until it feels more like
they inhabit the same world. Now have a look at the highlights and
shadows; the highlights look a little hot, so lower Red Output White (Figure 7, part B).
|
5. | Now move over to Blue in the view (Alt+3/Opt+3)
and in Levels. In this case, there is almost no match whatsoever. The
can is much brighter and more washed out than the background. Raise
Input Blue and bring gamma way down. Now the can looks believably like
it belongs there (Figure 7, part C).
|
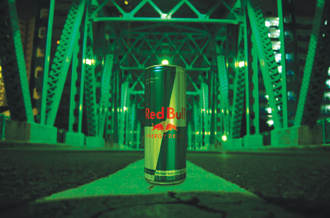
It’s strange to make all of
these changes without ever looking at the result in full color. So now,
go ahead and do so. Astoundingly, that can is now within range of
looking like it belongs in that scene; the remaining adjustments are
subjective. If you want the can to pick up a little less green from the
surroundings as I did, lower Green Input White. Back in the RGB channel,
adjust Gamma according to how much you want this element to pop. And of
course, finish the composite: Defocus slightly with a little fast blur,
add a shadow, and you may start to buy it (Figure 8).
No Clear Reference
Life doesn’t always
cooperate and provide nice white, black, and midgray references in
foreground and background source; the world is much more interesting
than that.
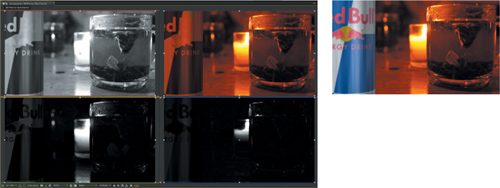
Figure 9
contains a scene so strongly lit with one color, it’s hard to tell what
anything besides the glass would look like under white light, and even
that is suspect.
The basic technique still
works in this case, but it requires a bit more artistry. Instead of
carefully matching specific values, this time you must go channel by
channel and simply make each image look plausible in grayscale black and
white.
This
time, begin with the red, not the green, channel, because it is clearly
dominant. The foreground needs little adjustment to RGB to work in Red;
just a slight reduction in Output White, to 0.85, and it looks pretty
good.
Move over to the green channel
and it’s a whole different story. Were it not for the light of the
candle this channel might be black, and matching the foreground clearly
means bringing Green Output White way, way down (as low as 0.15). Now
it’s hard to tell what’s even happening, so raise the exposure control  in the viewer until the scene is somewhat illuminated (up as high as
10.0), and the foreground looks washed out compared with the extreme
contrast of the background. Crush black and white contrast by raising
Green Input Black up toward 0.3 and lowering Green Input White down to
about 0.55. Great, but now the black level needs to be lifted just a
touch, to 0.005 (you’d never notice it except that it’s so overexposed).
Click the exposure control icon to reset that and it’s looking pretty
good.
in the viewer until the scene is somewhat illuminated (up as high as
10.0), and the foreground looks washed out compared with the extreme
contrast of the background. Crush black and white contrast by raising
Green Input Black up toward 0.3 and lowering Green Input White down to
about 0.55. Great, but now the black level needs to be lifted just a
touch, to 0.005 (you’d never notice it except that it’s so overexposed).
Click the exposure control icon to reset that and it’s looking pretty
good.
Blue is the same story only
more so, and yowza, is there a lot of grain here. Similar Blue Output
White and Blue Input Black levels to green will work, but there’s no
clear reason to increase white contrast in this channel, so leave Blue
Input White where it is, and likewise Blue Output Black. Flashing with
the exposure control reveals all.
Now for the moment of truth:
Toggle back to RGB to reveal a darned good color match happening here.
With grain and maybe a little specular kick on the side, this element
could look as though it had been there all along.
Notes
It can be a
good idea to take a break when attempting fine color adjustment. Upon
return, a clear first impression can save you a lot more noodling. |
So even in cases where it’s
not really possible to be scientific about matching color, there are
clear procedures to follow that allow you to make confident, bold, even
radical color adjustments in composites.