The banner you build in this lesson has many elements to it—imported assets, masks, gradients, text, layers, and so on.
1. Creating the document
Start by creating the new, basic document to hold all your further work.
1. | Choose File > New.
|
2. | In the New Document dialog box, set the dimensions to 728 pixels wide by 90 pixels high. This is a standard horizontal leaderboard banner size.
|
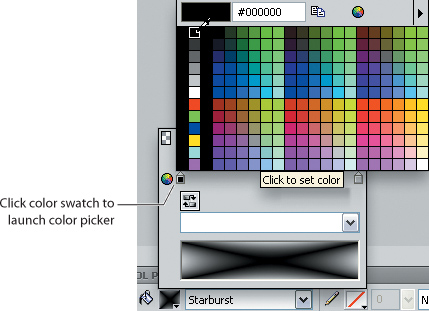
3. | Click the color swatch to set a custom canvas color.
|
4. | Choose black (#000000) from the color picker and click OK.
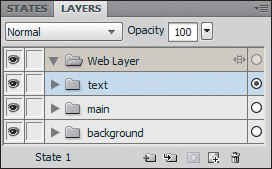
Ultimately, this document will use multiple layers. You will add those now.
|
5. | Double-click the existing Layer 1 name in the Layers panel and rename it background.
|
6. | Click the New/Duplicate Layer icon (
 ) at the bottom of the Layers panel.
|
7. | Name the new layer main.
|
8. | Repeat step 6 to create one more layer, and name it text.
|
9. | Save your file as movie_banner_working.fw.png.
|
2. Adding the background
The background for the final banner is not just a
flat color; it’s got some depth and variation in tone. You will create
that now.
1. | Lock
the text and main layers by clicking the empty box beside the layer
names. This will force any new objects into the background layer.
|
2. | Select the Rectangle tool, and draw a rectangle the same size as the canvas (728 × 90 pixels).

|
3. | In the Properties panel, set the X and Y coordinates to 0.
|
4. | In the Properties panel, change the Fill Category to Gradient > Starburst.
|
5. | Click the Fill color box to open the Gradient editor.
|
3. Editing gradient colors
Now you will set the colors for the gradient.
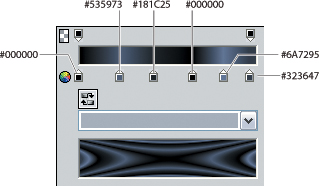
1. | Click the far-left color swatch.
|
2. | Use the Eyedropper tool to select the black color swatch.
|
3. | Add
a new swatch by clicking just below the gradient ramp, where your
cursor becomes an arrow with a plus sign next to it. A new gradient
color swatch appears.

|
4. | Click the color swatch, change the existing color value in the field to #535973, and press Enter or Return.
|
5. | Continue adding color swatches to the gradient by typing the following values into the field: 181C25, 000000, 6A7295, and 323647.
|
6. | Place
the color swatches so that they resemble this figure, and click away
from the Edit Gradient pop-up window when you’ve finished.
|
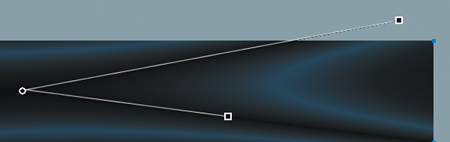
4. Editing gradient direction and angle
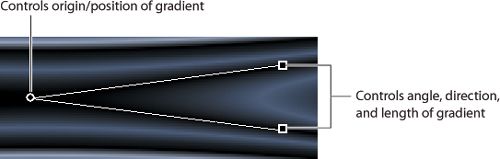
You can alter the angle and direction of a gradient by moving the gradient control arm (or arms).
With the rectangle still active, and the gradient
applied, you should see two control arms. The arms are normally black,
but we’ve outlined them in white here to make them easier to see.
1. | Select the Pointer tool from the Tools panel.
|
2. | Change
the length and angle of the upper gradient arm by dragging the square
control point until it is similar to what you see here. Again, we have
outlined the control arms in white so it’s easier for you to see the
change.
|
3. | Rename the rectangle background.
|
4. | Lock the background layer.
|
5. | Save your file. |