There are several other brush categories and variants that
allow you to go past mixing media and into the realm of special effects.
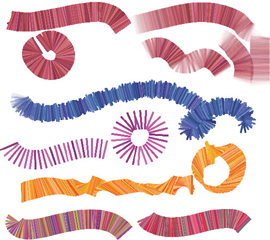
Figure 1
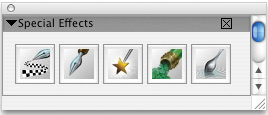
shows a sampling of strokes you’ll want to try, . It’s called Special Effects and is shown in Figure 2.
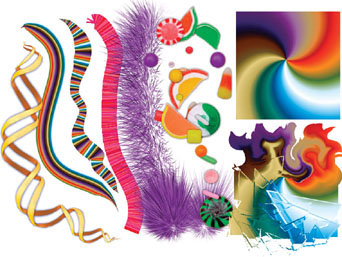
If that stroke on the far left in Figure 7.1
looks familiar, then you haven’t forgotten Pattern Pen Masked. The
pattern used here is called Double Helix, but I think of it as Twisted
Linguini. Moving to the right, you’ll see a stroke made with a Pens
variant, but this one doesn’t use the current color—it paints with the
current gradient! This particular gradient is called Vivid Colored
Stripes, and it was used with the Paint Bucket to fill two rectangles at
the far right, in order to demonstrate some distortion effects,
Hurricane (in the Distortion category) and Shattered (an F-X variant).
Gradient pens come in two flavors, and both are shown in Figure 7.1.
Grad Pen uses all the colors in a gradient and squeezes them down the
stroke like toothpaste. Grad Repeat Pen performs as advertised,
repeating all the colors in strips that run perpendicular to the stroke.
I don’t think they can do that with toothpaste—yet.
Anatomy of a Brush
The next stroke has the charming name Piano
Keys, and it resides in the F-X category. I like using this brush to
demonstrate how to change the behavior of a variant using Brush
Controls. Choose Piano Keys from the Brush Selector Bar or the Special
Effects custom palette and start a new canvas big enough to let you do a
lot of test scribbles. With a bright color at medium saturation, make a
couple of strokes so you’ll have the default qualities of the brush
visible to compare with changes. Open Brush Controls from the Window
menu. We’ll be looking at several sections of this long palette, and you
won’t be able to see all of them at once. That’s okay; just expand or
collapse them as needed with the little black triangle next to the name
of the section. Let’s begin with the top two controls, General and Size,
shown in Figure 3.
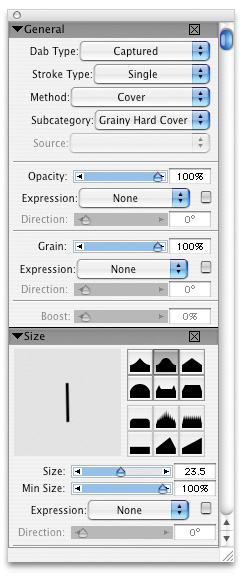
General gives you the most basic info about any
variant. The Dab Type for this brush is Captured, which means it is an
irregular shape or group of pixels, such as a small drawing. The shape
in this case is a very thin rectangle. You can get an individual Piano
Keys dab on your canvas if you tap your Wacom pen tip on the tablet. The
Size Controls also show the shape of the Dab, in the Brush Dab preview
window. (If that window shows a circle, tap on it once, and it will show
the captured shape.)
|
Several other members of the F-X category use
captured dabs: Fairy Dust, Fire, Shattered and Squeegee. Yes, you can
make a new and unique brush dab for your current variant. Create it,
then select it with the Rectangular Selection tool. Use the Capture Dab
command at the top of the popup menu in the Brush Selector Bar.
|
Skip to the Opacity setting and notice that it
is at 100% and the Expression field shows None. This means there can be
no variation in opacity within a stroke. Click on the Expression popup
menu to see the choices available for altering opacity. (These are the
same choices you get whenever you see the Expression option in any of
the Brush Controls sections.) Choose Pressure, and make a test stroke.
Now your brush can respond to pressure input from your Wacom pen. Figure 4 shows my stroke with default settings at the top left and the pressure-responsive strokes at the top right.
Close
or collapse General Controls and take another look at the Size
Controls. You can choose to vary the width of the stroke, but there will
be no effect unless you reduce Min (minimum) Size to less than 100%.
When Min Size is around 40% and Random is chosen for Expression, you get
the jagged result in the blue stroke. (I’m just switching color between
changes because it’s more fun.)
Let’s return to the original settings before you
make the next few changes. You don’t have to remember what those
settings were, just use the Restore Default Variant command in the Brush
Selector Bar popup menu. Close or collapse the Size Controls and expand
Spacing and Angle.
Spacing refers to the space between dabs.
Raising that value to about 40% gives you the picket fence look shown in
purple. There are two important things to notice in the Angle Controls
section: Expression is a function of Direction, and Ang(le) Range is the
maximum 360 degrees. This makes it possible to paint a circle and have
all the dabs radiate from the center. What happens if you reduce the Ang
Range or change the Expression choice to something different? The gold
color I used for strokes with Ang Range at 180 degrees and Pressure used
for Expression look a bit like twisted ribbons.
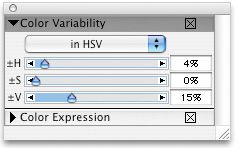
Restore the default variant again and open one
more control section, Color Variability. It’s near the bottom of the
stack of palettes and shown in Figure 5.
With the HSV settings shown, you can see why the color variation in the
Piano Keys stroke has darker and lighter shades of very similar colors.
Value or Luminosity variation is relatively high at 15%, with Hue
variation only 4% and no Saturation variation at all. Play with those
sliders and see what happens. I chose the red color used for the
original default stroke and raised Hue variation to 25% for the
multicolored stroke at the bottom left. The last stroke has Saturation
variability set to the maximum. As expected, the dabs range from rich
vibrant red to neutral gray.