IT tutorials
 
Applications Server
 

Microsoft Lync Server 2013 : Mac Client - Audio, Video Calls and Conferencing

12/17/2013 3:04:48 AM
- Free product key for windows 10
- Free Product Key for Microsoft office 365
- Malwarebytes Premium 3.7.1 Serial Keys (LifeTime) 2019

Audio/Video Calls and Conferencing

One of the more interesting features in the Microsoft Lync:Mac client is the capability to participate in audio or video conferences with other users of the Lync Server 2013 environment. Before the first participation in either an audio conference or a video conference, users should configure their audio and video devices in the audio and video device preferences section. After these devices are configured, a user is ready to start the first conference.

For purposes of this section, view a call and a conference as essentially the same event, with the only difference being the number of parties involved. If two parties are involved, it’s a call. If more than two parties are involved, it’s a conference. Generally, the steps are identical for initiating and managing both. Whenever the steps vary, they are called out as such.

Making an Audio Call

Initiating an audio call is as simple as clicking a contact and selecting the call option, which is a retro microphone icon as shown in Figure 1 After this is done, the contact receives a pop-up and an audio notification and has the option to answer, decline, or redirect. Answer and decline are obvious in what they do. Redirect gives the option to reply through IM or to set one’s status to Do Not Disturb. Accepting the call updates both users’ status to In a Call.

Image

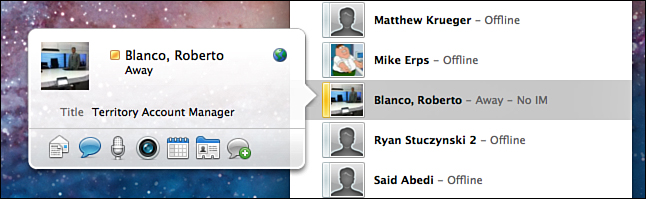
Figure 1. Initiating a call.

If you’re already in an IM conversation, you can add audio by clicking the telephone icon and choosing how you’d like to reach the person—either via Lync call or over the PSTN. A call connecting is shown in Figure 2.

Image

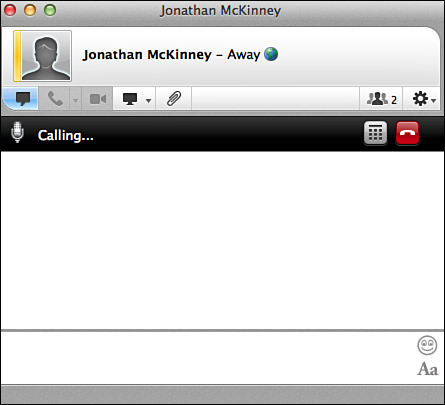
Figure 2. Calling a Lync contact.

Making a Video Call

Initiating a video call is as simple as clicking a contact and then selecting start a video call. Much as with the audio call, the recipient has the option to accept, decline, or redirect. Redirect gives the option to reply with an IM as well.

When the call is accepted, the usual client window opens in the Video view. The recipient initially sees the caller but the caller won’t see the recipient until she clicks Start My Video in the window. By default, each participant in a two-way call sees herself in a picture-in-picture window inside the main video window. The picture-in-picture can be moved anywhere within the video window and will not block access to the following buttons. You can modify the picture-in-picture, also called the preview, by right-clicking it. This gives the options to hide or resize the preview.

Inside the video window are several buttons, including the following:

• End Video Call

• Put Video Call on Hold

• Enter Full Screen

• Mute Microphone

• Adjust Volume or Mute Speakers

• Network Quality

• Time in the Call

Enter Full Screen expands the video windows to encompass the entire screen. The option at the upper-right corner becomes Exit Full Screen.

Clicking End Video Call ends the call and downgrades to a simple IM conversation.

 
Others
 
- Understanding Core Exchange Server 2013 Design Plans (part 5) - Configuring Exchange Server 2013 for Maximum Performance and Reliability, Securing and Maintaining an Exchange Server 2013 Implementati
- Understanding Core Exchange Server 2013 Design Plans (part 4) - Determining Exchange Server 2013 Placement
- Understanding Core Exchange Server 2013 Design Plans (part 3) - Understanding AD Design Concepts for Exchange Server 2013 - Understanding the AD Domain Structure
- Understanding Core Exchange Server 2013 Design Plans (part 2) - Understanding AD Design Concepts for Exchange Server 2013 - Understanding the AD DS Forest
- Understanding Core Exchange Server 2013 Design Plans (part 1) - Planning for Exchange Server 2013
- Sharepoint 2013 : Installing and Configuring Windows Azure Workflow Server (part 3) - Testing and Verifying the Workflow Installation
- Sharepoint 2013 : Installing and Configuring Windows Azure Workflow Server (part 2) - The Install
- Sharepoint 2013 : Installing and Configuring Windows Azure Workflow Server (part 1) - Workflow Manager Install
- Sharepoint 2013 : Installing and Configuring Azure Workflow Server - Enhancements in Workflow
 
 
Top 10
 
- Microsoft Visio 2013 : Adding Structure to Your Diagrams - Finding containers and lists in Visio (part 2) - Wireframes,Legends
- Microsoft Visio 2013 : Adding Structure to Your Diagrams - Finding containers and lists in Visio (part 1) - Swimlanes
- Microsoft Visio 2013 : Adding Structure to Your Diagrams - Formatting and sizing lists
- Microsoft Visio 2013 : Adding Structure to Your Diagrams - Adding shapes to lists
- Microsoft Visio 2013 : Adding Structure to Your Diagrams - Sizing containers
- Microsoft Access 2010 : Control Properties and Why to Use Them (part 3) - The Other Properties of a Control
- Microsoft Access 2010 : Control Properties and Why to Use Them (part 2) - The Data Properties of a Control
- Microsoft Access 2010 : Control Properties and Why to Use Them (part 1) - The Format Properties of a Control
- Microsoft Access 2010 : Form Properties and Why Should You Use Them - Working with the Properties Window
- Microsoft Visio 2013 : Using the Organization Chart Wizard with new data
Technology FAQ
- Is possible to just to use a wireless router to extend wireless access to wireless access points?
- Ruby - Insert Struct to MySql
- how to find my Symantec pcAnywhere serial number
- About direct X / Open GL issue
- How to determine eclipse version?
- What SAN cert Exchange 2010 for UM, OA?
- How do I populate a SQL Express table from Excel file?
- code for express check out with Paypal.
- Problem with Templated User Control
- ShellExecute SW_HIDE
programming4us programming4us