3. Understanding Groups
Now that you know how to create user accounts, it's
time to learn how to create group accounts. As instructors, we are
always amazed when students (who work in the IT field) have no idea why
they should use groups. This is something every organization should be
using.
To illustrate their usefulness, let's say we have a
Sales department user by the name of wpanek. Our organization has 100
resources shared on the network for users to access. Because wpanek is
part of the Sales department, he has access to 50 of the resources. The
other 50 are used by the Marketing department. If the organization is
not using groups, and wpanek moves from Sales to Marketing, how many
changes do we have to make? The answer is 100. We have to move him out
of the 50 resources he currently can use and place his account in the
50 new resources that he now needs.
Now, let's say that we use groups. The Sales group
has access to 50 resources and the Marketing group has access to the
other 50. If wpanek moves from Sales to Marketing, we only need to make
two changes. We just have to take wpanek out of the Sales group and
place him in the Marketing group; after this is done wpanek can access
everything he needs to do his job.
3.1. Group Properties
Now that you understand why you should use groups,
let's go over setting up groups and their properties. When you are
creating groups, it helps to understand some of the options that you
need to use.
Group Type
You can choose from two group types—Security groups and Distribution groups.
Security groups can have rights and
permissions placed on them. For example, if you wanted to give a
certain group of users access to a particular printer, but you wanted
to control what the were allowed to do with this printer, you'd create
a Security group and then apply certain rights and permissions to this
group.
Security groups can also receive emails. If someone sent an email to the group, all users within that group would receive it.
Distribution groups are used for email only. You cannot place permissions and rights for objects on this group type.
Group Scope
When it comes to group scopes, your choices depend on what domain function level you are working with. If
you are in Native mode (Windows 2000 Native, 2003, or 2008) you will
have three choices:
Domain local groups
Domain local groups are groups that remain in
the domain in which they were created. You use these groups to grant
permissions within a single domain. For example, if you create a domain
local group named HPLaser, you cannot use that group in any other
domain and it has to reside in the domain in which you created it.
You can create domain local groups in domain Mixed or Native modes.
Global group
Global groups can contain other groups and
accounts from the domain in which the group is created. In addition,
you can give them permissions in any domain in the forest.
Global groups can be created in domain Mixed or Native modes.
Universal groups
Universal groups can include other groups and
accounts from any domain in the domain tree or forest. You can give
universal groups permissions in any domain in the domain tree or forest.
You can create universal groups only if you are in a domain Native mode.
3.2. Creating Group Strategies
When you are creating a group strategy, think of
this acronym that Microsoft likes to use during the exam: AGDLP (or
AGLP). This acronym stands for a series of actions you should perform.
It always applies in Mixed mode and you can also apply it in Native
mode. Here is how it expands:
A = Accounts (Create your user accounts.)
G = Global groups (Put user accounts into global groups.)
DL = Domain local groups (Put global groups into domain local groups.)
P = Permissions (Assign permissions like Deny or Apply on the domain local group.)
Another acronym that stands for a strategy you can
use is AUDLP (or AULP). This is always used in native mode. Here is how
it expands:
A = Accounts (Create your user accounts.)
U = Universal groups (Put the user accounts into universal groups.)
DL = Domain local groups (Put universal groups into domain local groups.)
P = Permissions (Place permissions on the local group.)
3.3. Creating a Group
To create a new group, open the Active
Directory Users And Computers snap-in. Click the OU where the group is
going to reside. Right-click and choose New and then Group. After you
create the group, just click the Members tab and choose Add. Add the
users that you want to reside in that group, and that's all there is to
it.
4. Filtering and Advanced Active Directory Features
The Active Directory Users And Computers tool has a
couple of other features that come in quite handy when you are managing
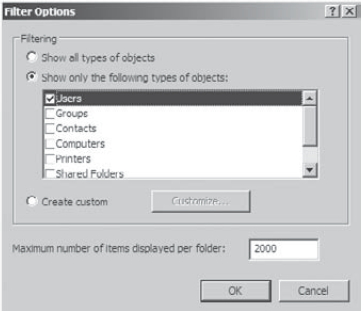
many objects. You can access the Filter Options dialog box by clicking
the View menu in the MMC and choosing Filter Options. You'll see a
dialog box similar to the one shown in Figure 1.
Here, you can choose to filter objects by their specific types within
the display. For example, if you are an administrator who works
primarily with user accounts and groups, you can select those specific
items by placing check marks in the list. In addition, you can create
more complex filters by choosing Create Custom. Doing so provides you
with an interface that looks similar to that of the Find command.
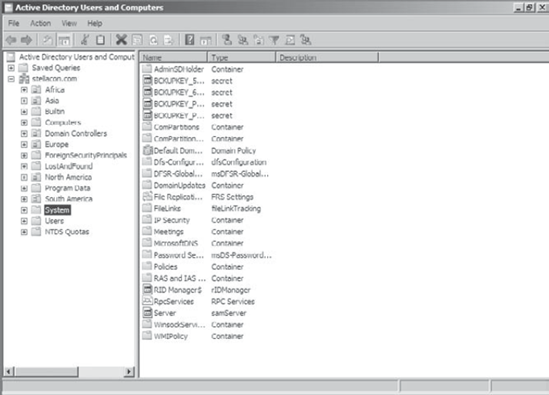
Another option in the Active Directory Users And
Computers tool is to view Advanced options. You can enable the Advanced
options by choosing Advanced Features in the View menu. This adds two
top-level folders to the list under the name of the domain.
The System folder (shown in Figure 2)
provides additional features that you can configure to work with Active
Directory. You can configure settings for the Distributed File System
(DFS), IP Security (IPSec) policies, the File Replication Service
(FRS), and more. In addition to the System folder, you'll see the
LostAndFound folder. This folder contains any files that may not have
been replicated properly between domain controllers. You should check
this folder periodically for any files so that you can decide whether
you need to move them or copy them to other locations


As you can see, managing Active Directory objects is
generally a simple task. The Active Directory Users And Computers tool
allows you to configure several objects. Let's move on to look at one
more common administration function—moving objects.