3. Synchronizing the Directories
After the Directory Synchronization tool has
been installed, it can be used to synchronize the directories for the
first time. For the first synchronization, a copy of the local users
and groups is written to the Office 365 directory. From there forward,
the Directory Synchronization tool checks for any changes to the local
AD objects and updates the Office 365 directory with the changes.
If the default option was selected on the
final page when the Directory Synchronization tool was installed, the
Microsoft Online Directory Services Synchronization Configuration Wizard
starts automatically. If not, you can invoke the wizard by logging on
to the system where the tool is installed, and, from the Start menu,
selecting All Programs, Microsoft Online Services, Directory
Synchronization, Directory Sync Configuration. Use the wizard to
configure directory synchronization, as detailed here:
1. At the Welcome screen, click Next.
2. At the Microsoft
Online Services Credentials screen, enter the credentials of an Office
365 administrator account, and click Next. The wizard verifies that
directory synchronization has been activated in the online tenant. If a
configuration error message appears, the activation of the feature
might not be complete within Office 365, which can be verified using
the online portal. After activation is verified, the wizard continues.
3. At the Active Directory Credentials page, enter the credentials of an Enterprise Admin account, and click Next.
4. At the Exchange Hybrid Deployment page, click Next to continue.
5. When the configuration is complete, click Next.
6. At the Finished page, verify that the Synchronize Directories Now check box is selected, and click Finish.
Note
When configured, the directory
synchronization service automatically creates a service account named
MSOL_AD_SYNC in the Users container at the root of Active Directory,
and applies a randomly generated password that never expires. This
service account is used by the Directory Synchronization tool to read
the local Active Directory and write to Office 365, using the
credentials provided in the Microsoft Online Services Credentials page
of the Configuration Wizard. This service account should never be moved
or removed, and the password on the account should never be manually
reset; otherwise, synchronization failures will occur.
After directory synchronization has been
configured, it will run every three hours automatically. If there are
changes that need to be synchronized more urgently, there are two
methods that can be used to force synchronization. The first method is
to run the Directory Services Synchronization Configuration Wizard,
following the same procedure already described. To force directory
synchronization, the Synchronize Directories Now check box should be
selected on the final page of the wizard. Though simple, this method of
forcing synchronization does require the appropriate credentials to be
entered each time the wizard is run. To force directory synchronization
without the need to enter credentials, Windows PowerShell can be used.
Use the following procedure to force directory synchronization using a
Windows PowerShell cmdlet:
1. Log on to the
system where the Directory Synchronization tool is installed using an
account with local administrator permissions.
2. Use Windows Explorer to navigate to the directory where the Directory Synchronization tool is installed (by default, %programfiles%\Microsoft Online Directory Sync), and double-click on the DirSyncConfigShell.psc1 file, which opens a Windows PowerShell window with the directory synchronization cmdlets loaded.
3. Execute the cmdlet Start-OnlineCoexistenceSync to force directory synchronization.
4. Activating Synchronized Users
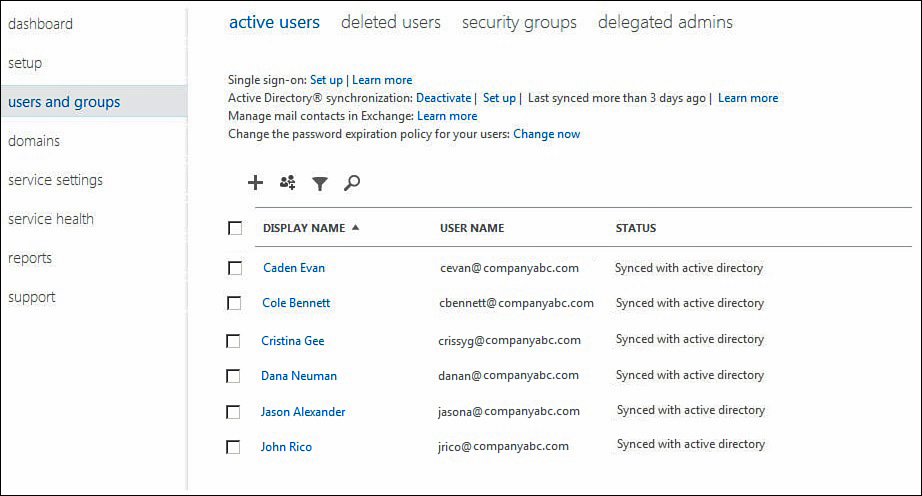
After the initial synchronization is
complete, AD users and groups will appear in the Lync Online/Office 365
directory with a status of “Synced with active directory,” as shown in Figure 2.
Although the users are now part of the directory, they are not enabled
for Lync Online until they are activated. To activate newly
synchronized user accounts, use the following procedure:
1. Log on to the Office 365 Portal.
2. On the left side of the main page, click Users and groups.
3. At the top of the users list, click the Filter icon, which has the funnel symbol.
4. Use the drop-down menu to select Unlicensed users.
5. From the list of
unlicensed users, either click the check box next to individual user
accounts, or click the check box at the top of the list to select all
user accounts.
6. From the Quick steps menu at the right, click on Activate synced users.
7. At the Assign
licenses screen, select the check box for the Lync Online plan that the
user will be licensed for, along with any other Office 365 services and
plans that the organization has a subscription for.

Figure 2. Newly synchronized users in the Lync Online/Office 365 directory.
8.
At the Send results in email page, keep the default selection of Send
email if the username and temporary password for the new account should
be sent to an administrator via email, and then enter up to five
recipient email addresses separated by semicolons. When finished, click
Activate.
9. At the
Results page, verify that the user account has been successfully
activated, and make note of the temporary password automatically
generated. Click Finish to complete the procedure.