Configuring Database Mirroring by Using the Wizard
After you have the
endpoints created, the roles established, the connections to the
endpoints granted, and the mirror database restored on the mirror
server, you could easily run through the final short steps in the
Database Mirroring Wizard to enable and start mirroring. Figure 6 shows the Mirror option from the AdventureWorks
database (reached by right-clicking the database name) from what will
be the principal server. Because this database is not enabled for
mirroring yet, you must run through the Configure Security option on the
top portion of the Mirroring page (refer to Figure 5).
At this point, you can probably see only the network server address of
the principal server. Don’t worry; the rest (mirror and witness network
server addresses) will be established and identified during the
Configure Database Mirroring Security Wizard steps.

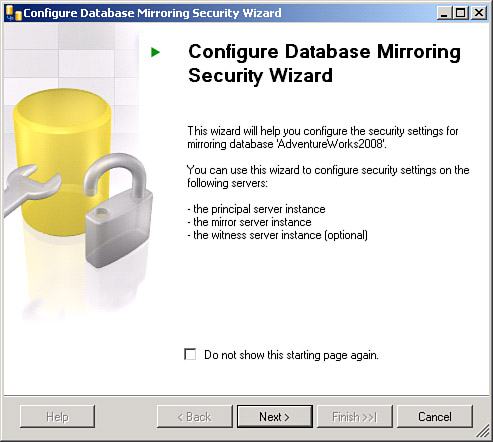
You need to click the
Configure Security button on the Mirroring page. This immediately
launches the Configure Database Mirroring Security Wizard for the
database you have selected (AdventureWorks, in this example). Figure 7 shows this initial wizard splash page.
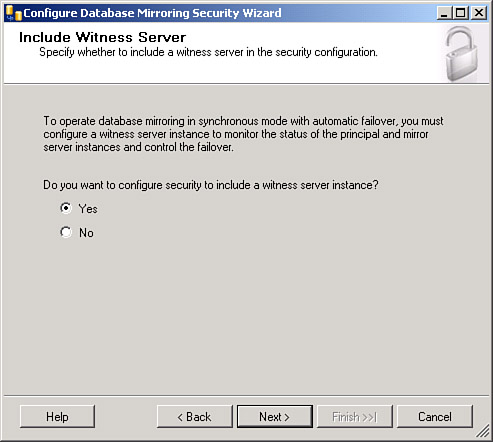
You must configure all
three server instances (principal, mirror, and witness servers) for the
high-availability mode. The first option that must be indicated is
whether you plan to include a witness server instance in your mirroring
configuration. You are configuring a high-availability database
mirroring configuration (synchronous mode with automatic failover), so
you should select Yes on the wizard dialog shown in Figure 8; you do so because you want to create a full high-availability mode for automated failover.
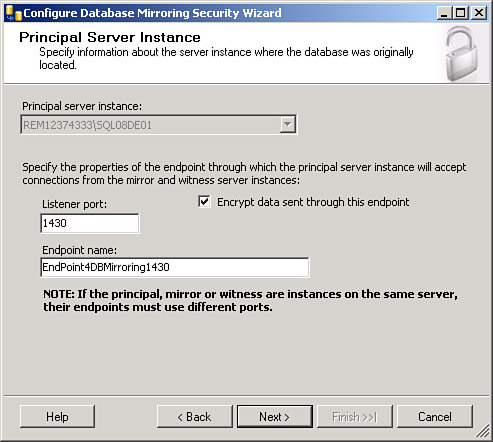
The next page in the wizard
prompts you to decide where to save the security configurations for
database mirroring. You have no choice for the principal and mirror
server instances; their security configuration information must be
stored with them. You must also choose the default location for the
witness server instance. The wizard then takes you through each server
instance in the database mirroring configuration to establish all needed
connection information to implement database mirroring. As you can see
in Figure 9, this starts with the principal server instance. The wizard should find the endpoint and listener_port values you set up earlier (listener_port value 1430 and endpoint name EndPoint4DBMirroring1430, in this example).
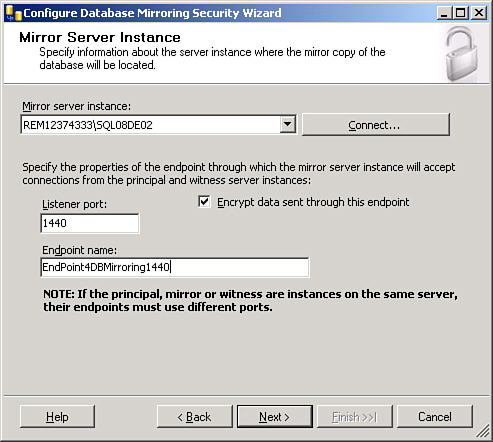
Next comes the specification
of the listener and endpoint entry for the mirror server instance
(where the mirror copy of the database will be located). Initially, this
page lists all server instances available on your network (that is,
possible mirror server instances) and does not have a listener port or
endpoint name specified yet. You need to identify which server you want
to use as the mirror server instance (REM12374333\SQL08DE02,
in this example) and click the Connect button to establish a valid
(authorized) connection to the mirror server instance. Because you
already set up the endpoint on this server (and granted connection
permission, using a specific login ID), when you complete the connection
dialog, the endpoint (EndPoint4DBMirroring1440, in this example) and listener_port value (1440, in this example) should be enabled, as shown in Figure 10.
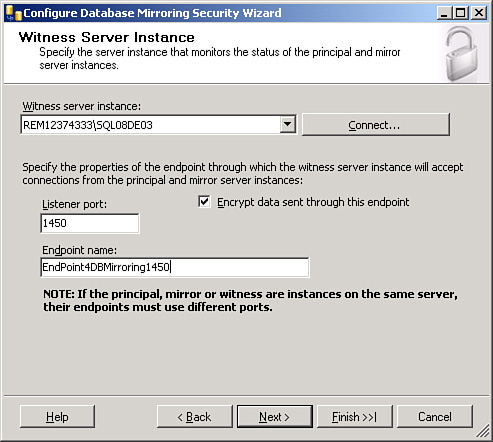
Finally, you need to
specify the witness server instance. Again, this dialog page lists all
server instances available on the network (that is, possible witness
server instances) and does not have a listener port or an endpoint name
specified yet. You need to identify which server you want to use as the
witness server instance (REM12374333\SQL08DE03,
in this example) and click the Connect button to establish a valid
(authorized) connection to the witness server instance. Because you
already set up the endpoint on this server (and granted connection
permission, using a specific login ID), when you complete the connection
dialog, the endpoint (EndPoint4DBMirroring1450, in our example) and listener_port value (1450, in this example) should be enabled, as shown in Figure 11.
The last step in the
Configure Database Mirroring Security Wizard is to identify any service
accounts that you want to use for the server instances in this database
mirroring configuration. You are already using a single domain login ID
for this purpose and explicitly granted connect permissions on each
endpoint. Therefore, nothing more needs to be done here. If the server
instances use different accounts in the same or a trusted domain as
their service accounts for SQL Server, you can enter these accounts
here. It is best to do this via scripts (as you saw earlier, when you
created the endpoints on each server instance).
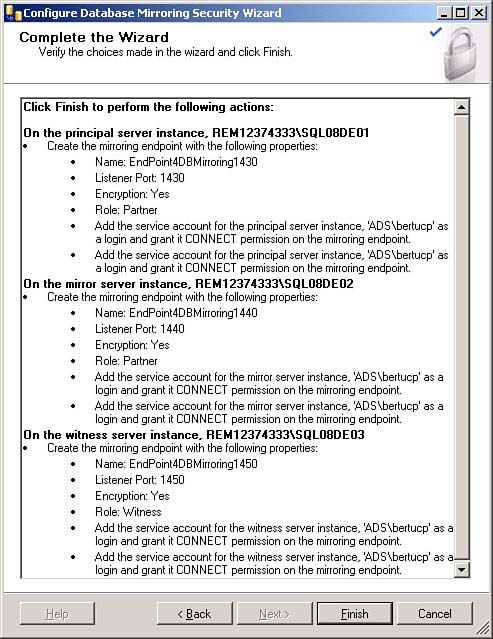
As you can see in Figure 12,
the Configure Database Mirroring Security Wizard now presents a summary
list of all the actions on each server instance that it will perform.
You click Finish to execute them.
A report is generated,
telling the total number of actions taken (three, in this case) and the
status of each action. If any errors or warnings result, you can drill
down into the Report button option in the bottom-right corner of this
summary of actions page to determine what has occurred. If each status
shows success, a Database Properties dialog, as shown in Figure 13,
appears when you close this report page. This dialog gives you the
option to start mirroring immediately or not start mirroring (because
you will start mirroring at some other time). For this example, you want
to start mirroring right away, so click the Start Mirroring button.
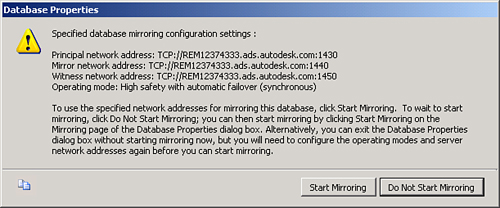
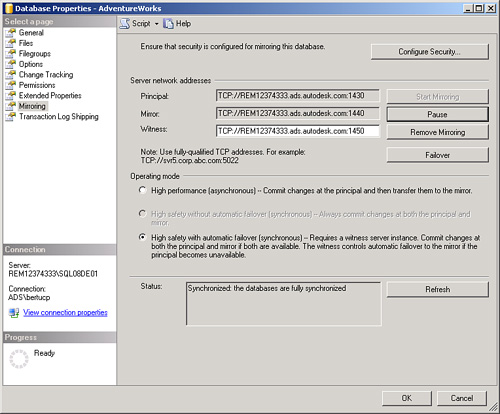
Figure 14 shows the full Database Properties screen for the AdventureWorks database, all server network addresses, and the operating mode for mirroring.
If you look at the SQL
Server log file (that is, the current log), you can see log entries
indicating that database mirroring is active:
2/21/2009 22:33:33,spid21s,Unknown,Database mirroring is
          active with database 'AdventureWorks' as the
          principal copy. This is an informational message
          only. No user action is required.
2/21/2009 22:33:09,spid17s,Unknown,Starting up database 'AdventureWorks'.
2/21/2009 22:33:07,Server,Unknown,SQL Server is now
          ready for client connections. This is an
          informational message; no user action is required.
2/21/2009 22:33:00,spid12s,Unknown,The Database
           Mirroring protocol transport is now listening for connections.
2/21/2009 22:33:00,spid12s,Unknown,Server is
        listening on [ 'any' <ipv4> 1430].
Congratulations. You are now mirroring a database!