Now that you know the types
of backups, the recovery models they relate to, and the devices you can
write to, you are ready to back up your database. You can create backups
with SQL Server 2008 by using either the SSMS or T-SQL. Some backups
are supported only through T-SQL, but the vast majority can be
accomplished with either tool.
Creating Database Backups with SSMS
The backup options in SSMS are accessible through the Object Explorer. For example, you can right-click the AdventureWorks2008 database in the SSMS Object Explorer, select Tasks and Backup, and a backup window like the one shown in Figure 2 appears.
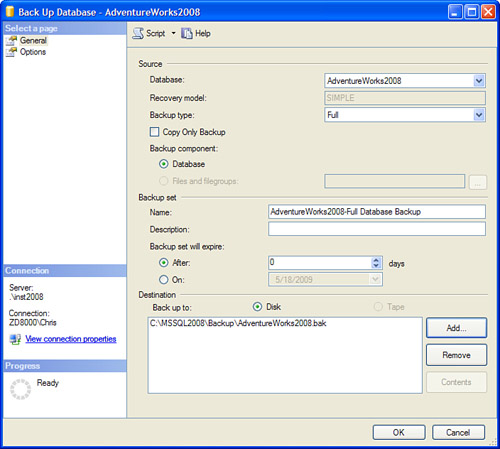
The Source section on the Back
Up Database window contains information relative to the database that
will be backed up. The target database is displayed in the first
drop-down, along with the recovery model set for the database. The
backup types available in the drop-down are dependent on the recovery
model. For simple recovery, only full and differential backup types are
available. For full recovery and bulk-logged recovery models, all backup
types are available in the drop-down.
The Backup Set section
allows you to give the backup a meaningful name and specify when the
backup set will expire. When the backup set expires, the backup can be
overwritten and is no longer retained. If the backup is set to expire
after 0 days, it will never expire.
The Destination section
identifies the disk or tape media that will contain the backup. You can
specify multiple destinations in this section by clicking the Add
button. For disk media, you can specify a maximum of 64 disk devices.
The same limit applies to tape media. If multiple devices are specified,
the backup information is spread across those devices. All the devices
must be present for you to be able to restore the database. If no tape
devices are attached to the database server, the Tape option is
disabled.
You can select several different types of options for a database backup. Figure 3 shows the options page available when you back up a database by using SSMS.
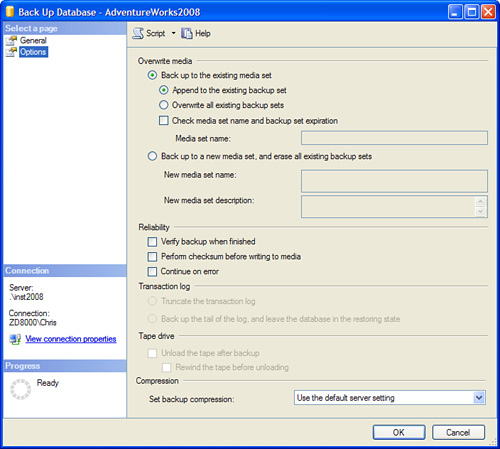
The Overwrite Media
section allows you to specify options relative to the destination media
for the backup. Keep in mind that a given media set can contain more
than one backup. This can occur if the Append to the Existing Backup Set
options is selected. With this option, any prior backups contained on
the media set are preserved, and the new backup is added to it. With the
Overwrite All Existing Backup Sets option, the media set contains only
the latest backup, and no prior backups are retained.
You
can use the options in the Reliability section to ensure that the
backup that has been created can be used reliably in a restore
situation. Verifying the backup when finished is highly recommended, but
doing so causes the backup time to be extended during the verification.
Similarly, the Perform Checksum Before Writing to Media option helps
ensure that you have a sound backup, but again, it causes the database
backup to run longer.
The options in the
Transaction Log section are available for databases in the full recovery
or bulk-logged model. These options are disabled in the simple recovery
model. The Truncate the Transaction Log option causes any inactive
portion of the transaction log to be removed after the database backup
is complete.
The set of options in the Tape
Drive section are enabled only when tape has been selected for the
destination media. Selecting the Unload the Tape After Backup option
causes the media tape to be ejected when the backup completes. This
option can help identify the end of a backup and prevent the tape from
being overwritten the next time the backup runs. The Rewind the Tape
Before Unloading option is self-explanatory; it causes the tape to be
released and rewound before you unload the tape. The last set of options
relate to compressed database backups.
Note
Keep in mind that all
backups can be performed while the database is in use. SQL Server is
able to keep track of the changes occurring during the backup and can
maintain transactional consistency as of the end of the backup. You need
to consider some performance overhead during the actual backup, but the
backup can occur during active database hours. However, it is still a
good idea to schedule your database backups during off-hours, when
database activity is at a minimum.
Creating Database Backups with T-SQL
The T-SQL BACKUP
command offers a myriad of options to perform all the backup operations
available in SSMS. However, SSMS does not support some backup operations
that can be performed only with T-SQL.
The BACKUP command comes in three different flavors. The first flavor involves the backup of a database. The command syntax starts with BACKUP DATABASE,
followed by the relevant parameters and options. The second flavor
involves the backup of a file or filegroup that is part of the database.
The command syntax for this type of backup also utilizes the BACKUP DATABASE
command, but a file or filegroup is specified after the database name
to identify which parts of the database should be backed up. The last
flavor involves the backup of the database’s transaction log. The syntax
for backing up the transaction log starts with BACKUP LOG. Each flavor shares many of the same options. The basic syntax for backing up a database follows:
BACKUP DATABASE { database_name | @database_name_var }
TO < backup_device > [ ,...n ]
[ [ MIRROR TO < backup_device > [ ,...n ] ] [ ...next-mirror ] ]
[ WITH
     [ BLOCKSIZE = { blocksize | @blocksize_variable } ]
     [ [ , ] { CHECKSUM | NO_CHECKSUM } ]
     [ [ , ] COMPRESSION | NO_COMPRESSION]
     [ [ , ] COPY_ONLY ]
     [ [ , ] { STOP_ON_ERROR | CONTINUE_AFTER_ERROR } ]
     [ [ , ] DESCRIPTION = { 'text' | @text_variable } ]
     [ [ , ] DIFFERENTIAL ]
     [ [ , ] EXPIREDATE = { date | @date_var }
     | RETAINDAYS = { days | @days_var } ]
     [ [ , ] PASSWORD = { password | @password_variable } ]
     [ [ , ] { FORMAT | NOFORMAT } ]
     [ [ , ] { INIT | NOINIT } ]
     [ [ , ] { NOSKIP | SKIP } ]
     [ [ , ] MEDIADESCRIPTION = { 'text' | @text_variable } ]
     [ [ , ] MEDIANAME = { media_name | @media_name_variable } ]
     [ [ , ] MEDIAPASSWORD = { mediapassword | @mediapassword_variable } ]
     [ [ , ] NAME = { backup_set_name | @backup_set_name_var } ]
     [ [ , ] { NOREWIND | REWIND } ]
     [ [ , ] { NOUNLOAD | UNLOAD } ]
     [ [ , ] RESTART ]
     [ [ , ] STATS [ = percentage
 ] ]
]
The number of options is extensive, but many of them are optional. A BACKUP DATABASE command can be as simple as the following example:
BACKUP DATABASE [AdventureWorks2008]
 TO  DISK = N'C:\mssql2008\backup\AdventureWorks2008_COPY.bak'
The first part of the BACKUP command is related to the database you want to back up (database_name), followed by the location to which you want to write the backup (backup_device). The remainder of the syntax relates to the options that can be specified following the WITH clause. These options determine how your backup will be created and the properties of the resulting backup. Table 1 outlines these options.
Table 1. BACKUP DATABASE Options
| Option | Description |
|---|
| BLOCKSIZE | The physical block size that will be used to create the backup. The default is 64KB. |
| CHECKSUM | NO_CHECKSUM | When CHECKSUM is specified, a checksum is calculated before the backup is written to validate that the backup is not corrupt. The default is NO_CHECKSUM. |
| COMPRESSION | NO_COMPRESSION | This
new option in SQL Server 2008, available only with the Enterprise or
Developer Edition, causes the backup file to be compressed. The default
is NO_COMPRESSION. |
| STOP_ON_ERROR | CONTINUE_AFTER_ERROR | This option is used in conjunction with the CHECKSUM option. The STOP_ON_ERROR option, which is the default, causes the backup to fail if the checksum cannot be validated. |
| DESCRIPTION | This is a 255-character description of the backup set. |
| DIFFERENTIAL | This option causes a differential backup to occur, which captures changes only since the last backup. |
| EXPIREDATE | This option specifies the date on which the backup set will expire and be overwritten. |
| RETAINDAYS | This option specifies the number of elapsed days before the backup set can be overwritten. |
| PASSWORD | This is a password that must be specified when restoring the backup set. |
| FORMAT | NOFORMAT | FORMAT causes the existing media header and backup set to be overwritten. The default is NOFORMAT. |
| INIT | NOINIT | The INIT
option causes a backup set to be overwritten. The backup set is not
overwritten if the backup set has not expired or if it does not match
the media name specified with the NAME option. NOINIT, which is the default, causes the backup set to be appended to the existing media. |
| NOSKIP | SKIP | NOSKIP, which is the default, allows backup sets to be overwritten if they have expired. The SKIP option skips expiration and media name checks and is used to prevent the overwriting of backup sets. |
| MEDIADESCRIPTION | This is a 255-character description for the entire backup media containing the backup sets. |
| MEDIANAME | This is a 128-character name for the backup media. If it is specified, the target media must match this name. |
| MEDIAPASSWORD | This
is a password for the media set. When media is created with this
password, the password must be supplied to be able to create a backup
set on that media or to restore from that media. |
| NAME | This is a 128-character name for the backup set. |
| NOREWIND | REWIND | This option is used for tape operations. REWIND, which is the default, causes the tape to be released and rewound after it fills. |
| NOUNLOAD | UNLOAD | This option is used for tape operations. NOUNLOAD, which is the default, causes the tape to remain in the tape drive after a backup completes. UNLOAD causes the tape to be rewound and unloaded when the backup completes. |
| RESTART | This option has no effect and is in place only for backward compatibility. |
| STATS | This option causes completion statistics to be displayed at the specified interval to assess progress. |
| COPY_ONLY | This option allows a backup to be made without affecting the normal sequence of backups. |