A database restore allows a
database or part of a database to be recovered to a state that it was in
previously. This state includes the physical structure of the database,
configuration options, and data contained in the database. The options
you have for recovery are heavily dependent on the backup plan you have
in place and way you have configured your
database. Databases that are set to simple recovery mode have limited
options for database restore. Databases that are in full recovery mode
and have frequent backups have many more restore options. Following are
the basic options for restore:
Restore an entire database.
Perform a partial restore.
Restore a file or page from a backup.
Restore a transaction log.
Restore a database to a point in time by using a database snapshot.
The following sections
delve further into the restore options listed here. They focus on the
means for accomplishing these restores and some of the common restore
scenarios you might encounter.
Restores with T-SQL
The command to restore a database in SQL Server is aptly named RESTORE. The RESTORE command is similar to the BACKUP
command in that it can be used to restore a database, part of a
database, or a transaction log. You restore an entire database or part
of a database by using the RESTORE DATABASE syntax. You do transaction log restores by using the RESTORE TRANSACTION syntax.
Database Restores with T-SQL
Listing 6 shows the full syntax for RESTORE DATABASE.
Listing 6. RESTORE DATABASE Syntax
--To Restore an Entire Database from a Full database backup (a Complete Restore):
RESTORE DATABASE { database_name | @database_name_var }
[ FROM <backup_device> [ ,...n ] ]
[ WITH
   [ { CHECKSUM | NO_CHECKSUM } ]
   [ [ , ] { CONTINUE_AFTER_ERROR | STOP_ON_ERROR } ]
   [ [ , ] ENABLE_BROKER ]
   [ [ , ] ERROR_BROKER_CONVERSATIONS ]
   [ [ , ] FILE = { file_number | @file_number } ]
   [ [ , ] KEEP_REPLICATION ]
   [ [ , ] MEDIANAME = { media_name | @media_name_variable } ]
   [ [ , ] MEDIAPASSWORD = { mediapassword |
                    @mediapassword_variable } ]
   [ [ , ] MOVE 'logical_file_name' TO 'operating_system_file_name' ]
                [ ,...n ]
   [ [ , ] NEW_BROKER ]
   [ [ , ] PARTIAL ]
   [ [ , ] PASSWORD = { password | @password_variable } ]
   [ [ , ] { RECOVERY | NORECOVERY | STANDBY =
          {standby_file_name | @standby_file_name_var }
   } ]
   [ [ , ] REPLACE ]
   [ [ , ] RESTART ]
   [ [ , ] RESTRICTED_USER ]
   [ [ , ] { REWIND | NOREWIND } ]
   [ [ , ] STATS [ = percentage ] ]
   [ [ , ] { STOPAT = { date_time | @date_time_var }
    | STOPATMARK = { 'mark_name' | 'lsn:lsn_number' }
             [ AFTER datetime ]
    | STOPBEFOREMARK = { 'mark_name' | 'lsn:lsn_number' }
            [ AFTER datetime ]
   } ]
   [ [ , ] { UNLOAD | NOUNLOAD } ]
]
|
Once
again, there are many available options for restoring a database, but a
simple restore is fairly straightforward. The following example
demonstrates a full restore of the AdventureWorks2008 database:
RESTORE DATABASE [AdventureWorks2008]
FROM DISK = N'C:\mssql2008\backup\AdventureWorks2008_FullRecovery.bak'
WITH FILE = 1,  NOUNLOAD,  REPLACE,  STATS = 10
For more sophisticated restores, you can specify options following the WITH clause. Table 2 briefly describes these options. Many of the options are the same as for the BACKUP command and provide similar functionality.
Table 2. RESTORE DATABASE Options
| Option | Description |
|---|
| CHECKSUM | NO_CHECKSUM | When CHECKSUM
is specified, a checksum is calculated before the backup is restored.
If the checksum validation fails, the restore fails as well. The default
is NO_CHECKSUM. |
| STOP_ON_ERROR | CONTINUE_AFTER_ERROR | The STOP_ON_ERROR option, which is the default, causes the backup to fail if an error is encountered. CONTINUE_AFTER_ERROR allows the restore to continue if an error is encountered. |
| ENABLE_BROKER | This option starts the Service Broker so that messages can be received. |
| ERROR_BROKER_CONVERSATIONS | Service
Broker conversations with the database being restored are ended, with
an error stating that the database is attached or restored. |
| FILE = { file_number | @file_number } | This option identifies the backup set number to be restored from the backup media. The default is 1, which indicates the latest backup set. |
| KEEP_REPLICATION | This
option prevents replication settings from being removed during a
restore operation. This is important when setting up replication to work
with log shipping. |
| MEDIANAME | This is a 128-character name for the backup media. If it is specified, the target media must match this name. |
| MEDIAPASSWORD | This
is a password for the media set. If the media was created with a
password, the password must be supplied to restore from that media. |
| MOVE | This option causes the specified logical_file_name to be moved from its original file location to another location. |
| NEW_BROKER | This option creates a new service_broker_guid. |
| PARTIAL | This option causes a partial restore to occur that includes the primary filegroup and any specified secondary filegroup(s). |
| PASSWORD | This
password is specific to the backup set. If a password was used when
creating the backup set, a password must be used to restore from the
media set. |
| RECOVERY | NORECOVERY | STANDBY | The RECOVERY option, which is the default, restores the database so that it is ready for use. NORECOVERY renders the database inaccessible but able to restore additional transaction logs. The STANDBY
option allows additional transaction logs to be applied but the
database to be read. These options are discussed in more detail later in
this section. |
| REPLACE | This option causes the database to be created with the restore, even if the database already exists. |
| RESTART | This option allows a previously interrupted restore to restart where it was stopped. |
| RESTRICTED_USER | This option restricts access to the database after it has been restored. Only members of the db_owner, dbcreator, or sysadmin role can access it. |
| REWIND | NOREWIND | This option is used for tape operations. REWIND, which is the default, causes the tape to be released and rewound. |
| STATS | This option causes completion statistics to be displayed at the specified interval to assess progress. |
| STOPAT | STOPATMARK | STOPBEFOREMARK | This
option causes a restore to recover to a specified date/time or to
recover to a point defined by a specific transaction. The STOPAT option restores the database to the state it was in at the date and time. The STOPATMARK and STOPBEFOREMARK options restore based on the specified marked transaction or LSN. |
| UNLOAD | NOUNLOAD | This option is used for tape operations. NOUNLOAD cause the tape to remain in the tape drive after a restore completes. UNLOAD, which is the default, causes the tape to be rewound and unloaded when the restore completes. |
Transaction Log Restores with T-SQL
The syntax details and options for restoring a transaction log backup are similar to those for RESTORE BACKUP. The options not available with RESTORE LOG include ENABLE_BROKER, ERROR_BROKER_CONVERSATIONS, NEW_BROKER, and PARTIAL.
The RECOVERY | NORECOVERY | STANDBY
options are particularly important when performing transaction log
restores and also when restoring a database that will have transaction
logs applied. If these options are used incorrectly, you can render your
database inaccessible or unable to restore subsequent transaction log
backups. With the RECOVERY option,
any uncommitted transactions are rolled back, and the database is made
available for use. When a restore (of either a database or transaction
log) is run with this option, no further transaction logs can be
applied. The NORECOVERY and STANDBY options do allow subsequent transaction logs to be applied. When the NORECOVERY
option is specified, the database is completely unavailable after the
restore and is left in a restoring state. In this state, you cannot read
the database, update the database, or obtain information about the
database, but you can restore transaction logs.
With the STANDBY option, the database is left in a read-only state that allows some database access. standby_file_name must be specified with the STANDBY
option. The standby file contains uncommitted transactions rolled back
to place the database in a consistent state for read operations. If
subsequent transaction log backups are applied to the STANDBY database, the uncommitted transactions in the standby file are reapplied to the database.
Caution
Take note of the standby_file_name name used when restoring with the STANDBY option and make sure the file is secure. If another restore operation is performed and the same standby_file_name
is used, the previous standby file is overwritten. The database cannot
be fully recovered without the standby file, so you have to perform all
the restore operations again.
We speak from personal
experience on this one. During a data recovery drill, for a large
database (approximately 1TB), we spent hours restoring the transaction
logs on a set of log-shipped databases. We manually restored the last
log to be applied to place the database in STANDBY mode. Another database also in the data recovery drill was also placed in STANDBY,
and unfortunately, the same standby file was used on this database.
This caused more than one person a very long night. Be careful!
Once again, many of these options are
not required for most types of restores. For example, the following
command uses basic options to restore a transaction log backup to the AdventureWorks2008 database:
RESTORE LOG [AdventureWorks2008] FROM
DISK =
N'C:\mssql2008\backup\AdventureWorks2008\AdventureWorks2008_backup_200906091215.trn'
WITH  FILE = 1,  NOUNLOAD,  STATS = 10, NORECOVERY
Typically, the
individual restore commands you will use are along the lines of the
preceding example. The restores become more complicated when many
restores of different types are involved in a recovery option.
Fortunately, SSMS can help ease this pain.
Restoring by Using SSMS
The
restore capabilities in SSMS are comprehensive and can reduce the
amount of time needed to perform a restore and limit the number of
errors. This is partly due to the fact that SSMS keeps track of the
backups that have occurred on a server. When a restore operation is
requested for a database, SQL Server reads from its own system tables
and presents a list of backups that it knows about that can be restored.
In situations in which many files need to be restored, SSMS can be an
invaluable tool.
You access the
restore functions in SSMS by right-clicking the database in the Object
Explorer and selecting Tasks and then Restore. The options available for
restore include Database, File and Filegroups, and Transaction Log.
Which restore options are enabled depends on the state of the database
being restored. The Transaction Log option is disabled for databases
that were restored with the RECOVERY option or are set to simple recovery mode. Figure 6 shows an example of the restore screen that is displayed when you select a database restore for the AdventureWorks2008 database.
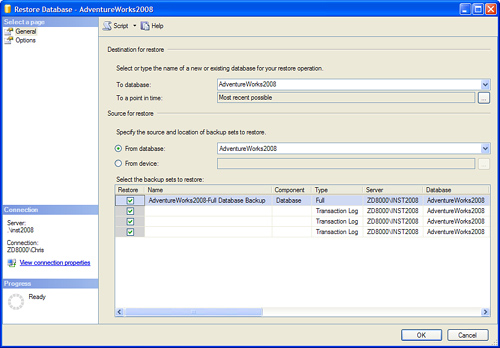
The Restore Database window can show more than one type of backup, depending on what is available. The first backup shown in Figure 14.6
is a full backup, followed by a series of transaction log backups. The
beauty of this screen is that the backups are shown in the order in
which they should be applied. This order is very important with restores
because they must be
applied in the order in which they occurred. You can choose to apply all
the backups or selectively choose the backups you want to apply. If you
uncheck the first full database backup, all subsequent log backups are
unchecked as well. If you recheck the full database backup and click one
of the transaction log backups toward the bottom of the list, all the
required backups that happened prior to the selected backups are also
selected.
Figure 7 shows an example or the Options page of the Restore Database window for the AdventureWorks2008 database. The Options page allows you to specify many of the T-SQL RESTORE options reviewed previously. The Overwrite the Existing Database option is equivalent to the REPLACE
parameter and forces a replacement of the restored database if it
exists already. The Preserve the Replication Settings option is
equivalent to KEEP_REPLICATION. The Restrict Access to the Restored Database option is the same as using the RESTRICTED_USER option with the T-SQL RESTORE
command. The Prompt Before Restoring Each Backup option does not have a
T-SQL equivalent; it displays a prompt before restoring each backup set
to ask whether you want to restore it.
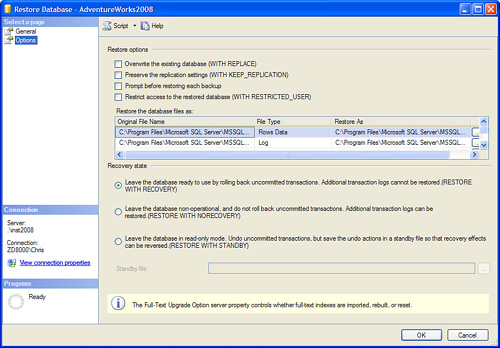
The last three options on the
Options page relate the recovery state of the last backup set restored.
The first option is synonymous with the RECOVERY option, the second option is the same as NORECOVERY, and the last option is equivalent to the STANDBY option. The standby filename must be supplied with the STANDBY
option and defaults to the default backup directory for the server. By
default, the name of the file contains the name of the database being
restored.
Tip
You
should click the Script button available on the Restore Database window
if you want to see what is going on under the hood of the SSMS restores
or want to run a restore later. You can learn a lot about the T-SQL
options and how they work by scripting out the commands.
Restore Information
Backup files and system
tables contain a wealth of information about what can be restored or
already has been restored. You can retrieve information from the backup
files by using variations of the RESTORE
command. These variations do not actually perform the restore operation
but provide information about the backups that can be restored. The RESTORE commands and some useful system tables are detailed in the following sections.
The RESTORE FILELISTONLY Command
The RESTORE FILELISTONLY
command returns a result set that contains a list of the database and
log files contained in the backup. An example of this command follows:
RESTORE FILELISTONLY
FROM DISK = 'C:\mssql2008\backup\AdventureWorks2008_Partial.bak'
The results from this type of
restore include the logical and physical filenames, the type of each
file, and the size of each file.
The RESTORE HEADERONLY Command
The RESTORE HEADERONLY
command returns a result set that contains the backup header data for
all backup sets on the specified backup device. This command is useful
when multiple backup sets are written to the same device. An example of
this command follows:
RESTORE HEADERONLY
FROM DISK = 'C:\mssql2008\backup\AdventureWorks2008_Partial.bak'
More than 50 columns are
returned in the result set. Some particularly useful pieces of
information include the start and finish time for the backup, recovery
mode when the backup was taken, type of backup, and name of the computer
from which the backup was performed.
The RESTORE VERIFYONLY Command
The RESTORE VERIFYONLY
command verifies that a backup set is complete and readable. The
restore does not attempt to verify the structure of the data in the
backups, but it has been enhanced to run additional checks on the data.
The checks are designed to increase the probability of detecting errors.
An example of this command follows:
RESTORE VERIFYONLY
FROM DISK = 'C:\mssql2008\backup\AdventureWorks2008_Partial.bak'

/*Result from the prior RESTORE VERIFYONLY command
The backup set on file 1 is valid.
*/
The results from the prior example show that the RESTORE VERIFYONLY command does not contain much output, but the value of this command is in helping ensure that the backups are sound.
Backup and Restore System Tables
The system tables for backups and restores are found in the msdb
system database. These system tables are used to keep historical
information about the backups and restores that have occurred on the
server. These system tables are listed in Table 3.
Table 3. Backing Up and Restoring System Tables
| msdb System Table | Description |
|---|
| backupfile | Contains one row for each data or log file of a database. |
| backupfilegroup | Contains one row for each filegroup in a database at the time of backup. |
| backupmediafamily | Contains a row for each media family. |
| backupmediaset | Contains one row for each backup media set. |
| backupset | Contains a row for each backup set. |
| logmarkhistory | Contains one row for each marked transaction that has been committed. |
| restorefile | Contains one row for each restored file. These include files restored indirectly, by filegroup name. |
| restorefilegroup | Contains one row for each restored filegroup. |
| restorehistory | Contains one row for each restore operation. |
| suspect_pages | Contains one row per page that failed with an 824 error (with a limit of 1,000 rows). |
| sysopentapes | Contains one row for each currently open tape device. |
You
are able to query these tables to obtain a variety of information
related to backups and restores. You can tailor these queries to look at
a specific database or a specific time frame. The following example
retrieves restore information for the AdventureWorks2008 database:
select destination_database_name 'database', h.restore_date, restore_type,
 cast((backup_size/1024)/1024 as numeric(8,0)) 'backup_size MB',
  f.physical_device_name
 from msdb..restorehistory h (NOLOCK)
   LEFT JOIN msdb..backupset b (NOLOCK)
   ON h.backup_set_id = b.backup_set_id
   LEFT JOIN msdb..backupmediafamily f (NOLOCK)
   ON b.media_set_id = f.media_set_id
 where h.restore_date > getdate() - 5
    and UPPER(h.destination_database_name) = 'AdventureWorks2008'
 order by UPPER(h.destination_database_name), h.restore_date desc
This example displays information related to restores that have been executed in the past five days for the AdventureWorks2008
database. The restore date, type of restore, size of the backup, and
physical location of the file used for the restore are displayed when
you run this query.
Caution
Queries against system tables
are acceptable and can provide a wealth of information, but you need to
exercise caution whenever you are dealing with a system table. SQL
Server uses these tables, and problems can occur if the values in them
are changed or their physical structure is altered.
Backup and Restore Report
A set of standard reports
that come with SQL Server 2008 provide a variety of information about
your databases, including recent restores and backups. You can access
these reports by right-clicking on a database in the SSMS Object
Explorer, then Reports, and then Standard Reports. You see over a dozen
reports ready for you to run.
A report particularly useful
for obtaining restore and backup information is named Backup and
Restore Events. This report details the latest backup and restore events
that have occurred on a particular database. An example of this report
is shown in Figure 8.
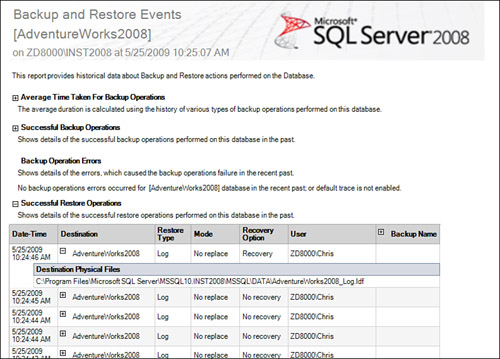
The
interactive report allows you to drill down into each backup or restore
event to obtain more information. For example, the restore information
shown in Figure 14.8
was obtained by clicking on the plus button next to the Successful
Restore Operations label. You can then drill down into an individual
restore to obtain more information, including the physical files
involved in the operation.