The CHECK Constraint
You can use the CHECK constraint to enforce domain integrity and to provide a means for restricting the values that can be entered in a column. A CHECK constraint is implemented as a Boolean expression, and it must not be FALSE
if the insertion or update is to proceed. The Boolean expression can
reference other columns in the same table, but it cannot reference other
tables. Foreign keys and triggers can be used to reference columns in
other tables, if needed. The expression can also include functions that
do not return results. A CHECK constraint that is defined on a specific column can reference only the values in the column.
CHECK constraints
are good for ensuring the format of data inserted in a column and for
defining a list of acceptable values. Columns with phone numbers or
Social Security numbers are good candidates for CHECK constraints that enforce formatting restrictions. Columns that have the data types money or integer can use CHECK
constraints to ensure that the values are always greater than or equal
to zero. A column that has a small fixed number of valid values is also a
good candidate for a CHECK constraint. A fixed number of values can be defined in the CHECK
constraint, and no additional table lookup or coding is necessary to
ensure that the valid values are inserted. The following example shows a
CHECK constraint on the Employee table that checks the values for the Gender column:
ALTER TABLE [HumanResources].[Employee]  WITH CHECK
 ADD  CONSTRAINT [CK_Employee_Gender]
 CHECK  ((upper([Gender])='F' OR upper([Gender])='M'))
The CHECK constraint in this example ensures that only F or M is inserted in this column. These types of CHECK constraints are relatively fast and are preferred over FOREIGN KEY constraints when the values are fixed.
Note
Be careful with CHECK constraint expressions that can evaluate to NULL. CHECK constraints allow insertions and updates to the table to proceed when the CHECK constraint expression does not evaluate to FALSE. A NULL value is considered to be unknown and does not evaluate to FALSE,
so the insertion or update succeeds. For example, if you have a
nullable column that has a constraint specifying that the value must be
greater than or equal to zero, this constraint does not prevent a NULL value from being inserted into the column.
Keep in mind that the creation of a CHECK
constraint on a table that already has data in it may fail. This is due
to a validation performed when the constraint is created. If existing
data violates the constraint, the constraint is not created. The only
exception is to create the constraint by using the NOCHECK
option. When this option is used, the existing data is not checked, but
any future updates or insertions are. The following example shows the
creation of a CHECK constraint on the Employee table:
 ALTER TABLE [HumanResources].[Employee]  WITH NOCHECK
 ADD  CONSTRAINT [CK_Employee_Gender_F]
 CHECK  ((upper([Gender])='F'))
The constraint is on the Gender column that already has a check constraint on it, which ensures that the data values are only F or M. The new constraint on the Gender column specifies that the value must be F. The existing data has values of F and M, but the NOCHECK option allows you to add the constraint anyway.
Any new rows added to the Employee table after the new CK_Employee_Gender_F CHECK constraint has been added are then checked. With multiple CHECK
constraints defined on a column, the constraints are evaluated in the
order in which they were added to the table. In the preceding example,
the CK_Employee_Gender constraint is evaluated first, and then the new CK_Employee_Gender_F constraint is evaluated. If a Gender value of F is entered, both constraints evaluate to TRUE, and the change is accepted. If a value of M is inserted in the Gender column, the CK_Employee_Gender constraint succeeds, but the CK_Employee_Gender_F constraint fails, and the change is rejected.
Creating Constraints
You can define constraints on a single column or on multiple columns. Single-column constraints are referred to as column-level
constraints. You can define this type of constraint when you create the
column on the table. Constraints that reference multiple columns must
be defined on the table and are considered table-level constraints. Table-level constraints must be defined after all the referenced columns in the table are created.
Using T-SQL to Create Constraints
You can create constraints with T-SQL by using the CREATE TABLE or ALTER TABLE statement. When you create a column-level constraint by using the CREATE TABLE statement, the CONSTRAINT
keyword and constraint definition are included immediately after the
column definition. Table-level constraints defined with the CREATE TABLE statement are specified after the column list in the table definition.
The Customer table in the Adventureworks2008 database is a good example of a table that has several different types of constraints. Listing 2 shows the CREATE TABLE command, along with the constraint definitions for a table named Customer2 that is modeled after the Customer table. All the constraints in this example have been included in the CREATE TABLE statement. The constraints on this table include PRIMARY KEY, FOREIGN KEY, and CHECK constraints. You can find all the constraints in the CREATE TABLE statement by looking for the CONSTRAINT keyword.
Listing 2. Creating Constraints by Using a CREATE TABLE Statement
CREATE TABLE [Sales].[Customer2](
   [CustomerID] [int] IDENTITY(1,1) NOT FOR REPLICATION NOT NULL,
   [TerritoryID] [int] NULL,
   [AccountNumber]  AS
      (isnull('AW'+[dbo].[ufnLeadingZeros]([CustomerID]),'')),
   [CustomerType] [nchar](1) NOT NULL
      CONSTRAINT CK_Customer_CustomerType2 CHECK
       ((upper([CustomerType])='I' OR upper([CustomerType])='S')),
   [rowguid] [uniqueidentifier] ROWGUIDCOL  NOT NULL
      CONSTRAINT [DF_Customer_rowguid2]  DEFAULT (newid()),
   [ModifiedDate] [datetime] NOT NULL
      CONSTRAINT [DF_Customer_ModifiedDate2]  DEFAULT (getdate()),
 CONSTRAINT [PK_Customer_CustomerID2] PRIMARY KEY CLUSTERED
   ([CustomerID] ASC),
 CONSTRAINT FK_Customer_SalesTerritory_TerritoryID2 FOREIGN KEY
   ([TerritoryID])
   REFERENCES [Sales].[SalesTerritory] ([TerritoryID])
)
GO
|
Generally, it is easier to manage constraints by using the ALTER TABLE statement than by integrating them into the CREATE TABLE statement. One of the biggest reasons is that the scripting capability in SQL Server Management Studio (SSMS) generates ALTER TABLE
statements for many of the constraints. You can easily script a table
and its constraints by using SSMS, and you will find that SSMS uses the ALTER TABLE statement extensively. Listing 3 includes a statement to remove the Customer2 table and a subsequent set of statements that re-creates the Customer2 table and utilizes the ALTER TABLE statement to create several of the constraints. The statements to re-create the Customer2 table were generated using the Object Explorer in SSMS. Some of the constraints are created within the initial CREATE TABLE statement, and some are created with the ALTER TABLE statement.
Listing 3. Creating Constraints by Using ALTER TABLE
IF  EXISTS (SELECT * FROM dbo.sysobjects WHERE id
   = OBJECT_ID(N'[Sales].[Customer2]') AND OBJECTPROPERTY(id, N'IsUserTable') = 1)
 DROP TABLE [Sales].[Customer2]
go

CREATE TABLE [Sales].[Customer2](
   [CustomerID] [int] IDENTITY(1,1) NOT FOR REPLICATION NOT NULL,
   [TerritoryID] [int] NULL,
   [AccountNumber]  AS (isnull('AW'+[dbo].[ufnLeadingZeros]([CustomerID]),'')),
   [CustomerType] [nchar](1) COLLATE SQL_Latin1_General_CP1_CI_AS NOT NULL,
   [rowguid] [uniqueidentifier] ROWGUIDCOL  NOT NULL
    CONSTRAINT [DF_Customer_rowguid2]  DEFAULT (newid()),
   [ModifiedDate] [datetime] NOT NULL
    CONSTRAINT [DF_Customer_ModifiedDate2]  DEFAULT (getdate()),
 CONSTRAINT [PK_Customer_CustomerID2] PRIMARY KEY CLUSTERED
(
   [CustomerID] ASC
) ON [PRIMARY]
) ON [PRIMARY]

GO
ALTER TABLE [Sales].[Customer2]  WITH CHECK
 ADD  CONSTRAINT [FK_Customer_SalesTerritory_TerritoryID2]
  FOREIGN KEY(   [TerritoryID])
   REFERENCES [Sales].[SalesTerritory] (   [TerritoryID])
GO
ALTER TABLE [Sales].[Customer2]  WITH CHECK
 ADD  CONSTRAINT [CK_Customer_CustomerType2]
  CHECK  ((upper([CustomerType])='I' OR upper([CustomerType])='S'))
|
Using SSMS to Create Constraints
SSMS
simplifies the administration of constraints by providing a
user-friendly interface that allows you to view and manage constraints.
The visual tools available for managing constraints in SSMS include the
Object Explorer, Database Diagram Editor, and Table Designer.
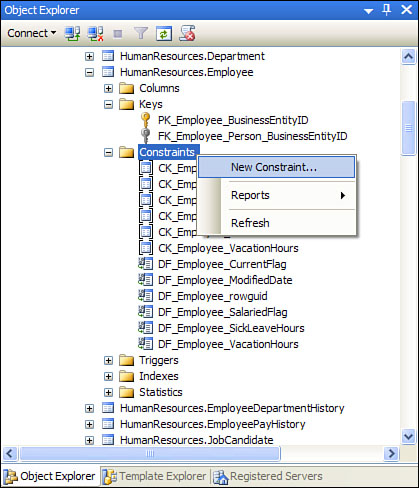
Figure 3 shows the Object Explorer with the Constraints node expanded for the Employee table and the New Constraint option selected. The Constraints node contains the CHECK and DEFAULT constraints for the table. Notice in the Object Explorer that some of the constraints (PRIMARY KEY, UNIQUE, and FOREIGN KEY) are actually contained under the Keys node.
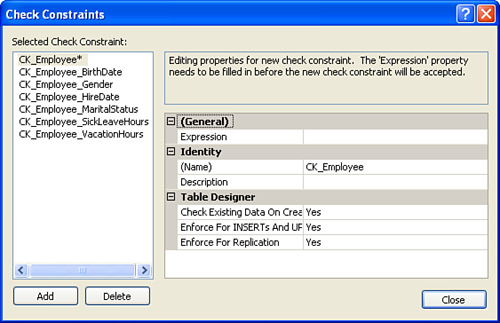
When you select the New Constraint option from the Object Explorer, the Check Constraints dialog, shown in Figure 4, appears. This dialog gives you the option to define a new CHECK
constraint on the table selected. You simply fill in a valid expression
for the constraint, give it a unique name, and select the options you
want.
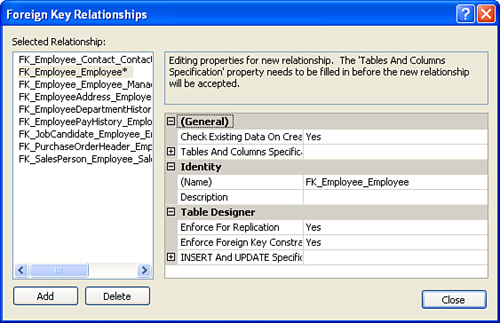
Similarly, you can right-click the Keys node and select New Foreign Key to add a new FOREIGN KEY constraint. Figure 5
shows the Foreign Key Relationships dialog displayed after you select
New Foreign Key. You click the ellipsis to the right of Tables and
Columns Specification, and you can select the primary key table you want
the foreign key to relate to. Finally, you select the desired options,
and you are ready to add your new FOREIGN KEY constraint.
Tip
When you use the Object
Explorer to add or modify constraints, two windows are important to this
process. The first window is the Constraint window, which allows you to
input the constraint information. The Table Designer window that
displays the column properties for the table is the other window that is
important to the change process. It is launched in the background, and
you can view it on the tabbed display of SSMS. When you make changes
using the Constraint window, those changes are not applied via SSMS
until the Table Designer window is closed. This may cause some confusion
because even though you close your Constraint window with your changes,
those changes may not be reflected in the database. You must close the
Table Designer window to be able to actually make the changes to the
table. When you close the Table Designer window, a prompt appears,
asking whether you want to save the changes to the table. If you click
Yes, your constraint changes are applied to the database. If you click
No, none of the constraint changes you have made are applied. You can
also use the Table Designer menu to script out the related changes and
apply them manually via a database engine query window.
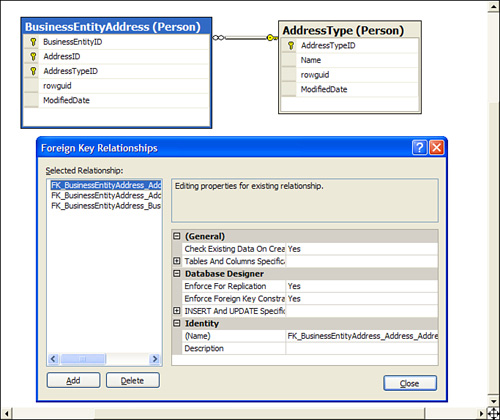
The Database Diagram Editor
is another great visual tool for adding constraints. This tool is
particularly useful for viewing and adding foreign key relationships to
tables. Consider, for example, the database diagram shown in Figure 26.6. This diagram shows the AddressType and BusinessEntityAddress
tables and the relationships that exist between them. To add a new
relationship, you right-click the table you want to add the foreign key
to and select the Relationships option. After you fill in the
appropriate information for the relationship, you can generate a change
script by using the Table Designer menu, or you can simply close the
database diagram window and respond to the prompt to save changes. You
can also see options to add other constraints, such as CHECK constraints, by right-clicking the table in the database diagram and selecting the desired option.
You can also launch
windows for adding constraints from the Table Designer menu. To enable
the Table Designer menu, you right-click the table in Object Explorer
that you want to add constraints to and select the Design option. The
table and column properties are displayed, and the Table Designer menu
is enabled. The Table Designer menu includes options to manage
relationships, indexes/keys, and CHECK constraints.
Tip
It is a
good idea to generate a script to implement changes made using SSMS
visual tools. You can review the script for accuracy, run it at a later
time, and save it in a file to keep track of the changes. You can also
apply the saved script to other environments, if needed.