Creating a Partitioned Table
Tables are partitioned only
when they are created. This is an important point to keep in mind when
you are considering adding partitions to a table that already exists.
Sometimes, performance issues or other factors may lead you to determine
that a table you have already created and populated may benefit from
being partitioned.
The re-creation of large tables
in a production environment requires some forethought and planning. The
data in the table must be retained in another location for you to
re-create the table. Bulk copying the data to a flat file and renaming
the table are two possible solutions for retaining the data. After you
determine the data retention method, you can re-create the table, with
the new partition scheme. For simplicity’s sake, the example in Listing 3 creates a new table named sales_big_Partitioned instead of using the original sales_big table. The second part of Listing 3 copies the data from the sales_big table into the sales_big_Partitioned table.
Listing 3. Creating a Partitioned Table
CREATE TABLE dbo.sales_big_Partitioned(
        sales_id int IDENTITY(1,1) NOT NULL,
        stor_id char(4) NOT NULL,
        ord_num varchar(20) NOT NULL,
        ord_date datetime NOT NULL,
        qty smallint NOT NULL,
        payterms varchar(12) NOT NULL,
        title_id dbo.tid NOT NULL
) ON SalesBigPS1 (ord_date)  --this statement is key to Partitioning the table
GO

GO

--Insert data from the sales_big table into the new sales_big_partitioned table
SET IDENTITY_INSERT sales_big_Partitioned ON
GO
INSERT sales_big_Partitioned with (TABLOCKX)
 (sales_id, stor_id, ord_num, ord_date, qty, payterms, title_id)
 SELECT sales_id, stor_id, ord_num, ord_date, qty, payterms, title_id
  FROM sales_big
go
SET IDENTITY_INSERT sales_big_Partitioned OFF
GO
|
The key clause to take note of in this listing is ON SalesBigPS1 (ord_date). This clause identifies the partition scheme on which to create the table (SalesBigPS1) and the column within the table to use for partitioning (ord_date).
After you create the table,
you might wonder whether the table was partitioned correctly.
Fortunately, there are some catalog views related to partitions that you
can query for this kind of information. Listing 4 shows a sample SELECT statement that utilizes the sys.partitions view. The results of the statement execution are shown immediately after the SELECT
statement. Notice that there are six numbered partitions and that the
estimated number of rows for each partition corresponds to the number of
rows you saw when you selected the data from the unpartitioned SalesBig table.
Listing 4. Viewing Partitioned Table Information
select convert(varchar(16), ps.name) as partition_scheme,
       p.partition_number,
       convert(varchar(10), ds2.name) as filegroup,
       convert(varchar(19), isnull(v.value, ''), 120) as range_boundary,
       str(p.rows, 9) as rows
   from sys.indexes i
   join sys.partition_schemes ps on i.data_space_id = ps.data_space_id
   join sys.destination_data_spaces dds
        on ps.data_space_id = dds.partition_scheme_id
   join sys.data_spaces ds2 on dds.data_space_id = ds2.data_space_id
   join sys.partitions p on dds.destination_id = p.partition_number
                      and p.object_id = i.object_id and p.index_id = i.index_id
   join sys.partition_functions pf on ps.function_id = pf.function_id
   LEFT JOIN sys.Partition_Range_values v on pf.function_id = v.function_id
            and v.boundary_id = p.partition_number - pf.boundary_value_on_right
   WHERE i.object_id = object_id('sales_big_partitioned')
     and i.index_id in (0, 1)
   order by p.partition_number

/* Results from the previous SELECT statement
partition_scheme partition_number filegroup  range_boundary      rows
---------------- ---------------- ---------- ------------------- ---------
SalesBigPS1                     1 Older_Data                             0
SalesBigPS1                     2 2005_Data  2005-01-01 00:00:00        30
SalesBigPS1                     3 2006_Data  2006-01-01 00:00:00    613560
SalesBigPS1                     4 2007_Data  2007-01-01 00:00:00    616450
SalesBigPS1                     5 2008_Data  2008-01-01 00:00:00    457210
SalesBigPS1                     6 2009_Data  2009-01-01 00:00:00         0
*/
|
Adding and Dropping Table Partitions
One
of the most useful features of partitioned tables is that you can add
and drop entire partitions of table data in bulk. If the table
partitions are set up properly, these commands can take place in
seconds, without the expensive input/output (I/O) costs of physically
copying or moving the data. You can add and drop table partitions by
using the SPLIT RANGE and MERGE RANGE options of the ALTER PARTITION FUNCTION command:
ALTER PARTITION FUNCTION partition_function_name()
{ SPLIT RANGE ( boundary_value ) | MERGE RANGE ( boundary_value ) }
Adding a Table Partition
The SPLIT RANGE
option adds a new boundary point to an existing partition function and
affects all objects that use this partition function. When this command
is run, one of the function partitions is split in two. The new
partition is the one that contains the new boundary point. The new
partition is created to the right of the boundary value if the partition
is defined as a RANGE RIGHT partition function or to the left of the boundary if it is a RANGE LEFT partition function. If the partition is empty, the split is instantaneous.
If the partition being split
contains data, any data on the new side of the boundary is physically
deleted from the old partition and inserted into the new partition. In
addition to being I/O intensive, a split is also log intensive,
generating log records that are four times the size of the data being
moved. In addition, an exclusive table lock is held for the duration of
the split. If you want to avoid this costly overhead when adding a new
partition to the end of the partition range, it is recommended that you
always keep an empty partition available at the end and split it before
it is populated with data. If the partition is empty, SQL Server does
not need to scan the partition to see whether there is any data to be
moved.
Note
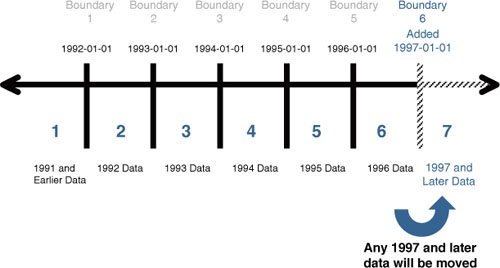
Avoiding the overhead associated with splitting a partition is the reason the code in Listing 24.19 defined the SalesBigPF1 partition function with a partition for 2009, even though there is no 2009 data in the sales_big_partitioned
table. As long as you split the partition before any 2009 data is
inserted into the table and the 2009 partition is empty, no data needs
to be moved, so the split is instantaneous.
Before you split a partition, a filegroup must be marked to be the NEXT USED partition by the partition scheme that uses the partition function. You initially allocate filegroups to partitions by using a CREATE PARTITION SCHEME statement. If a CREATE PARTITION SCHEME statement allocates more filegroups than there are partitions defined in the CREATE PARTITION FUNCTION statement, one of the unassigned filegroups is automatically marked as NEXT USED by the partition scheme, and it will hold the new partition.
If there are no filegroups currently marked NEXT USED by the partition scheme, you must use ALTER PARTITION SCHEME
to either add a filegroup or designate an existing filegroup to hold
the new partition. This can be a filegroup that already holds existing
partitions. Also, if a partition function is used by more than one
partition scheme, all the partition schemes that use the partition
function to which you are adding partitions must have a NEXT USED filegroup. If one or more do not have a NEXT USED filegroup assigned, the ALTER PARTITION FUNCTION statement fails, and the error message displays the partition scheme or schemes that lack a NEXT USED filegroup.
The following SQL statement adds a NEXT USED filegroup to the SalesBigPS1 partition scheme. Note that in this example, the filegroup specified is a new filegroup, 2010_DATA:
ALTER PARTITION SCHEME SalesBigPS1 NEXT USED '2010_Data'
Now that you have specified a NEXT USED
filegroup for the partition scheme, you can go ahead and add the new
range for 2010 and later data rows to the partition function, as in the
following example:
--Alter partition function with the yearly values to partition the data
ALTER PARTITION FUNCTION SalesBigPF1 () SPLIT RANGE ('01/01/2010')
GO
Figure 2 shows the effects of splitting the 2009 table partition.
You can also see the effects of splitting the partition on the system catalogs by running the same query as shown earlier, in Listing 4:
/* New results from the SELECT statement in Listing 4
partition_scheme partition_number filegroup  range_boundary      rows
---------------- ---------------- ---------- ------------------- ---------
SalesBigPS1                     1 Older_Data                             0
SalesBigPS1                     2 2005_Data  2005-01-01 00:00:00        30
SalesBigPS1                     3 2006_Data  2006-01-01 00:00:00    613560
SalesBigPS1                     4 2007_Data  2007-01-01 00:00:00    616450
SalesBigPS1                     5 2008_Data  2008-01-01 00:00:00    457210
SalesBigPS1                     6 2009_Data  2009-01-01 00:00:00         0
SalesBigPS1                     7 2010_Data  2010-01-01 00:00:00         0
*/
Dropping a Table Partition
You can drop a table partition by using the ALTER PARTITION FUNCTION ... MERGE RANGE
command. This command essentially removes a boundary point from a
partition function as the partitions on each side of the boundary are
merged into one. The partition that held the boundary value is removed.
The filegroup that originally held the boundary value is removed from
the partition scheme unless it is used by a remaining partition or is
marked with the NEXT USED property.
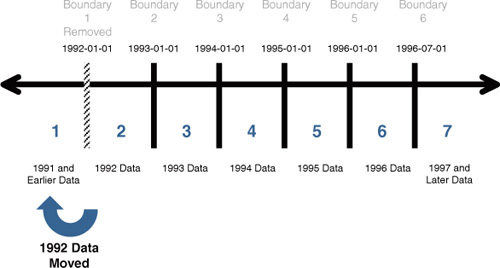
Any data that was in the removed partition is moved to the remaining neighboring partition. If a RANGE RIGHT
partition boundary was removed, the data that was in that boundary’s
partition is moved to the partition to the left of boundary. If it was a
RANGE LEFT partition, the data is moved to the partition to the right of the boundary.
The following command merges the 2005 partition into the Old_Data partition for the sales_big_partitioned table:
ALTER PARTITION FUNCTION SalesBigPF1 () MERGE RANGE ('01/01/2005')
Figure 3 demonstrates how the 2005 RANGE RIGHT partition boundary is removed and the data is merged to the left, into the Old_Data partition.
Caution
Splitting or merging partitions for a partition function affects all objects using that partition function.
You can also see the effects of merging the partition on the system catalogs by running the same query as shown in Listing 4:
/* New results from the SELECT statement in Listing 2
partition_scheme partition_number filegroup  range_boundary      rows
---------------- ---------------- ---------- ------------------- ---------
SalesBigPS1                     1 Older_Data                            30
SalesBigPS1                     3 2006_Data  2006-01-01 00:00:00    613560
SalesBigPS1                     4 2007_Data  2007-01-01 00:00:00    616450
SalesBigPS1                     5 2008_Data  2008-01-01 00:00:00    457210
SalesBigPS1                     6 2009_Data  2009-01-01 00:00:00         0
SalesBigPS1                     7 2010_Data  2010-01-01 00:00:00         0
*/
Like
the split operation, the merge operation occurs instantaneously if the
partition being merged is empty. The process can be very I/O intensive
if the partition has a large amount of data in it. Any rows in the
removed partition are physically moved into the remaining partition.
This operation is also very log intensive, requiring log space
approximately four times the size of data being moved. An exclusive
table lock is held for the duration of the merge.
If you
no longer want to keep the data in the table for a partition you are
merging, you can move the data in the partition to another empty table
or empty table partition by using the SWITCH PARTITION option of the ALTER TABLE command. This option is discussed in more detail in the following section.