|
The key ingredient in any BI solution is the data.
Data can come from many different places; for example, you could mine
the data from the web (for example, by mining social intelligence data
from blogs), you could have existing business data in a data warehouse
and use SQL Server to analyze the data, or you could simply have a
spreadsheet that you want to use as your back-end data source. In this
exercise, you’ll use SQL Azure as the back-end data source. This
database example will be relatively simple for you to create; it’s
intended to illustrate the integration capabilities as opposed to
comprehensively exploring the heavyweight data processing that you can
do in SQL Azure.
You’ve done this first part of
the walkthrough before, so it should be mostly review at this point. The
data that you’ll create in this exercise will be sales data. It won’t be extensive, but it will be enough to allow you to build some simple BI reports.
1. Create Sales Data for the Business Intelligence Dashboard
1.1. Create Sales Data for the Business Intelligence Dashboard
Click the Database tab in your portal. Create a new database by clicking Create (as shown in the following graphic).

Provide a name (such as Contoso),
and select the edition (which will autopopulate the amount of storage
available). Be sure to make note of the server name and administrator
user name. You can manage and reset the administrator password by
clicking Reset Admin Password. Click
the Firewall Rules accordion control to manage your firewall rules.
Note that you’ll need to ensure that you have the firewall of your
machine registered here so you can access the SQL Azure database. For demonstration purposes, create a firewall rule that is open for your machine name, such as MyServer0.0.0.0-255.255.255.255.
(You wouldn’t want to deploy a database into production with this type
of rule in place; you’d want something more restrictive.) with the rule After
you create your SQL Azure database, you can then navigate away from the
Windows Azure portal and open SQL Server 2008 R2 Management Studio. When
prompted, provide the name of your server and enter the logon
information. Also, click the Options button to expose the Connections
Properties tab, and select Contoso (or whatever you named your SQL Azure
database). Click Connect. SQL Server connects to your new SQL Azure
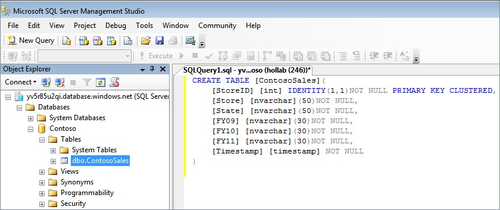
database. You now need to create a table and populate that table with some data. To do this, click the New Query button and then enter the following SQL script to create your new table: CREATE TABLE [ContosoSales](
[StoreID] [int] IDENTITY(1,1)NOT NULL PRIMARY KEY CLUSTERED,
[Store] [nvarchar](50)NOT NULL,
[State] [nvarchar](50)NOT NULL,
[FY09] [nvarchar](30)NOT NULL,
[FY10] [nvarchar](30)NOT NULL,
[FY11] [nvarchar](30)NOT NULL,
[Timestamp] [timestamp] NOT NULL
)
Your SQL Server view should look similar to this graphic.
Now that you’ve created your table, you’ll want to populate it with some data. This data is purely fictional (any relation to real companies is purely coincidental and unintentional), so use the SQL script here as a starting point to add as many records to your database as you’d like: INSERT INTO [ContosoSales]
([Store],[State],[FY09],[FY10],[FY11])
VALUES
('Contoso Sports', 'CO', '1263712', '1332918','1443988')
Eventually
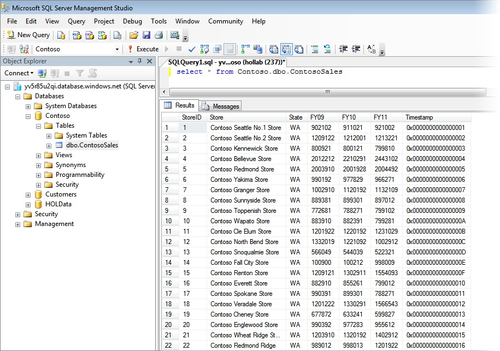
you will have several records. To view all of the records you entered,
type the following script and click the Execute Query button (in this
script, Contoso is the database name and ContosoSales is the table
name): Select * from Contoso.dbo.ContosoSales
The following graphic illustrates the type of results you would see upon entering this SQL script in the query window.
|