Creating a BI
solution using SSRS is one way of integrating SQL Azure and SharePoint;
you can also create more programmatic and interesting BI applications
through code-based solutions.
1. Creating a WCF Service
A WCF service provides a way to abstract access to data or services remotely. WCF services can be called
from many different types of client applications, such as Windows Forms
or Windows Presentation Foundation (WPF) applications, JavaScript or
jQuery-based applications, or Silverlight
applications. Silverlight is an interesting technology for SharePoint
because it is supported natively, and you can create very compelling
user experiences with it. This is also not the first time you’ve seen
Silverlight.
However, creating the WCF service will be just the first part of the exercise; you’ll then create an application that will consume the WCF service to render information returned by the service in SharePoint.
1.1. Create a WCF Service to Access Sales Data
Open
Visual Studio 2010 and click File | New Project. Select Other Project
Types and select Visual Studio Solution. Provide a name for your
solution (such as SalesDataSolution) and click OK.
Right-click
the new solution and select Add | New Project. Select WCF and then
click WCF Service Application. Provide a name for the application (such
as GetContosoSalesData) and click OK.
Right-click the newly added project and select Add | Class. Call the new class SalesData and then amend the code in the class as shown in the bolded code here:
using System;
using System.Collections.Generic;
using System.Linq;
using System.Web;

namespace GetContosoSalesData
{
    public class SalesData
    {
        public string StoreName { get; set; }
        public string StoreID { get; set; }
        public string State { get; set; }
        public string FY09Sales { get; set; }
        public string FY10Sales { get; set; }
        public string FY11Sales { get; set; }
        public int TotalSales { get; set; }

    }
}
Right-click the project and add another new class by clicking Add | Class. Call the new class FiscalSalesData. Amend the code as shown in the bolded code here:
using System;
using System.Collections.Generic;
using System.Linq;
using System.Web;

namespace GetContosoSalesData
{
    public class FiscalSalesData
    {
        public string StoreID { get; set; }
        public string FY09Sales { get; set; }
        public string FY10Sales { get; set; }
        public string FY11Sales { get; set; }
    }
}
Rename Service1 and IService1 to ContosoService and IContosoService respectively. You can do this by double-clicking Service1.svc to show the service code, double-clicking the first instance of Service1, and then clicking Refactor and Rename.
Right-click the project and select Add | Add New Item. Select Data and then click XML. Name the file clientaccesspolicy.xml and click Add. Replace the default XML with the XML shown here:
<?xml version="1.0" encoding="utf-8"?>
<access-policy>
  <cross-domain-access>
    <policy>
      <allow-from http-request-headers="*">
        <domain uri="*"/>
      </allow-from>
      <grant-to>
        <resource path="/" include-subpaths="true"/>
      </grant-to>
    </policy>
  </cross-domain-access>
</access-policy>
Add another new XML file. Call this file crossdomain.xml and then replace the default XML with that shown here:
<?xml version="1.0"?>
<!DOCTYPE cross-domain-policy SYSTEM "http://www.macromedia.com/xml/dtds/cross-domain-
policy.dtd">
<cross-domain-policy>
  <allow-http-request-headers-from domain="*" headers="*"/>
</cross-domain-policy>
Now click Data and Add New Data Source.
Select
Database in the first step of the wizard, and then click Next. Select
Entity Data Model, click Next, and then click Generate From Database.
Click Next.
In
the Choose Your Data Connection dialog box, click New Connection.
Provide the server name and then select the specific database to which
you’d like to connect. Provide a name for your connection (such as ContosoEntities) and click OK. Select the table or tables you’d like to expose in the entity data model.
Now you will amend the service contract code to complete the WCF service. To do this, double-click the IContosoService.cs file and amend the contract code as shown in the bolded code here:
using System;
using System.Collections.Generic;
using System.Linq;
using System.Runtime.Serialization;
using System.ServiceModel;
using System.ServiceModel.Web;
using System.Text;

namespace GetContosoSalesData
{
    [ServiceContract]
    public interface IContosoService
    {
        [OperationContract]
        List<SalesData> GetContosoStoreSales();

        [OperationContract]
        List<FiscalSalesData> GetFiscalSalesData();
    }
}
Now add the following code in the main service code file as shown in bold:
using System;
using System.Collections.Generic;
using System.Linq;
using System.Runtime.Serialization;
using System.ServiceModel;
using System.ServiceModel.Web;
using System.Text;

namespace GetContosoSalesData
{
    public class ContosoService : IContosoService
    {
        List<SalesData> returnAlStoresSalesData = new List<SalesData>();
        List<FiscalSalesData> returnFiscalSalesData = new List<FiscalSalesData>();
        ContosoEntities salesDataContext = new ContosoEntities();

        public List<SalesData> GetContosoStoreSales()
        {
            var salesData = from sales in salesDataContext.ContosoSales
                            select sales;
            foreach (var item in salesData)
            {
                SalesData tempSalesItem = new SalesData();
                tempSalesItem.StoreID = item.StoreID.ToString();
                tempSalesItem.StoreName = item.Store.ToString();
                tempSalesItem.FY09Sales = item.FY09.ToString();
                tempSalesItem.FY10Sales = item.FY10.ToString();
                tempSalesItem.FY11Sales = item.FY11.ToString();
                tempSalesItem.TotalSales = Convert.ToInt32(tempSalesItem.FY09Sales) +
Convert.ToInt32(tempSalesItem.FY10Sales) + Convert.ToInt32(tempSalesItem.FY11Sales);
                returnAlStoresSalesData.Add(tempSalesItem);
            return returnAlStoresSalesData;
        }
        public List<FiscalSalesData> GetFiscalSalesData()
        {
            var salesData = from sales in salesDataContext.ContosoSales
                            select sales;
            foreach (var item in salesData)
            {
                FiscalSalesData tempSalesItem = new FiscalSalesData();
                tempSalesItem.StoreID = item.StoreID.ToString();
                tempSalesItem.FY09Sales = item.FY09.ToString();
                tempSalesItem.FY10Sales = item.FY10.ToString();
                tempSalesItem.FY11Sales = item.FY11.ToString();
                returnFiscalSalesData.Add(tempSalesItem);
            }

            return returnFiscalSalesData;
        }
    }
}
This service code provides you with two main web methods to call: GetContosoStoreSales and GetFiscalSalesData.
The first method uses the data context (created through the entity data
model) to query the sales data and return an aggregate of the sales
data for each of the stores. It does this by performing a real-time
calculation of the total sales across the fiscal years. The second
method similarly uses LINQ to query the data context but this second
instance returns the individual fiscal sales for each of the
stores—using StoreID as the identifier for the store in the returned
data.
With the coding of the WCF service complete, you now need to deploy the service. You can either deploy the service to Windows Azure or you can deploy the service to your
local IIS. Either way will work fine; however, if you deploy with
Windows Azure, you can implement the service in both SharePoint Server
and SharePoint Online via your Silverlight Application. In this
exercise, you’ll deploy to your local Internet Information Service
(IIS). To do this, first create a new folder called AzureSales on your local system drive. This is the virtual directory to which you will publish the service.
To publish the service to the virtual directory you just created, right-click the service project and select Publish.
Select
File System in the Publish Method drop-down list, and then browse to
the new folder you created in the Target Location field.
Click Publish to publish the files to the folder.
Now that you’ve published the files to the virtual directory, you’ll need to create a new web application in IIS.
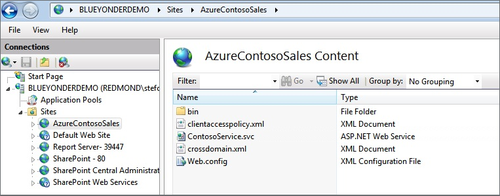
To create a new web application, open IIS 7 and navigate to the Sites node. Right-click and select Add Web Site.
Give your site a name (such as AzureContosoSales), browse to the publish location of your service
for the physical path, click Connect As, select Specific User, and then
click Set to add your user name and password. Finally, provide a unique
port number (such as 8897) for the website.
When done, click the newly added site and click the Content View tab. You should see something similar to the following screen.
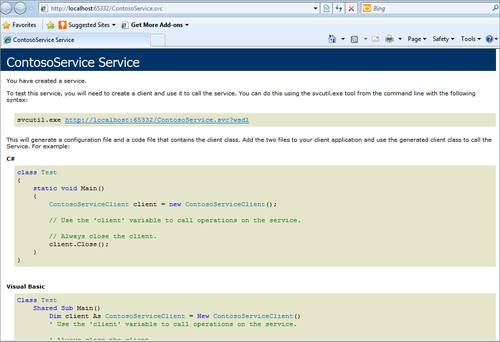
At this point, you can right-click the service
file (for example, ContosoService.svc) and select Browse to invoke your
service. When you invoke your service, you should see something similar
to the following screen. (Note that if you get an error, you might want
to check the settings of your application pool to ensure that it is set
to the right version of the .NET Framework.)