1. Default and named instances
Since SQL
Server 2000, multiple instances (copies) of SQL Server can be installed
on one server, thus providing various benefits, such as the ability to
control the amount of memory and CPU resources granted to each instance,
and the option to maintain different collation and service pack levels
per instance.
As we'll see shortly,
one of the choices during installation of SQL Server is the selection
between a named instance and a default instance. While there can only be
a single default instance per server, the Enterprise edition of SQL
Server 2008 supports the installation of up to 50 named instances.
When connecting to SQL Server, the instance name is specified in the connection string; for example, BNE-SQL-PR-01\SALES
will connect to the SALES instance on the BNE-SQL-PR-01 server. In
contrast, connecting to the default instance requires the server name
only—that is, BNE-SQL-PR-01.
In addition to the instance name, SQL Server 2008 uses an instance ID,
which by default has the same value as the instance name. The instance
ID is used to identify registry keys and installation directories,
particularly important on servers with multiple installed instances.
With this background in mind, let's install an instance of SQL Server using the GUI installation wizard.
2. GUI installation
Rather than bore you
with every installation step, most of which are self-explanatory, I'll
summarize the installation and include screen shots for the most
important steps. Start the installation by running setup.exe from the
SQL Server DVD. The setup process begins with a check on the installed
versions of the Windows Installer and the .NET Framework. If the
required versions are missing, the setup process offers the choice to
install them. After these components are verified (or installed), setup
begins with the SQL Server Installation Center, as shown in figure 1.
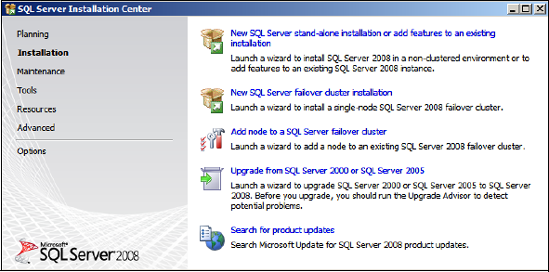
The
Installation Center is the starting point for a wide variety of tasks.
For our example, let's start by clicking the Installation tab and then
selecting the "New SQL Server stand-alone installation or add features
to an existing installation" option. Setup begins with a check for
potential problems that may prevent an installation from completing
successfully. You can view details of the checks by clicking Show
Details. Address any problems preventing installation, or click OK to
continue.
Click Install to install the required setup support files.
In
the Setup Support Rules screen, additional checks are processed before
installation continues; for example, the installer warns of the presence
of Windows Firewall with a warning to unblock appropriate ports. Review
the warnings/failures (if any) and click Next.
The
Installation Type screen lets you choose between installing a new
instance or adding features to an existing instance. For our example,
let's choose the default (Perform a New Installation) and click Next.
The
Product Key screen asks you to select between a free edition
(Enterprise Evaluation or Express) or the option to enter a product key
(supplied with the purchase of SQL Server). Make the appropriate choice
and click Next.
At the license terms screen, review the terms, check the "I accept the license terms" box, and click Next.
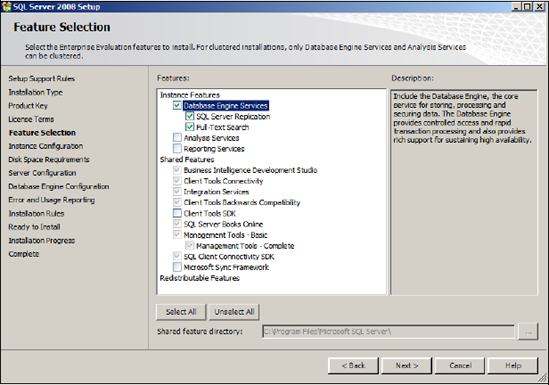
On the Feature Selection screen shown in figure 2,
select the appropriate features and choose an installation directory
(or accept the default). You can display additional information on each
feature by clicking on the feature name. Click Next.
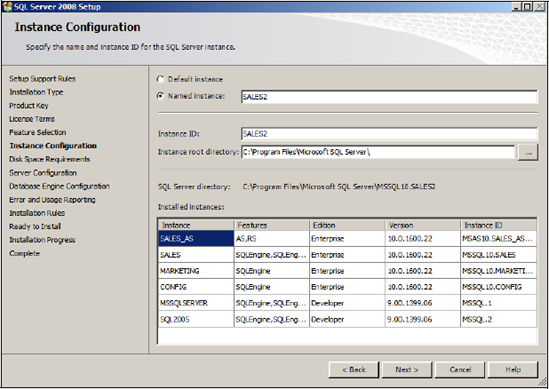
In the Instance Configuration screen, shown in figure 3,
choose between a default or a named instance, enter the instance ID and
root directory (or accept the default settings), and click Next.
The
Disk Space Requirements screen confirms the existence (or absence) of
the necessary disk space for installation to proceed. Review the summary
of required and available space and click Next to continue.
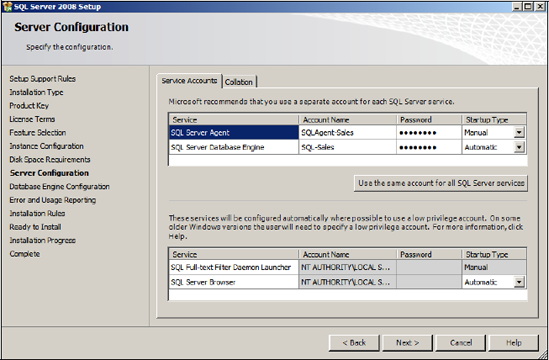
In the Server Configuration screen, shown in figure 4,
enter the account names and passwords for the SQL services, and
optionally change the startup type. These accounts should be created as standard privilege accounts
prior to installation. Before clicking Next to continue, click the
Collation tab to review (and optionally modify) the default collation.
As we covered earlier, use caution when selecting a custom collation.
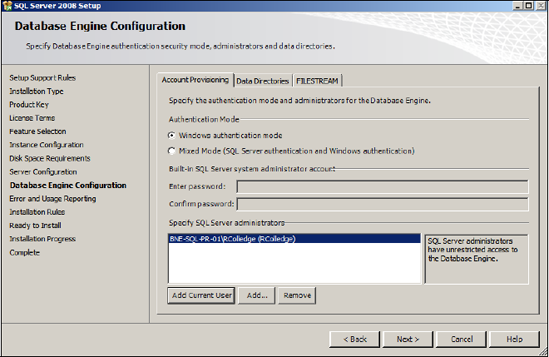
On the first tab of the Database Engine Configuration screen, shown in figure 5, you select the authentication mode for the instance: Windows or Mixed Mode.
Windows authentication mode is the most secure option, and is therefore
the default (and recommended) option. If you choose Mixed Mode, be sure
to enter a strong system administration (SA) account password.
Regardless of the selected authentication mode, click either Add Current
User or Add to select a user to add to the SQL Server administration
group. Unlike earlier versions, SQL Server 2008 setup enforces this
selection as a secure alternative to adding the BUILTIN\Administrators
group to the SQL Server administration role. To continue, click the Data Directories tab.
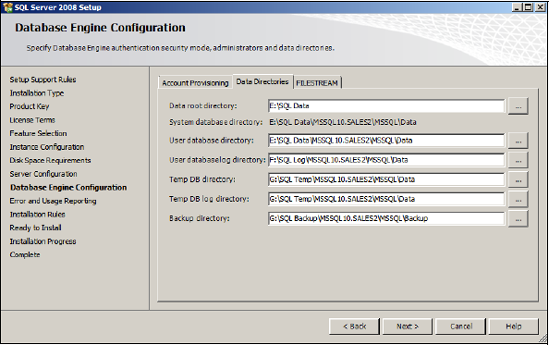
The Data Directories tab, as shown in figure 6,
lets you specify default directories for data, log, tempdb, and backup
directories. As covered earlier, physical disk separation of these
directories is important. After entering the directory locations, click the FILESTREAM tab to continue.
Use the FILESTREAM tab to configure the instance for FileStream access.
FileStream is a new option for binary large object (BLOB) management.
Regardless of the selection at this point, FileStream can be configured
as a postinstallation task. After reviewing the options on this tab,
click Next.
In the remaining installation steps, you'll accomplish the following:
Specify whether to send error reports and feature usage data to Microsoft
Review final installation rules checks
View the summary of installation choices, and click Install to execute the installation based on the previous selections
View the installation progress
On the Completion screen, view the installation log file
When installation is
complete, SQL Server saves the choices you made during setup in
ConfigurationFile.ini, which you'll find in the C:\Program
Files\Microsoft SQL Server\100\Setup Bootstrap\Log\yyyymmdd_hhmmss
directory. You can use this file to confirm the installation proceeded
with the required options, as well as use it as a base for subsequent
unattended installations via the command prompt. We'll cover these
options shortly.
After
installation, you must perform a number of important configuration
activities, such as sizing the tempdb database, setting minimum and
maximum memory values, and creating SQL Agent alerts.
3. Command prompt installations
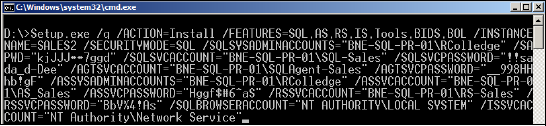
In addition to
using the GUI installation wizard that we've just covered, you can
install SQL Server 2008 from the command prompt, as you can see in figure 7. You can find the syntax and options in SQL Server BOL in the "How to: Install SQL Server 2008 from the Command Prompt" topic.
As mentioned earlier, the ConfigurationFile.ini is created at the end
of a GUI-based installation. This file should be preserved in its
original state for later analysis, but you can make a copy and use it
for subsequent installations at the command prompt via the /Configurationfile parameter, as shown in figure 8.

Command prompt
installations with configuration files are ideal in standardizing and
streamlining installation, particularly when installations are performed
by those without the appropriate SQL Server knowledge.