You often need to modify
database tables after you create them. Fortunately, you can use several
tools to accomplish this task. These tools are the same set of tools you
can use to add, modify, and delete tables: the SSMS Object Explorer,
Table Designer, Database Diagram Editor, and T-SQL. The following
sections touch on each of these tools but focus most heavily on the use
of T-SQL.
Regardless of the method you
use, you must always exercise caution when modifying tables,
particularly in a production environment. Table relationships and the
impact to data that may already exist in a table are key considerations
in modifying a table. A visual tool such as a database diagram can
assist you in determining the impact to related tables and
can be used to generate the T-SQL script. The following section looks
at the underlying T-SQL that can be used to modify a table, and then we
delve into the visual tools that can simplify your life and generate
some of the T-SQL for you.
Using T-SQL to Modify Tables
You can modify tables in many
different ways, including making changes to the columns, constraints,
and indexes associated with a table. Some of the changes have a bigger
impact on the database than others. Some modifications require that the
modified table be dropped and re-created to effect the change.
Fortunately, you can use the T-SQL ALTER TABLE
statement to mitigate the database impact and help streamline many of
the most common modifications. You can make the following types of
changes by using the ALTER TABLE statement:
Change a column property, such as a data type or NULL property.
Add new columns or drop existing columns.
Add or drop constraints.
Enable or disable CHECK and FOREIGN KEY constraints.
Enable or disable triggers.
Reassign partitions.
Alter an index associated with a constraint.
The following sections discuss a few examples of these types of changes to familiarize you with the ALTER TABLE command.
Changing a Column Property
You can use the ALTER COLUMN clause of the ALTER TABLE command to modify column properties, including the NULL property or the data type of a column. Listing 1 shows an example of changing the data type of a column.
Listing 1. Changing the Data Type of a Column by Using ALTER TABLE
alter table titles
  alter column notes varchar(400) null
|
You must be aware of several
restrictions when you modify the data type of a column. The following
rules apply when altering columns:
You cannot modify a text, image, ntext, or timestamp column.
The column cannot be the ROWGUIDCOL for the table.
The column cannot be a computed column or be referenced by a computed column.
The column cannot be a replicated column.
If the column is used in an index, the column length can only be increased in size. In addition, it must be of varchar, nvarchar, or varbinary data type, and the data type cannot change.
If statistics have been generated using CREATE STATISTICS, the statistics must first be dropped before the column can be altered.
The column cannot have a PRIMARY KEY or FOREIGN KEY constraint or be used in a CHECK or UNIQUE constraint. The exception is that a column with a CHECK or UNIQUE constraint, if defined as variable length, can have the length altered.
A column with a default defined for it can have only the length, nullability, or precision and scale altered.
If a column has a schema-bound view defined on it, the same rules that apply to columns with indexes apply.
Tip
Changing some data types can result in changing the data. For example, changing from nchar to char
could result in any extended characters being converted. Similarly,
changing precision and scale could result in data truncation. Other
modifications, such as changing from char to int,
might fail if the data doesn’t match the restrictions of the new data
type. Before you change data types, you should always validate that the
data conforms to the desired new data type.
Adding and Dropping Columns
You add columns to a table by using the ADD COLUMN clause. Listing 2 illustrates the addition of a new column named ISBN to the titles table.
Listing 2. Adding a Column by Using ALTER TABLE
ALTER TABLE titles
  add ISBN int null
|
When you use the ALTER TABLE
statement to add a column, the new column is added at the end of the
table. In most cases, this location is acceptable. The location of the
column in the table generally has no bearing on the use of the table.
There are, however, situations in which it is desired to have the new
column added in the middle of the table. The ALTER TABLE
statement does not work for this situation. To add a column in the
middle of the table, you need to create a new version of the table with a
different name and the columns in the desired order, copy the data from
the old table, drop the old table, and rename
the new table with the old table name. Alternatively, you can also
accomplish this by using SSMS, as described in the following section.
There are also some issues
you need to consider with regard to the null option specified for a new
column. In the case of a column that allows nulls, there is no real
issue: SQL Server adds the column and allows a NULL value for all rows. If NOT NULL
is specified, however, the column must be an identity column or have a
default specified. Note that even if a default is specified, if the
column allows nulls, the column is not populated with the default if no
value is provided for the column. You use the WITH VALUES clause as part of the default specification to override this and populate the column with the default.
With some restrictions, columns can also be dropped from a table. Listing 3 shows the syntax for dropping a column. You can specify to drop multiple columns, separated by commas.
Listing 3. Dropping a Column by Using ALTER TABLE
alter table titles
  drop column ISBN
|
The following columns cannot be dropped:
A column in a schema-bound view
An indexed column
A replicated column
A column used in a CHECK, FOREIGN KEY, UNIQUE, or PRIMARY KEY constraints
A column associated with a default or bound to a default object
A column bound to a rule
Note
Be careful when using ALTER TABLE
to modify columns that hold existing data. When you add, drop, or
modify columns, SQL Server places a schema lock on the table, preventing
any other access until the operation completes. Changes to columns in
tables that have many rows can take a long time to complete and generate
a large amount of log activity.
As mentioned earlier, the ALTER TABLE
statement is not the only T-SQL statement you can use to modify tables.
You accomplish some table changes by using T-SQL that drops and
re-creates the tables that are being modified. The following sections
look at some examples of these types of changes.
Using Object Explorer and the Table Designer to Modify Tables
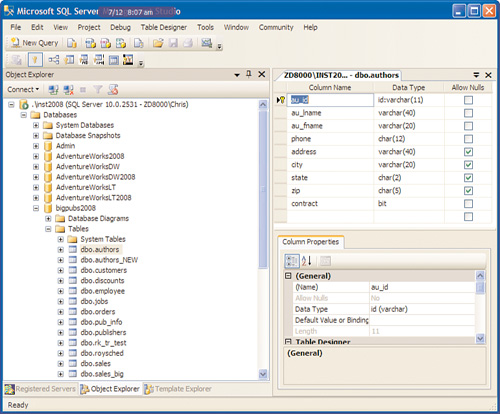
The Object Explorer in SSMS is your window into the various tables available for modification in a database. You expand the Tables
node in the Object Explorer tree and right-click the table you would
like to modify. Then you select the Design option, and a Table Designer
window appears, showing all the table columns. In addition, a Table
Designer menu option appears at the top of the SSMS window. The Table
Designer menu includes many options, including Insert Columns, Delete
Columns, and Remove Primary Key. The full list of available options is
shown in Figure 1. A Table Designer window for the BigPubs2008.Authors table is shown as the active tab on the right side of Figure 1.
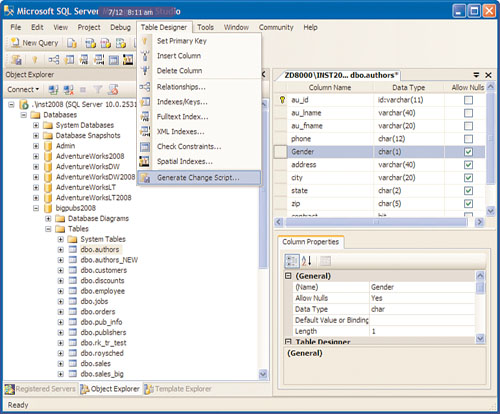
To illustrate the power of the Table Designer, let’s add a new column to the authors table. You can add the column to the middle of the table, just prior to the address column. You do this by highlighting the entire address
row in the Table Designer grid and then selecting Table Designer,
Insert Column. A new data entry row is added to the Table Designer grid,
where you can specify the name of the new column, the data type, and a
null option. For this example, you can name the new column Gender, with a data type of char(1) and the setting ALLOW NULLS. Figure 2 shows the Table Designer grid with the newly added Gender
column highlighted. In addition, the figure shows the Table Designer
menu options with the newly enabled Generate Change Script option
selected.
You do not need to use the
Generate Change Script option for changes you make in the Table
Designer. You can close the Table Designer tab where you made your
changes, and the Table Designer makes the changes for you behind the
scenes. Sometimes, though, you might want to script the changes and see
exactly what is going to happen to the database. Clicking the Script
button is also the preferred method for deploying changes to other
environments. You can save a script in a change repository and execute
it in your target environments. This approach ensures that you have a
repeatable, well-documented means for making table changes.
Listing 4 shows the contents of a script that would be generated based on the new Gender column you added to the authors table. For the sake of space, some of the initial script options and the triggers associated with the authors table have been removed from the script. The important point to note is how extensive this script is. A new temporary authors table is created, and it includes the new column; the data from the authors
table is copied into the temporary table; and then the table is
renamed. In addition, the script must manage the constraints, indexes,
and other objects associated with the authors table. The good news is that Table Designer does most of the work for you.
Listing 4. Changing Script Generated from the Table Designer
ALTER TABLE dbo.authors
   DROP CONSTRAINT DF__authors__phone__04C4C0F4
GO
CREATE TABLE dbo.Tmp_authors
   (
   au_id dbo.id NOT NULL,
   au_lname varchar(40) NOT NULL,
   au_fname varchar(20) NOT NULL,
   phone char(12) NOT NULL,
   Gender char(1) NULL,
   address varchar(40) NULL,
   city varchar(20) NULL,
   state char(2) NULL,
   zip char(5) NULL,
   contract bit NOT NULL
   )  ON [PRIMARY]
GO
ALTER TABLE dbo.Tmp_authors ADD CONSTRAINT
   DF__authors__phone__04C4C0F4 DEFAULT ('UNKNOWN') FOR phone
GO
IF EXISTS(SELECT * FROM dbo.authors)
    EXEC('INSERT INTO dbo.Tmp_authors (au_id, au_lname,
      au_fname, phone, address, city, state, zip, contract)
      SELECT au_id, au_lname, au_fname, phone, address,
         city, state, zip, contract
      FROM dbo.authors WITH (HOLDLOCK TABLOCKX)')
GO
ALTER TABLE dbo.titleauthor
   DROP CONSTRAINT FK__titleauth__au_id__14070484
GO
DROP TABLE dbo.authors
GO
EXECUTE sp_rename N'dbo.Tmp_authors', N'authors', 'OBJECT'
GO
ALTER TABLE dbo.authors ADD CONSTRAINT
   UPKCL_auidind PRIMARY KEY CLUSTERED
   (
   au_id
   ) WITH( STATISTICS_NORECOMPUTE = OFF, IGNORE_DUP_KEY = OFF,
      ALLOW_ROW_LOCKS = ON, ALLOW_PAGE_LOCKS = ON) ON [PRIMARY]
GO
CREATE NONCLUSTERED INDEX aunmind ON dbo.authors
   (
   au_lname,
   au_fname
   ) WITH( STATISTICS_NORECOMPUTE = OFF, IGNORE_DUP_KEY = OFF,
      ALLOW_ROW_LOCKS = ON, ALLOW_PAGE_LOCKS = OFF) ON [PRIMARY]
GO
ALTER TABLE dbo.authors WITH NOCHECK ADD CONSTRAINT
   CK__authors__au_id__03D09CBB
      CHECK (([au_id] like
      '[0-9][0-9][0-9]-[0-9][0-9]-[0-9][0-9][0-9][0-9]'))
GO
ALTER TABLE dbo.authors WITH NOCHECK ADD CONSTRAINT
   CK__authors__zip__05B8E52D
      CHECK (([zip] like '[0-9][0-9][0-9][0-9][0-9]'))
GO
|
You
will find that you can make most of the changes you want to make by
using the Table Designer. To make other changes, you can use the same
approach you just used to add a column. This approach involves making
the changes via the Table Designer menu options and then using the
option to script the change. This is a great way to evaluate the impact
of your changes and to save those changes for later execution.
Using Database Diagrams to Modify Tables
Database diagrams offer an
excellent visual view of your database tables that you can also use to
modify tables. You do this by adding the table you want to modify to a
new or existing database diagram. Oftentimes, it is best to also add all
the related tables to the diagram as well. You can easily do this by
right-clicking the table and choosing the Add Related Tables option.
With a database diagram, you
have the same options that you have with the Table Designer, plus you
have diagramming options. Both the Table Designer and Database Diagrams
menus are shown when a database diagram is in focus. These menus
disappear if you change the tabbed window to a Database Engine query
window, so remember that you must select the diagram window to be able
to display the menu options.
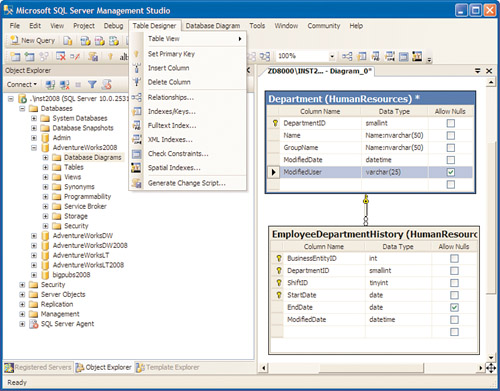
Figure 3 shows a database diagram for the HumanResouces.Department
table, along with its related table. The Table Designer menu is
selected to show that it is available when you work with a database
diagram. You must have one of the tables selected to enable all the menu
options. In Figure 3, the Department table has been highlighted, and a new ModifiedUser column has been added to the end of the table. Figure 3
also shows that the Database Diagram menu is available for selection.
This menu includes options to add tables to the diagram and manipulate
the tables within the diagram.
The same scripting options
are available with a database diagram as are available in the Table
Designer. You can make your changes from within the diagram and then
choose the Generate Change Script menu option. Listing 5 shows the change script generated based on the addition of the ModifiedUser column to the end of the Department table. As expected, this change is accomplished with an ALTER TABLE statement.
Listing 5. The Change Script Generated from a Database Diagram
ALTER TABLE HumanResources.Department ADD
    ModifiedUser varchar(20) NULL
GO
|
The use of the ALTER TABLE
statement in this listing brings us full circle, back to our initial
method for making table modifications. Using all the tools discussed in
this section together will usually give you the best results.