1. Controlling Image Information Using the Layers Panel
When
you work on multi-layered documents, it’s important to understand the
options Photoshop gives you to control image information. For example,
working on a document that contains 20 layers is a difficult
proposition. Fortunately, Photoshop gives you complete control over the
document; everything from layer names to locking pixel information is
available in Photoshop’s bag of image-control tricks. For example, when
linking two layers together, you can move or resize the layers at the
same time, thus saving valuable time. Let’s explore some of the ways you
can control image information with the Layers panel.
Control Image Information
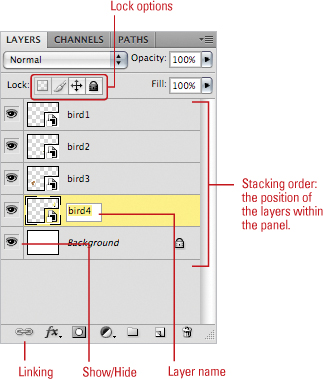
1. Select the Layers panel, and then use one of the following options:
- Layer Name. To name a layer, double-click on the current layer name, type a new name, and then press Enter (Win) or Return (Mac).
- Show/Hide.
To temporarily hide or show a layer (make its contents invisible or
visible in the document window), click the Eyeball button, located in
the Show/Hide box.
- Linking. To link two or more layers, hold the Shift key and click the layers you want to link, and then click the Link Layers
button (located at the bottom left of the Layers panel). The link icon
indicates the layers are linked. Linking lets you move or resize the
layers as a unit.
- Locking. The four available locking options are: Lock Transparent Pixels, Lock Image Pixels, Lock Position, and Lock All.
- Stacking Order.
To change the position of a layer in the stack, drag the layer up or
down. A dark line appears as a visual cue to indicate the new layer
location.
2. Moving Layers Between Documents
Photoshop documents typically
contain multiple layers. One web survey concluded that Photoshop
designers tend to create documents with an average of 14 layers.
Controlling layers is an important aspect of design, because the more
control you maintain, the more organized you are, and the better your
design will be. But what about controlling layers across multiple
documents? For example, you’re working on a design, and you need access
to some additional image information. The only problem is that the
additional information is located in another Photoshop document.
Photoshop gives you the ability to move layers between open documents.
Move Layers Between Documents
1. Open the documents in which you want to move layers.
|
2. To have more than one document in view, click the Window menu, point to Arrange, and then click Cascade or Tile.
|
3. Click on the document containing the layer you want to move.
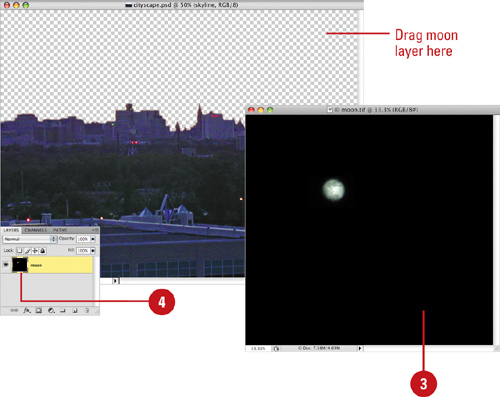 |
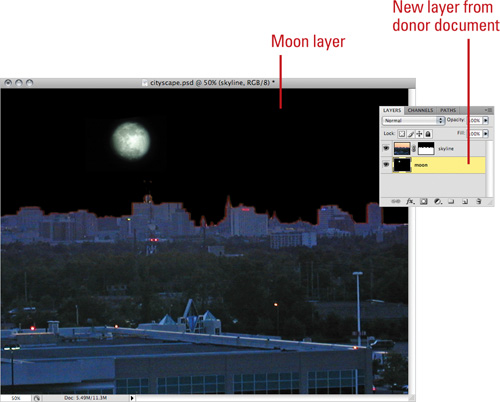
4. Drag the layer from the Layers panel into the window of the receiving document.
Photoshop creates a new layer with a copy of the image information from the other document.
Did You Know?
You can control the position of the moved layer.
Hold down the Shift key while dragging the layer into the other
document. Photoshop aligns the new layer to the center of the receiving
document.
You can move selected portions of a layer.
Select the area you want to move, click the Move tool, and then drag
the selected area directly from the document window into the window of
the receiving document.
 |