|
CorelDRAW’s layer feature provides
invaluable ways not only to organize but also to view complex drawings.
You can create several layers and move shapes between layers. You can
also name layers, control their order and appearance, change object
ordering within layers, group objects, and quickly see object
information. One immediate advantage to adopting layers in your
composition work is that you can hide layers. Suppose you have a lot of
objects that need labels, and you need to print the objects with and
without labels. The solution is to put all the labels on a layer. Hide
the layer, print just the objects, and then unhide the layer and make a
second print: easy!
Exploring the Object Manager
The Object Manager docker is your resource
for viewing layer content and using layers options. With the Object
Manager you can perform a whole range of actions: navigate document
pages, create and name layers, select and move objects between layers,
and set layers as editable, printable, and visible. To open the Object
Manager docker, choose Tools | Object Manager; this is a good
opportunity to give the Object Manager a shortcut key command, as
described earlier: CTRL+ALT+O is available.
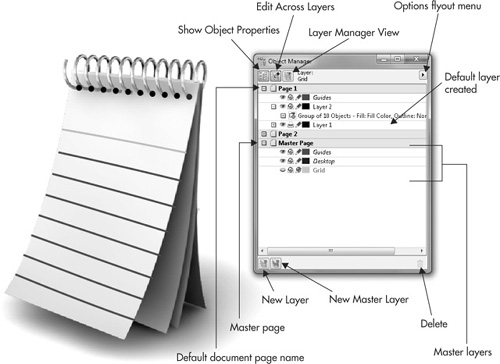
The Object Manager shows a listing of the layers,
each accompanied by options and a flyout menu. A master page also
appears and includes default layers for controlling guides, the desktop,
and grid objects. Figure 1
shows a drawing and what the Object Manager reports for this
composition. There is only one page, the drawing was created on two
layers on Page 1, and highlighted on the Object Manager list is a group
of ten objects, none of which has an outline color or width.
Navigating Pages, Objects, and Layers
The best way to use the Object Manager docker to
navigate through your document, select layers, and to control layer
options is by experimenting; the following steps are a guide.
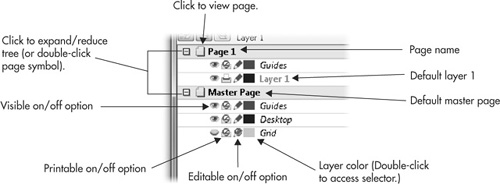
You’ll
learn exactly how these operations are performed. Look at the next
illustration, which shows a default layer structure for a new document.
Navigating and Mastering Layers
The
next steps have no right or wrong execution; rather, they’re simply
exploration steps to get you comfortable with working with layers. This
is why an illustration has already been created for you. You just work
the steps and see how any of several techniques can be applied to your
own work, future and present.
Open Alarming.cdr in CorelDRAW. Open
the Object Manager docker: choose Tools | Object Manager. Look at the
status of the layers. The background—the pattern fill of the clocks—is
locked so it cannot be moved at present. Also, there’s a layer on top
with a default name, and it’s hidden, which means it’s locked.
Investigate a little now; unhide the top layer to see what’s inside.  Okay,
the author is trying to be funny here. The layer contains a third hand,
yet within the context of an alarm clock, it’s really a second hand.
It’s possible now to select the group of objects on Layer 3 by clicking
them with the Pick tool, and if you click a second time, you can rotate
the hand by dragging the rotation handles.
Click twice (slowly, don’t double-click) on the name of Layer 3 on the
Object Manager, and then type a name in the field that’s more
descriptive than “Layer 3” for future reference. Try extra hand, because why not? Double-click
the Extra Hand layer title to open its contents. The hand is several
grouped objects, and they can be moved to the Clock layer. First, rename
the group: click Group Of 36 Objects twice, and then type third hand
in the field. Notice that control nodes are visible when a group or a
single object is selected, and if you chose to assign Zoom To Selected
to a keyboard shortcut , selecting items from the
Object Manager is an easy way to select and then zoom into an object
you want to work on. Double-click
the Clock layer title to open it, and then drag the Third Hand group
down below the layer title, but above the Group Of 233 Objects entry.
Layers have a hierarchy, and if you put the group below the Group Of 233
Objects, the third hand would be hidden from view by the 233 other
objects. 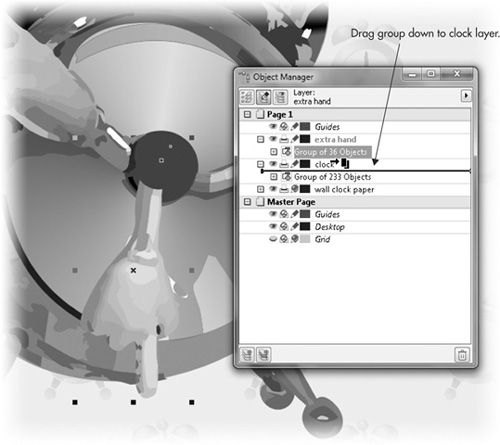 Double-click
the Extra Hand layer title. This action produces precisely nothing,
which indicates that there is nothing nested within the layer. So it’s
okay to delete it—with the layer title highlighted, click the trash
icon. Poof. Caution
There is no confirmation
box with the Delete trash icon; it’s very similar to pressing the
keyboard DELETE key. Be careful how you use it; to undo an inadvertent
deletion, click the workspace to put the document (and not the Object
Manager) “in focus,” and then press CTRL+Z (Edit | Undo).
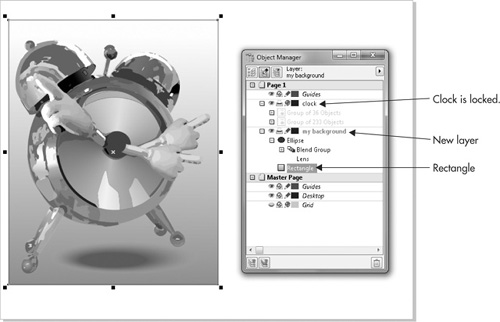
Similarly,
the background is expendable in this composition. Click the Wall Clock
Paper layer title to select it. The layer is locked and you can confirm
this by trying to move the clock pattern with the Pick tool. Click the
Lock or Unlock pencil icon with the red slash over it to make the layer
editable, and then click the Delete button. Tip
Every object on the Object
Manager’s list can be renamed, down to single objects. Consider giving a
very important object a custom name in your own work. Then, at any
time, you can locate the object by conducting a search with the Edit | Find feature, or just by scrolling through the list of objects.
Create
a new layer by clicking the New Layer button. Name it and then drag its
title to the bottom of the layer stack on this page. Click
the new layer highlighted on the Object Manager list, choose the
Rectangle tool from the toolbox, create a rectangle as a background for
the clock, and then apply a fill. Figure 2 shows a linear gradient fill and a blend with transparency added to the new background layer.
Using Object Manager Editing and View States
Objects can be on different layers, and you can edit
across layers in CorelDRAW. Create a new file that has objects on, let’s
say, three layers, to better learn through example about the editing
and view states of CorelDRAW layers. Open the Object Manager docker.
You’ll see three view state buttons at the top of the docker where
information about viewing and editing behavior is set. Clicking each
button toggles its state on or off. Each button has the following
effects:
Tip
You can use Combine, Group,
or Convert To Curves commands on objects in the Object Manager docker
by selecting the objects, right-clicking them, and choosing a command
from the pop-up menu.
Show Object Properties Click
the Show Object Properties button to set whether you want to view a
detailed name for a layer’s contents (color, type of object, and so on),
or just the name, default, or your own custom name. Edit Across Layers
Click the Edit Across Layers button to set whether objects can be
selected, moved, and copied between layers. While cross-layer editing is
disabled, only objects on your current page layer and/or on the desktop
can be selected or edited. While cross-layer editing is enabled, you
can select, move, or edit any object on an unlocked layer. Tip
Use the Object Manager to
PowerClip, change object order, copy object properties, and group
objects by using a right-click-drag action to drag one object onto
another. After you do so, the pop-up menu lists the available commands.
Grouping and PowerClip commands apply only when right-click-dragging
objects within the same layer.
Layer Manager View The
Layer Manager View button toggles your view to show only your
document’s layers. When working with complex drawings that have many
pages, layers, and objects, using this view can make managing layer
properties a lot easier. In this state, all page and object information
is omitted.
Controlling Layer Properties
Using the Layer Properties dialog, you can control
specific properties for each layer. To access these options, right-click
a specific layer in the Object Manager docker, and choose Properties
from the pop-up menu. You can access properties directly from the pop-up
menu, or display a modeless dialog for defining the properties of a
specific layer. There is a minor difference between using the dialog and
the pop-up menu: the pop-up (right-click) menu has the Rename command,
grouped with Delete, Cut, Copy, and Paste.
Options in this dialog control the following layer properties:
Visible
This option enables you to toggle the view state of a layer between
visible or hidden. You can also control the visibility of objects on a
layer by clicking the eye symbol to the left of the layer name. Printable
This option toggles on or off the printing state of objects on the
layer. You can also set whether layer objects are printable by clicking
the Printer symbol beside the layer in the Object Manager docker to
toggle the printing state of objects on the layer. Note
Nonprinting layers will
also not export. If you need objects selected on a nonprinting layer to
be included when exporting, you’ll need to turn on the layer’s Printable
option.
Editable
Use this option to lock or unlock all objects on a layer. While a layer
is locked, its objects can’t be edited (or even selected), which is a
little different from the Lock (object) command. You can also set
whether layer objects are editable by clicking the pencil symbol beside
the layer in the Object Manager docker to toggle the editing state of
objects on the layer. Master Layer
This option is only available after you’ve dragged a layer on the
Object Manager onto the Master Page icon. Changing a layer to a master
layer causes it to become part of the master page structure. Any objects
on a master page appear on all pages. For details on working with
master pages and master layers, see the next section. Layer Color This
selector sets the color swatch as it appears in the docker listing
directly to the left of a layer name, for easy recognition. Layer Color
also determines object colors when viewed using Normal or Enhanced views
while the Override Full Color View option is selected. You can also set
the color coding for a layer by double-clicking the color indicator
next to a layer name to open a typical color selector menu and then
clicking any color from the drop-down color picker. Override Full Color View
Use this option to control how the objects on the layer appear when
viewed using either Normal or Enhanced view. While selected, it has the
effect of displaying all objects in wireframe style, using the layer
color specified.
Working with Master Page Layers
Whenever a new document is created, a master page is
automatically created. The master page isn’t a physical page in your
document, but instead a place where document objects can be placed so
that they appear on every page of your document. Objects on a master
page layer are visible and printable on every page in your document,
making this an extremely powerful feature. For example, a text header or
footer, or a company logo, on a master page layer becomes a quick and
easy way to label all the pages in a pamphlet or brochure.
Moving any object onto a layer on the master page
makes it a master page object and causes it to appear on each page.
Let’s try out this feature.
Working with Master Page Items
Open the Object Manager docker by choosing Tools | Object Manager. Click the New Master Layer button at the lower-left corner of the docker and press ENTER. A new layer is automatically added to the master page with the default name “Layer 2.” With
this new master layer as your current layer, create the object(s) you
wish to appear on every page in their final position and appearance. By
creating the object while the master layer is selected, you cause the
object automatically to become a master layer object. You can also move
objects from other pages onto the master layer by click-dragging them in
the docker list from their position under a layer name to the master
layer name. Click
to select the new master page object(s) on your document page. Notice
that you can still select, move, and edit it. To toggle the lock or
unlock state of your master layer objects, click the Edit button (the
pencil symbol) beside the master page in the docker. Locking prevents
any accidental editing of the master page objects. Add pages to your document by clicking the + button at the lower left of the workspace. As you browse through the pages, you’ll see the same object on all pages.
Several
default layers already exist on your document’s master page for
controlling special items that appear in your document, such as Guides,
Grid, and Desktop. These layers have the following purposes:
Guides layer
This is a global layer for guides you create; if you click the Master
Guides entry on the Object Manager to select it, and then drag a guide
onto the page, all pages in the document will display this guide. If you
need a guide on only one page, you choose that Guides entry on the page
you’re working on, drag a guide from the Rulers, and that guide belongs
to the page and is not a master item. Tip
You can move a local guide,
a guide you created on a page, to the Master Guides entry on the Object
Manager to make it global—it will then appear on every page of your
document.
Grid layer
This controls the appearance of grid lines. You can control the grid
color and visibility, but you can’t set the Grid layer to be printable,
nor can you change its editable objects or add objects to that layer.
Options in the Grid Layer Properties dialog enable you to control the
grid display color and to gain quick access to the Grid page of the
Options dialog by clicking the Setup button in the dialog. To open the
Grid Layer Properties dialog, right-click the Grid layer under the
master page in the Object Manager docker, and choose Properties from the
pop-up menu. Tip
Grid layer visibility can be toggled on or off by clicking its eye icon on the Object Manager.
Desktop layer
This is a global desktop, the place outside of your drawing page. If
you want to keep objects handy but don’t want to print them on your
page, drag the object to this entry on the Object Manager. If you put an
object on the desktop from a layer, you can’t hide it or keep it from
printing, but if it’s explicitly placed on the master desktop, you can
hide it, keep it from being edited, and keep it from printing.
|