Working with Photoshop Tools
Photoshop
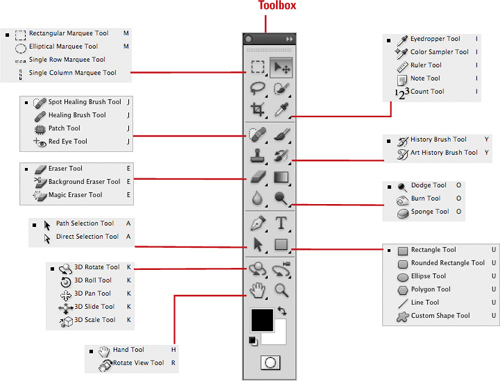
has an abundance of tools that give a Photoshop designer tremendous
control over any creative designing problems that may crop up. For
example, the Photoshop toolbox contains 8 selection tools (you can never
have enough selection tools), 10 painting or shape tools, 4 type tools,
and 12 tools dedicated to restoring and retouching images. Add to that
collection, slicing, sampling, and viewing tools and you have a total of
70 tools. When you work on a document, it’s important to know what
tools are available, and how they can help in achieving your design
goals. Photoshop likes to save space, so it consolidates similar tools
under one button. To access multiple tools, click and hold on any
toolbox button that contains a small black triangle, located in the
lower right corner of the tool button. Take a moment to explore the
Photoshop toolbox and get to know the tools.
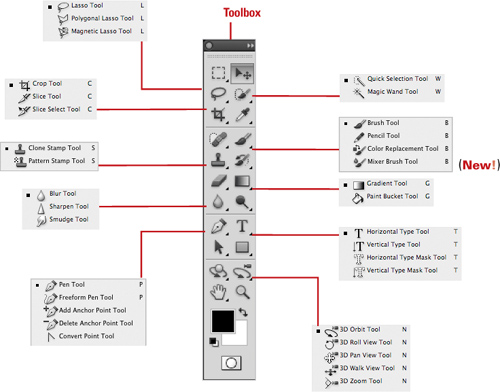
The Photoshop toolbox
contains the tools needed to work through any Photoshop job, but it’s
not necessary to click on a tool to access it. Simply using a letter of
the alphabet can access all of Photoshop’s tools. For example, pressing
the V key switches to the Move tool, and pressing the W key switches to
the Magic Wand tool. In addition, if a button has more than one tool
available, such as the Gradient and Paint Bucket buttons, pressing the
Shift key along with the tool’s shortcut lets you cycle through the
tool’s other options. You can quickly move between tools using
Spring-loaded keys. Rather than go back to the toolbox when you want to
switch tools, just hold down the shortcut letter key for the new tool,
use the tool, and then let go of the shortcut key and you’ll be back
using the first tool.
You can refer to Adobe Photoshop CS5 Keyboard Shortcuts (available for download on the Web at www.perspection.com)
for more information on all the letter assignments for the various
tools. To really get efficient in Photoshop, you need to learn to use
both hands. Use one hand for your mouse or drawing tablet, and the other
on the keyboard to make quick changes of tools and options.
Using the Options Bar
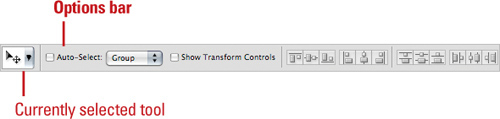
The Options bar displays
the options for the currently selected tool. If you are working with the
Shape Marquee tools, your options include Feather, Style, Width, and
Height. When working with the Brush tools, available tool options
include Size, Mode, Opacity, and Tolerance. The Airbrush mode of the
Brush tool also includes Flow. The Pencil tool options include Auto
Erase along with the standard Brush tool options. The Standard Shape
tool Options bar includes Fill Pixels, Weight, Radius, Style, and Color.
The important thing to remember is that the Options bar is customized
based on the tool you have selected.
Creating a New Document
Creating
a new Photoshop document requires more thought than creating a new word
processing document. For example, there are resolution and color mode
considerations to keep in mind. You can create as many new documents as
you need for your current project. However, since opening more than one
document takes more processing power, it’s probably best to work on only
one new document at a time. Once a new document is created, you have
access to all of Photoshop’s design and manipulation tools to create
anything you can imagine.
Create a New Document
You may find that you use the
same new document size over and over again. To save time, you can save
the settings as a preset. In the New dialog box, click the Preset list
arrow, click a setting, and then change the various options to customize
your new document. To name your customized preset, type a name in the
Name box, and then click Save Preset.