4. AbsoluteLayout
An AbsoluteLayout puts views on the screen wherever you tell it to. It doesn’t
try to resize anything, and it doesn’t try to line anything up; it just
puts things where it’s told. You might think that it would be an easy
type of layout to use, since you don’t have to second-guess how the
layout manager is going to rearrange things on your screen, but in
practice the use of AbsoluteLayout is a bad idea for almost all
applications. You usually want your application to run on as many
Android devices as possible, and the strength of the Android layout
manager is that it will automatically adapt your screen layout from
device to device. AbsoluteLayout bypasses most of the layout manager,
and while your application may look perfect on the device you used for
development, the odds are very good that it will look terrible on other
Android devices.
That warning aside, let’s take a look at an AbsoluteLayout XML
file:
<?xml version="1.0" encoding="utf-8"?>
<AbsoluteLayout xmlns:android="http://schemas.android.com/apk/res/android"
    android:orientation="vertical"
    android:layout_width="fill_parent"
    android:layout_height="fill_parent"
    >
<TextView
    android:layout_width="fill_parent"
    android:layout_height="wrap_content"
    android:text="Upper Left"
    android:layout_x="0.0px"
    android:layout_y="0.0px"
    />
<TextView
    android:layout_width="fill_parent"
    android:layout_height="wrap_content"
    android:text="Middle"
    android:layout_x="140.0px"
    android:layout_y="200.0px"
    />
<TextView
    android:layout_width="fill_parent"
    android:layout_height="wrap_content"
    android:text="Lower Right"
    android:layout_x="240.0px"
    android:layout_y="400.0px"
    />
</AbsoluteLayout>
As with any dimension in a layout file, the positions can be expressed in pixels (px),
device-independent pixels (dp), scaled pixels
(sp), inches (in), or millimeters
(mm), and the dimension has to be a floating-point
number.
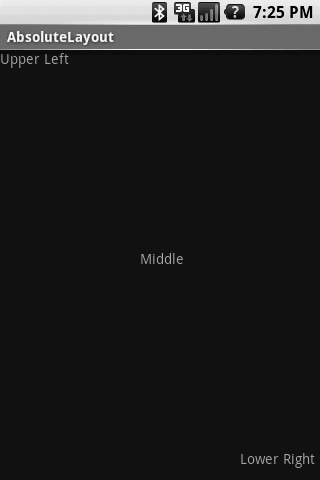
Figure 5 shows
the resulting screen layout. Obviously, the position (0, 0) is the
upper-left corner of the display, and the View is properly flush with
the corner. The lower-right corner on the emulator is supposed to be
(320, 480), but the View appears to be a little shy of that in both
dimensions.
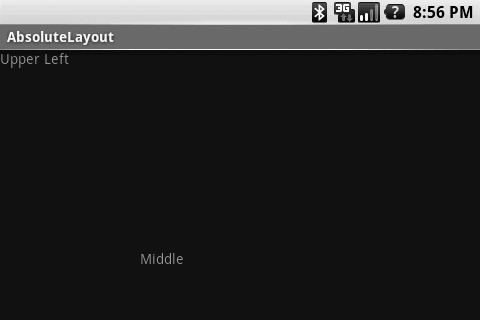
Just to caution against the use of AbsoluteLayout again, we
suggest you try changing the emulator skin to show the screen in landscape mode (enter
emulator -skin HVGA-L
from a
command or terminal window before you run the application), and you can
see in Figure 6 that the
application no longer looks right.
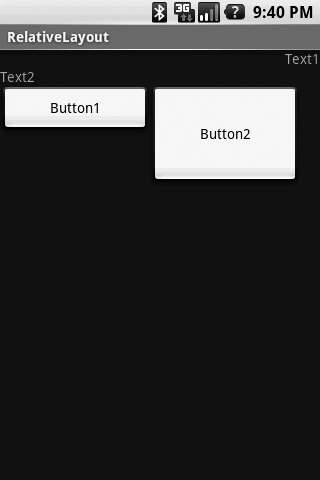
5. RelativeLayout
We’ve used RelativeLayout, often in combination with
LinearLayout, throughout the MJAndroid application. The advantage of
RelativeLayout is that you can express the relative positioning of the
Views in the screen, and the layout manager will do its best to fit them
all on the screen in the proper relations. An example follows:
<?xml version="1.0" encoding="utf-8"?>
<RelativeLayout xmlns:android="http://schemas.android.com/apk/res/android"
    android:orientation="vertical"
    android:layout_width="fill_parent"
    android:layout_height="fill_parent"
    >
  <TextView
    android:id="@+id/txtText1"
    android:layout_width="wrap_content"
    android:layout_height="wrap_content"
    android:text="Text1"
    android:gravity="top"
    android:layout_alignParentRight="true"
    />
  <TextView
    android:id="@+id/txtText2"
    android:layout_width="wrap_content"
    android:layout_height="wrap_content"
    android:text="Text2"
    android:layout_below="@+id/txtText1"
    />
  <Button
    android:id="@+id/btnButton1"
    android:layout_width="150dp"
    android:layout_height="wrap_content"
    android:text="Button1"
    android:layout_below="@+id/txtText2"
  />
  <Button
    android:id="@+id/btnButton2"
    android:layout_width="150dp"
    android:layout_height="100dp"
    android:text="Button2"
    android:layout_toRightOf="@+id/btnButton1"
    android:layout_alignTop="@+id/btnButton1"
  />
</RelativeLayout>
Figure 7 shows
what this looks like in portrait mode (the emulator default), and Figure 8 shows it
in landscape mode. The layout manager has adjusted the
arrangements in each case to match the layout
hints we gave in the XML.