In the Orientation
application, we ignored the precise values coming from the accelerometer
and instead just allowed iOS to make an all-or-nothing orientation
decision. The gradations between these orientations, such as the device
being somewhere between its left side and straight up and down, are
often interesting to an application.
Imagine you are going to
create a car racing game where the device acts as the steering wheel
when tilted left and right and the gas and brake pedals when tilted
forward and back. It is very helpful to know how far the player has
turned the wheel and how hard the user is pushing the pedals to know how
to make the game respond.
Likewise, consider the
possibilities offered by the gyroscope’s rotation measurements.
Applications can now tell if the iPhone is rotating, even if there is no
change in tilt. Imagine a turn-based game that switches between players
just by rotating the iPhone around while it is lying on a table or
sitting in an iPhone charging dock.
Setting Up the Project
In our next example
application, ColorTilt, we take a solid color and make it progressively
more transparent as the user tilts the device left or right or as they
rotate the iPhone faster. We’ll add two toggle switches (UISwitch) to the view to enable/disable the accelerometer and gyroscope.
It’s not as exciting as a car
racing game, but it is something we can accomplish in an hour, and
everything learned here will apply when you get down to writing a great
iPhone motion-enabled application.
Begin by creating a new View-Based iPhone Application in Xcode and calling it ColorTilt.
Adding the Core Motion Framework
Because
this project relies directly on Core Motion, we’ll need to add the Core
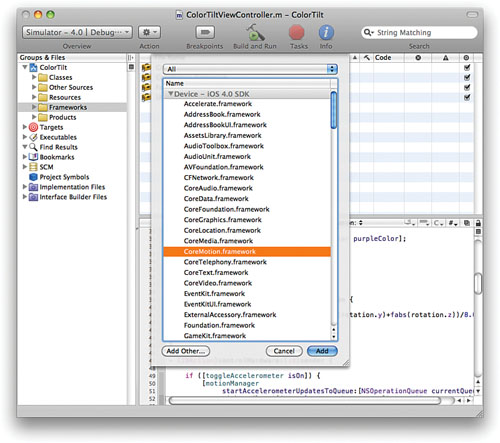
Motion framework for our code to work. Right-click the Frameworks group
in Xcode, and choose Add, Existing Frameworks.
Choose CoreMotion.framework from the list that appears, and then click the Add button, as shown in Figure 1.

Adding Outlets, Actions, and Properties
Our next step is to update the
ColorTiltViewController.h file with the appropriate outlets and actions
that we’ll need for the application.
Specifically, you should add an outlet for a UIView that will change colors—colorView, as well as two UISwitch instances—toggleAccelerometer and toggleGyroscope. We’ll also need an instance variable for our CMMotionManager object, which we’ll call motionManager.
Create corresponding @property declarations for each of these so we can access them easily from our application. As a final step, add an IBAction called controlHardware that will be used to enable or disable accelerometer and gyroscope readings.
The ColorTiltViewController.h file should read as shown in Listing 1.
Listing 1.
#import <UIKit/UIKit.h>
#import <CoreMotion/CoreMotion.h>

@interface ColorTiltViewController : UIViewController {
    IBOutlet UISwitch *toggleAccelerometer;
    IBOutlet UISwitch *toggleGyroscope;
    IBOutlet UIView *colorView;
    CMMotionManager *motionManager;
}

-(IBAction)controlHardware:(id)sender;

@property (nonatomic, retain) CMMotionManager *motionManager;
@property (nonatomic, retain) UISwitch *toggleAccelerometer;
@property (nonatomic, retain) UISwitch *toggleGyroscope;
@property (nonatomic, retain) UIView *colorView;

@end
|
For each of the @property declarations, we need a corresponding @synthesize line in the ColorTiltViewController.m implementation file. Add the following lines immediately following the @implementation line:
@synthesize motionManager;
@synthesize toggleAccelerometer;
@synthesize toggleGyroscope;
@synthesize colorView;
Next, let’s make sure we clean up after ourselves by releasing these objects in the ColorTiltViewController.m’s dealloc method:
- (void)dealloc {
    [motionManager release];
    [toggleAccelerometer release];
    [toggleGyroscope release];
    [colorView release];
    [super dealloc];
}
Preparing the Interface
Like the Orientation
application, the ColorTilt application’s interface isn’t a work of art.
It requires a few switches, labels, and a view. Open the
ColorTiltViewController.xib file in Interface Builder by double-clicking
it.
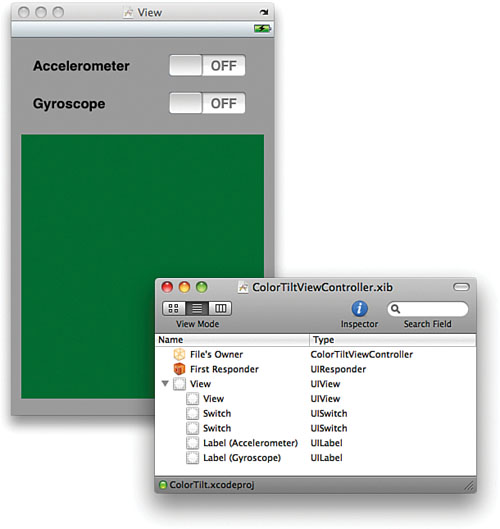
Lay out the user interface as follows:
1. | Add two UISwitch
instances at the top-right of the view, one above the other. Use the
Attributes Inspector (Command+1) to set each switch to Off by default.
|
2. | Add two labels (UILabel), Accelerometer and Gyroscope, to the view, positioned beside each switch.
|
3. | Drag a UIView
instance into the view and size it to fit in the view below the
switches and labels. Use the Attributes Inspector to change the view’s
background to green.
|
Your view should now resemble Figure 2. If you feel like arranging the controls differently, feel free!

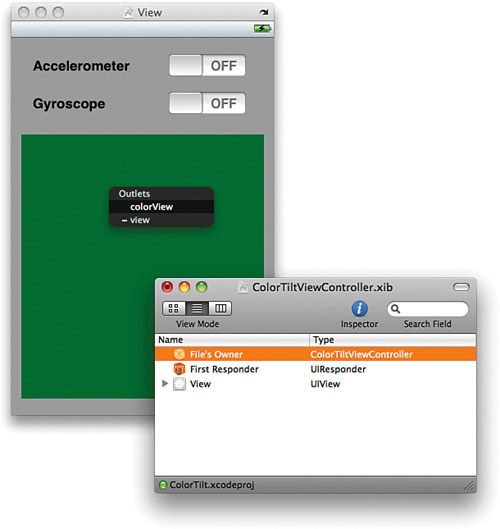
To connect the interface to the outlets defined earlier, begin by Control-dragging from the File’s Owner icon to the UIView, as shown in Figure 3. Choose colorView when prompted. Repeat the process for the two switches, connecting toggleAccelerometer to the switch beside the Accelerometer label and toggleGyroscope to the switch by the Gyroscope label.

To finish the interface, the two switches need to be configured to invoke the controlHardware method when their Value Changed
event occurs. Open the Document window so that the File’s Owner icon is
visible. Next, select each switch, open the Connections Inspector
(Command+2), and then drag from the circle beside Value Changed to the
File’s Owner icon and choose controlHardware when prompted. (Yes, both switches connect to the same action!)
Save the XIB file and return to Xcode when finished.