Besides drawing individual
graphics on the screen, there are various other useful effects that we
can perform by using sprites. Let's take a look at a few of these
effects: background images, fading to black, and fading between images.
1. Setting a Background Image
Games with solid color backgrounds can look a bit
dull, but we can liven things up by drawing a single sprite that
precisely fills the background of the game area. Because the sprite
results in the entire screen being redrawn, there is no need for the Draw code to clear the graphics device, which saves a little bit of graphics processing time.
The background is then drawn by specifying a render
rectangle rather than a sprite position and ensuring that the rectangle
fills the entire screen. We can actually obtain such a rectangle from
XNA very easily by querying the Game.Window.ClientBounds property. This returns a Rectangle structure that corresponds with the dimensions and position of the game window.
Provided that we draw the background first (or use a layerDepth
value that ensures it appears behind everything else), this will draw
the background texture to fill the screen and allow all our other
graphics to appear on top. The code to achieve this is shown in Listing 1.
Example 1. Using a sprite to create a background image
protected override void Draw(GameTime gameTime)
    {
        // No need to clear as we are redrawing the entire screen with our background image
        //GraphicsDevice.Clear(Color.CornflowerBlue);

        // Begin the spriteBatch
        _spriteBatch.Begin();
        // Draw the background image
        _spriteBatch.Draw(_backgroundTexture, this.Window.ClientBounds, Color.White);
        // Draw the smiley face
        _spriteBatch.Draw(_smileyTexture, _smileyPosition, Color.White);
        // End the spriteBatch
        _spriteBatch.End();

        base.Draw(gameTime);
    }
|
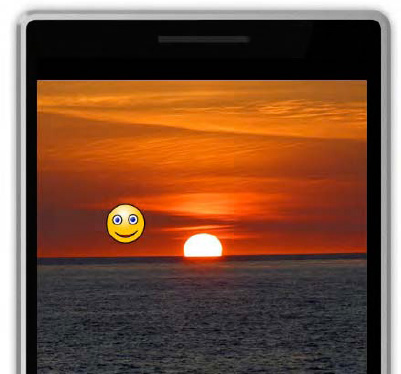
This can be seen in action in the BackgroundImage
example project. Note that we use a JPEG image for the background
because it is a photograph, which reduces the size of the compiled
application—just make sure that the picture is of the same aspect ratio
as the screen (tall and thin) so that it isn't distorted when it is
displayed. Figure 1 shows the output from this project.
2. Fading to Black
A common and useful effect seen on TV and in films is the fade to black,
which simply involves fading away everything on the screen to
blackness. This is great for scene transitions because it allows the
content of the entire screen to be updated without any jarring movement.
It can add a layer of presentational sparkle to games, too, perhaps
fading from the title screen into the game or fading between one level
and the next.
We can implement a fade to black very easily by first
drawing all the content on the screen and then rendering a full-screen
sprite over the top, colored black and with variable alpha intensity. To
fade to black, we start with an alpha value of 0 (transparent), at
which point the sprite will be invisible, and fade to 255 (opaque), at
which point the sprite will completely obscure everything on the screen.
Once we reach this point, the rest of the scene can be changed in
whatever way is appropriate, and the alpha level faded back toward zero
to fade the scene into visibility again.
Because the texture we need for the sprite is just a
solid color, we can actually create the texture in code rather than
having to add an image to the Content project. We can create a new
texture by specifying the device on which we will render it (a reference
to which is stored in the Game class's GraphicsDevice
property) along with its width and height. We can create the texture
with a width and height of just 1 pixel because XNA will happily stretch
it to whatever size we want.
Perhaps surprisingly, we will tell XNA to make the
texture's only pixel white rather than black because we can tint it
black when we draw it. Setting the texture up this way means that we
could also tint it any other color should we wish: fading to white,
green, or powder blue as suits our game.
First then, let's look at the code that creates the texture, which can be seen in Listing 2. This is extracted from the project's LoadContent method. It creates the Texture2D object and then calls its SetData
method to pass in the colors for the texture pixels. If the texture
were larger, this would set a pixel for each provided array element,
working horizontally across each row from left to right and then
vertically from top to bottom. Our array has just a single element to
match the pixels in the texture.
Example 2. Creating the fader texture
// Create the texture for our fader sprite with a size of 1 × 1 pixel
        _faderTexture = new Texture2D(GraphicsDevice, 1, 1);
        // Create an array of colors for the texture -- just one color
        // as the texture consists of only one pixel
        Color[] faderColors = new Color[] {Color.White};
        // Set the color data into the texture
        _faderTexture.SetData<Color>(faderColors);
|
The texture is then used in the Draw method, as shown in Listing 3.
In this example, we draw a number of smiley faces onto the background
and then draw the fader in front. The alpha level for the fader is
stored in a class variable named _faderAlpha, which is faded between 0 and 255 in the Update method.
Example 3. Drawing the fader texture
protected override void Draw(GameTime gameTime)
    {
        GraphicsDevice.Clear(Color.CornflowerBlue);

        // Begin the spriteBatch
        _spriteBatch.Begin(SpriteSortMode.Deferred, BlendState.NonPremultiplied);

        // Draw the smiley face sprites
        for (int i = 0; i < _smileyPositions.Length; i++)
        {
            _spriteBatch.Draw(_smileyTexture, _smileyPositions[i], Color.White);
        }

        // Draw the fader
        _spriteBatch.Draw(_faderTexture, this.Window.ClientBounds,
new Color(0, 0, 0, _faderAlpha));

        // End the spriteBatch
        _spriteBatch.End();

        base.Draw(gameTime);
    }
|
Each time the fader reaches maximum opacity, the
positions of the smiley faces are all updated, but we never see them
move because they are always obscured when this takes place. For the
full code and to see this running, take a look at the FadeToBlack example project.
3. Fading between Images
Similar to the fade to black effect is the fading
between images effect. It is essentially the same technique, but it uses
two sprites containing images rather than one sprite containing solid
color. By using a series of images, slideshow effects can be set up,
providing a very pleasant transition between each pair of images.
The effect can be seen in the FadeBetweenImages
example project. Although XNA provides a beautiful smooth transition
between the images, unfortunately a picture doesn't speak 1,000 words in
this case because it doesn't look very impressive at all on paper—it
needs to be seen in motion.
We can take a quick look at the code, though. We set up an array of three different background textures and load them in the LoadContent
method. To make the fade work, we store the index through the array of
the current background image (which is the image that will be fading
away) in the _backgroundImageIndex variable and the fader image (which is the image that will be fading into view) in the _faderImageIndex variable. These are initially given the values 0 and 1, respectively.
The Draw method, shown in Listing 4,
should look very similar because it's just like the previous listing.
Note that the tint color is now white rather than black so it shows in
its normal colors.
Example 4. Drawing the fading images
protected override void Draw(GameTime gameTime)
    {
        // No need to clear as we are drawing a full-screen image
        //GraphicsDevice.Clear(Color.CornflowerBlue);

        // Begin the spriteBatch
        _spriteBatch.Begin(SpriteSortMode.Deferred, BlendState.NonPremultiplied);
        // Draw the background image
        _spriteBatch.Draw(_backgroundTextures[_backgroundImageIndex],
this.Window.ClientBounds, Color.White);
        // Draw the fader
        _spriteBatch.Draw(_backgroundTextures[_faderImageIndex], this.Window.ClientBounds,
new Color(255, 255, 255, _faderAlpha));
        // End the spriteBatch
        _spriteBatch.End();

        base.Draw(gameTime);
    }
|
The Update code simply increments the value of _faderAlpha,
waiting for it to exceed 255. When this happens, it is reset back to 0,
and the image index variables are incremented. We use the %
modulus operator to automatically reset the index variables back to 0
once they reach the defined image count. The fade can, of course, be
made faster by adding a greater value to _faderAlpha; to slow it down, the variable could be converted to a float and a fractional value added. The relevant part of the code is in Listing 5.
Example 5. The Update code to fade between the series of images
// Increment the opacity of the fader
        _faderAlpha += 1;
        // Has it reached full opacity?
        if (_faderAlpha > 255)
        {
            // Yes, so reset to zero and move to the next pair of images
            _faderAlpha = 0;
            _backgroundImageIndex = (_backgroundImageIndex + 1) % IMAGE_COUNT;
            _faderImageIndex = (_faderImageIndex + 1) % IMAGE_COUNT;
        }