4.6. Using the Mobile 3D Graphics API (JSR-184)
Before starting, it would be a good idea to run through
some basic online tutorials
or even get hold of [Malizia 2006]. We assume that the reader is
familiar with 3D concepts such as meshes, transforms, cameras, vector
mathematics, and so on, and we do not cover them in detail here.
JSR-184, also
referred to as M3G, allows developers to load and animate 3D assets with
very few lines of code. Unlike many other 3D graphics libraries (such
as OpenGL and DirectX), M3G supports two programming models which can be
freely mixed together. In retained
mode, you usually require fewer lines of code to get your content
on-screen, but you do so at the cost of low-level control. Retained mode
operates on the concept of a scene graph where the world is represented
by a tree of nodes with the World node
at the root. This includes meshes, lights, cameras, 3D sprites, and so
on. You can also group subsets of nodes together and operate on the
group as a whole.
Immediate
mode is more like OpenGL where you send commands directly to the
graphics hardware for execution. You have much more fine-grained control
in immediate mode. These modes are logical ones not actual – you don't
specify a mode to code in, rather it is implicit from the way you
structure your program.
M3G is not a
replacement for non-Java mobile graphics technologies such OpenGL ES and
Direct3D Mobile but rather should be regarded as a complementary
technology. For example, on Symbian OS, the JSR-184 implementation uses
the OpenGL ES libraries directly and therefore M3G automatically
benefits from any hardware acceleration chip present on the device.
You can create
3D content programmatically using (a lot) of code but that is only
useful for small applications and demos. To use rich content, developers
usually import the 3D world from a special M3G file. This is a file
format specific to JSR-184 that can hold animations, textures, cameras,
lights, materials, meshes, and so on. A Java ME MIDlet can include .m3g files in its JAR or download them from a server.
Commercial modeling tools such
as 3D Studio come complete with the option to export a model in M3G
format. Unless you are a professional, you probably won't have access to
this, however, there is an open-source alternative called Blender which you can download for free from www.blender.org (see Figure 6).
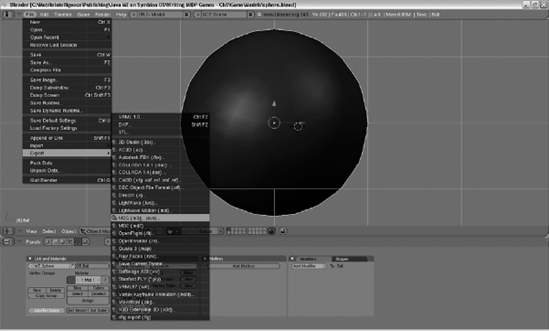
Blender does not include the option to export models in M3G file format by default, but there is a way around this. Blender supports extension via Python scripts and one such well-known script (m3g_export.py) can be found online. To get this to work correctly on Windows, you need to install Python (at least v2.5.x) and you need to copy m3g_export.py to your blender script directory – normally C:\Program Files\Blender Foundation\Blender\.blender\scripts.
When that is working you can create entire 3D worlds and easily use them in Java MIDlets by using the static Loader class which de-serializes a stream of classes that derive from Object3D
into a convenient array. In the sample game, we use a sphere mesh to
represent distant planets and orbiting objects. Below is the code which
shows how the sphere model shown in Figure 8.8 is loaded from the M3G file into the MIDlet proper:
Mesh sphere;
private void loadModels(){
  Object3D[] objects = null;
  try{
    objects = Loader.load(... + "sphere.m3g");
    World world = null;
    // find the world node first
    for(int i = 0; i < objects.length; i++){
      if(objects[i] instanceof World){
        world = (World) objects[i];
        break;
      }
    }
    if(world != null){
      for(int i = 0; i < world.getChildCount(); i++){
        Node node = world.getChild(i);
        if(node instanceof Mesh){
          sphere = (Mesh) node;
          break;
        }
      }
      if(sphere != null){
        setUpUniverse();
      }
    ...
Before we can draw
anything with M3G we need to set up our graphics environment. Since this
game is a first-person-shooter game, we always position the camera at
the point of view of the player. In this case, our model only includes
the sphere mesh so we have to add our own camera and lights during
setup:
private void initialiseGraphics(float width, float height){
  // set up a camera
  camera = new Camera();
  // set up a 60 degree FOV
  camera.setPerspective(60.0f, width / height, 0.1f, ...);
  ...
  // set up basic lighting
g3d = Graphics3D.getInstance();
  g3d.resetLights();
  // add a white ambient light at full intensity
  Light light = new Light();
  light.setMode(Light.AMBIENT);
  light.setColor(0xffffff);
  light.setIntensity(1.0f);
  light.setRenderingEnable(true);
  g3d.addLight(light, identity);
  ...
In M3G, many of the visual properties that describe a Mesh can be specified using the Appearance class. This is a container class that holds child objects such as Material (how the object responds to different light colors), PolygonMode (shading model, winding and culling mode) and Fog.
Once you're an experienced 3D
modeler you can specify these features during the design phase but for
now we define them in code for two reasons: it gives us the flexibility
to experiment easily and it allows us to demonstrate a very useful
technique. A mesh is expensive to create and takes up a fair bit of
memory when you consider all the vertices, texture coordinates, material
data, and so on. So in a mobile game we want to re-use the same mesh as
much as possible.
In our sample game, the HiggsParticle class is a subclass of the Mesh
class. When a new attack is launched at the player consisting of, say,
10 particles, we do not want 10 copies of the same mesh in memory. What
we can do instead is to use a single mesh and change the material
properties of its Appearance object. If we do this, we can simply render the same mesh multiple times by specifying different transforms and materials.
In Figure 1,
you can see a large blue-green planet off in the distance and a small
red-orange orbiting planetoid at the lower right. The following code
snippet shows how, during game setup, we create materials and transforms
for each of these while re-using the same mesh:
// setup an Appearance object and Materials
private void setUpUniverse(){
  appearance = sphere.getAppearance(0);
  polygonMode = appearance.getPolygonMode();
  polygonMode.setCulling(PolygonMode.CULL_BACK);
  polygonMode.setShading(PolygonMode.SHADE_SMOOTH);
  planetoidMaterial = new Material();
  planetoidMaterial.setColor(Material.AMBIENT, 0x00ff8000);
  planetoidMaterial.setColor(Material.DIFFUSE, 0xFF876A56);
  planetoidMaterial.setColor(Material.SPECULAR, 0x00C0C0C0);
  planetoidMaterial.setShininess(35.0f);
  blueGreenMaterial = new Material();
  blueGreenMaterial.setColor(Material.AMBIENT, 0x00000ff8);
  blueGreenMaterial.setColor(Material.EMISSIVE, 0x0000002a);
blueGreenMaterial.setColor(Material.DIFFUSE, 0xFF876A56);
  blueGreenMaterial.setColor(Material.SPECULAR, 0x0000a0a0);
  blueGreenMaterial.setShininess(90.0f);

  // initialize
  trOrbitingPlanetoid = new Transform();
  trBigRemoteBlueGreen = new Transform();

  trOrbitingPlanetoid.postTranslate(−40.0f, 0.0f, −10.0f);

  float bigScale = 100.0f;
  trBigRemoteBlueGreen.postTranslate(100.0f, 200.0f, −800.0f);
  trBigRemoteBlueGreen.postScale(bigScale,bigScale,bigScale);
Once everything is loaded and initialized, it is time to draw. The M3G
model is analogous to that of the SVG model. Firstly we bind our
standard MIDP Graphics context to the static instance of the Graphics3D
class from JSR-184. Since we are in immediate mode we need to set up
our camera each time we draw, execute a series of graphics commands and
then release our graphics context.
private void draw3D(Graphics g) {
  try{
    g3d = Graphics3D.getInstance();
    g3d.bindTarget(g, true, Graphics3D.ANTIALIAS |
                           Graphics3D.TRUE_COLOR |
                               Graphics3D.DITHER);
    g3d.clear(backGround);
    g3d.setCamera(camera, gameEngine.getPlayerLocation());
    drawUniverse();
  }
  catch(Exception e){
    e.printStackTrace();
  }
  finally{
    g3d.releaseTarget();
  }
}
The Graphics3D class has a number of render() method overloads, the most useful being the one that takes a Node and a Transform
as parameters. This allows us to use the technique outlined above
simply by changing the mesh material and supplying a different transform
to the render() method.
private void drawUniverse(){
  ...
  // move the small orbiting planetoid
  trOrbitingPlanetoid.postTranslate(−1.0f, 0.0f, 0.0f);
  trOrbitingPlanetoid.postRotate(−1.0f, 0.0f, 1.0f, −0.6f);
  // draw the planetoid
sphere.setTransform(trOrbitingPlanetoid);
  appearance.setMaterial(planetoidMaterial);
  g3d.render(sphere, trOrbitingPlanetoid);
  // now draw the distant stationary planet
  sphere.setTransform(trBigRemoteBlueGreen);
  appearance.setMaterial(blueGreenMaterial);
  g3d.render(sphere, trBigRemoteBlueGreen);
}
Normally in 3D games you need a
fair bit of vector and matrix mathematics to determine if any two
objects collide in space. However, in an FPS game, such as Finding Higgs,
which has a high rate of fire and runs on a mobile phone, performing
these calculations to determine if your shot hit its target can very
quickly become a performance bottleneck.
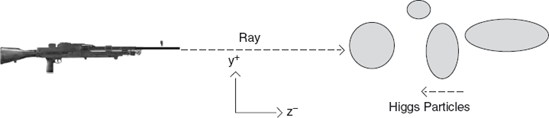
In M3G, collisions can be detected using the pick() method of the Group class. This method takes two vectors and a RayIntersection instance as inputs. The first vector is a position in space and the second is a direction. What happens (see Figure 7) is that the pick()
method finds the first object in the group (in z-order) that was
intersected by a ray fired from the position represented by the first
vector (the position of the player in space) in the direction of the
second (down the axis of the gun towards the attackers).
It only performs the check against group members for which picking is enabled and on return the RayIntersection instance contains information such as the Node that was picked, the distance to it, and so on. If no node was picked, the getIntersected() method returns null.
It should be obvious that
this saves us a lot of work in our sample game. In our context,
'picking' means getting shot, so to determine if we hit an attacking
Higgs particle, we only need to do the following:
private void handleWorldCollisions(){
  if(isFiring()){
  ...
  // extract vectors from current player transform
  float[] plyrPos = new float[16];
trPlayer.get(plyrPos);
  RayIntersection rayIntersection = new RayIntersection();
  attackGroup.pick(−1, plyrPos[3], plyrPos[7], plyrPos[11], // player loc
              - plyrPos [2], - plyrPos [6], - plyrPos [10], // direction
                                          rayIntersection);

  Node hit = rayIntersection.getIntersected();
  if(hit != null){
    numberOfHits++;
    updateScore();
    hit.setRenderingEnable(false); // don't show it again
    hit.setPickingEnable(false);   // don't allow it to be picked again
    ...
One last point to make with our
sample game is that it also demonstrates the large effect that the
number of pixels to be updated has on frame rate. As you move the camera
around the 3D universe, the large blue-green planet in the distance
comes in and out of view. Since this game always displays the current
frame rate in the top left corner you can see the frame rate vary
sharply as this happens. As you do this take into account that the small
orbiting planetoid is the same mesh (therefore has the same polygon
count) but occupies far fewer pixels on the screen.