We’ll be using a label (UILabel) and a few buttons (UIButton)
as our “study subjects” for this tutorial. Feel free to swap them out
with other interface elements to see how rotation and resizing is
handled across the iPhone object library.
Setting Up the Project
Begin by starting Xcode and creating a new application, SimpleSpin,
using the Apple View-Based iPhone Application template. Although all
our UI work will take place in Interface Builder, we’ll still need to
enable interface rotation with the shouldAutorotateToInterfaceOrientation: method.
Open the implementation file for the view controller (SimpleSpinViewController.m), and then find and uncomment shouldAutorotateToInterfaceOrientation:.
Because we’re not controlling the view programmatically at all, we’ll
go ahead and enable all possible iPhone screen orientations by returning
YES from this method.
The finished method implementation should resemble Listing 1.
Listing 1.
- (BOOL)shouldAutorotateToInterfaceOrientation:
        (UIInterfaceOrientation)interfaceOrientation {
    return YES;
}
|
Save
the implementation file and switch to Interface Builder by opening the
XIB file that defines the application’s
view—SimpleSpinViewController.xib. All the rest of our work for this
example will take place in this file.
Building a Flexible Interface
Creating a rotatable and resizable interface starts out like building any other iPhone interface—just drag and drop!
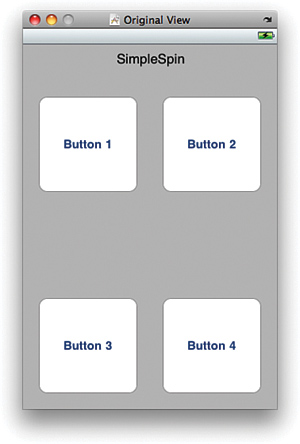
Using the Library (Tools, Library), drag a label (UILabel) and four buttons (UIButton) to the SimpleSpin view. Center the label at the top of the view and title it SimpleSpin. Name the buttons so you can tell them apart—Button 1, Button 2, Button 3, and Button 4. Position them below the label, as shown in Figure 1.
Testing Rotation
You’ve now built a simple
application interface, just as you have in earlier lessons. To get an
idea of what the interface looks like when rotated, click the curved
arrow in the upper-right corner of the Interface Builder’s view window,
as shown in Figure 2.

As
you might expect, the reoriented view does not look “quite right.” The
reason is that objects you add to the view are, by default, “anchored”
by their upper-left corners. This means that no matter what the screen
orientation is, they’ll keep the same distance from the top of the view
to their top and from left of the view to their left side. Objects also,
by default, are not allowed to resize within the view. As a result all
elements have the exact same size in portrait or landscape
orientations—even if they won’t fit in the view.
To fix our problem and create an iPhone-worthy interface, we need to use the Size Inspector.
Understanding Autosizing in the Size Inspector
As you’ve grown more experienced
building iPhone applications, you’ve gotten accustomed to using the
Interface Builder Inspectors. The Attributes and Connections Inspectors
have been extremely valuable in configuring the appearance and
functionality of your application. The Size Inspector (Command+3), on
the other hand, has remained largely on the sidelines, occasionally
called on to set the coordinates of a control but never used to enable
functionality—until now.
The magic of autorotating and autoresizing views is managed entirely through the Size Inspector’s Autosizing settings, shown in Figure 3.
This deceptively simple “square in a square” interface provides
everything you need to tell Interface Builder where to anchor your
controls and in which directions (horizontally or vertically) they can
stretch.
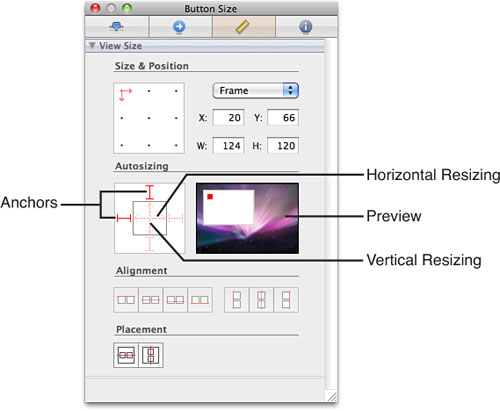
To understand how this
works, imagine that the inner square represents one of your interface
elements and the outer square is the view that contains the element. The
lines between the inner and outer square are the anchors. When clicked,
they toggle between solid and dashed lines. Solid lines are anchors
that are set. This means that those distances will be maintained when
the interface rotates.
Within the inner square
are two double-headed arrows, representing horizontal and vertical
resizing. Clicking these arrows toggles between solid and dashed lines.
Solid arrows indicate that the item is allowed to resize horizontally,
vertically, or both. As mentioned earlier, by default, objects are
anchored on their top and left and are not allowed to resize. This
configuration is visible in Figure 3.
Did you Know?
If you need a more
“visual” means of understanding the autosizing controls, just look to
the right of the two squares. The rectangle to the right shows an
animated preview of what will happen to your control (represented as a
red rectangle) when the view changes size around it. The easiest way to
understand the relationship between anchors, resizing, and view
size/orientation is to configure the anchors/resize arrows and then
watch the preview to see the effect.
Applying Autosize Settings to the Interface
To modify our
SimpleSpin interface with appropriate autosizing attributes, let’s
analyze what we want to have happen for each element and translate that
into anchors and resizing information.
As we work through the list,
select each of the interface elements, and then open the Size Inspector
(Commnd+3) and configure their anchors and resizing attributes as
described here:
The SimpleSpin label:
The label should float at the top center of the view. The distance
between the top of the view and the label should be maintained. The size
of the label should be maintained (Anchor:Top, Resizing: None).
Button 1:
The button should maintain the same distance between its left side and
the left side of the view, but it should be allowed to float up and down
as needed. It can resize horizontally to better fit a larger horizontal
space (Anchor: Left, Resizing: Horizontal).
Button 2:
The button should maintain the same distance between its right side and
the right side of the view, but it should be allowed to float up and
down as needed. It can resize horizontally to better fit a larger
horizontal space (Anchor: Right, Resizing: Horizontal).
Button 3:
The button should maintain the same distance between its left side and
the left side of the view, as well as its bottom and the bottom of the
view. It can resize horizontally to better fit a larger horizontal space
(Anchor: Left and Bottom, Resizing: Horizontal).
Button 4:
The button should maintain the same distance between its right side and
the right side of the view, as well as its bottom and the bottom of the
view. It can resize horizontally to better fit a larger horizontal
space (Anchor: Right and Bottom, Resizing: Horizontal).
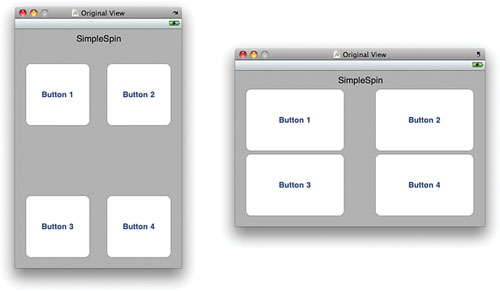
After you’ve worked through
one or two of the UI objects, you’ll realize that it took longer to
describe what we needed to do than it did to do it! Once the anchors and
resize settings are in place, the application is ready for rotation!
Click the rotate arrow in the Interface Builder’s view window and review
the result. Your view should now resize and resemble Figure 4.
You
can, if you choose, save the SimpleSpinViewController.xib changes, and
then return to Xcode and click Build and Run to test the application in
the iPhone Simulator or on your device. Because we haven’t modified
anything programmatically in the view, it should behave exactly the same
as what you’ve seen in Interface Builder.