Just like the MPMediaPickerController class in the preceding
section, Apple has provided an ABPeoplePickerNavigationController
and associated delegate protocol to allow you to both prompt
the user for contact information and display contact information to the
user. However, in this case the framework it provides also allows your
application to interact with person and group records directly.
Warning:
Once you reach the lower levels of the Address Book framework—for instance, dealing with
individual person records—the interface presented by the framework is in
C rather than Objective-C. This is especially obvious when dealing with
the address book programmatically rather than interactively using the
navigation controller.
1. Interactive People Picking
To illustrate how to use the ABPeoplePickerNavigationController, we’re
going to reuse the Prototype application code yet again. So, open the
Finder and navigate to the location where you saved the
Prototype project. Right-click on the folder
containing the project files and select Duplicate; a folder called
Prototype copy will be created containing a
duplicate of the project. Rename the folder
Prototype4, and just as we did before, prune the
application down to the stub (as we did in the previous section for the
media player example) with the Go! button and associated pushedGo: method that we’ll use to trigger the
display of our address book picker.
Click on the PrototypeViewController.h
interface file to open it in the Xcode editor. We need to declare the
class as both an ABPeoplePickerNavigationControllerDelegate
and a UINavigationControllerDelegate. Both declarations are necessary for the class to interact
with the ABPeoplePickerNavigationController:
#import <UIKit/UIKit.h>
#import <AddressBook/AddressBook.h>
					#import <AddressBookUI/AddressBookUI.h>

@interface PrototypeViewController : UIViewController
  <UINavigationControllerDelegate,
					ABPeoplePickerNavigationControllerDelegate>
{
    IBOutlet UIButton *goButton;
}

-(IBAction) pushedGo:(id)sender;

@end
Now modify the pushedGo: method
in the corresponding PrototypeViewController.m
implementation file:
-(IBAction) pushedGo:(id)sender {
    ABPeoplePickerNavigationController *peoplePicker =
     [[ABPeoplePickerNavigationController alloc] init];
    peoplePicker.peoplePickerDelegate = self;
    [self presentModalViewController:peoplePicker animated:YES];
    [peoplePicker release];
}
Next, add the three mandatory ABPeoplePickerNavigationControllerDelegate methods specified by the delegate protocol:
- (BOOL)peoplePickerNavigationController:
  (ABPeoplePickerNavigationController *)picker
  shouldContinueAfterSelectingPerson:(ABRecordRef)person
{
    [self dismissModalViewControllerAnimated:YES];
    return NO;
}

- (BOOL)peoplePickerNavigationController:
  (ABPeoplePickerNavigationController *)picker
  shouldContinueAfterSelectingPerson:(ABRecordRef)person
  property:(ABPropertyID)property
  identifier:(ABMultiValueIdentifier)identifier
{
    return NO;
}

- (void)peoplePickerNavigationControllerDidCancel:
  (ABPeoplePickerNavigationController *)picker
{
    [self dismissModalViewControllerAnimated:YES];
}
We’ve reached a point where you can compile and check the code,
but remember that you should also add the AddressBook and AddressBookUI
frameworks to the project before clicking the Build and Run button in
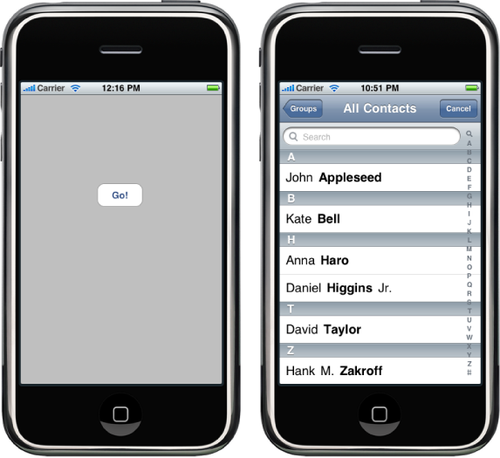
the Xcode toolbar. When you do so, you should see the familiar gray
screen with the Go! button as shown in Figure 1; click it and
you’ll be presented with a view of the address book. Selecting a name in
the address book will dismiss the picker view and return you directly to
the main gray screen.

The picker is displayed, but even if the user selects a name from
the list, we don’t do anything with the returned record. Let’s add some
additional code to the peoplePickerNavigationController:shouldContinueAfterSelectingPerson:
method to fix that omission:
- (BOOL)peoplePickerNavigationController:
  (ABPeoplePickerNavigationController *)picker
  shouldContinueAfterSelectingPerson:(ABRecordRef)person
{

    NSString *name = (NSString *)ABRecordCopyCompositeName(person);
					ABMutableMultiValueRef phones =
					ABRecordCopyValue(person, kABPersonPhoneProperty);
					NSArray *numbers =
					(NSArray *)ABMultiValueCopyArrayOfAllValues(phones);
					ABMutableMultiValueRef emails =
					ABRecordCopyValue(person, kABPersonEmailProperty);
					NSString *addresses =
					(NSString *)ABMultiValueCopyArrayOfAllValues(emails);
					NSString *note = (NSString *)
					ABRecordCopyValue(person, kABPersonNoteProperty );
					NSLog( @"name = %@, numbers = %@, email = %@, note = %@",
					name, numbers, addresses, note );

    [self dismissModalViewControllerAnimated:YES];
    return NO;
}
There are two basic types of properties: single-value and multivalue. Single-value properties
contain data that can have only a single value, such as a person’s name.
Multivalue properties contain data that can have multiple values, such
as a person’s phone number. You can see from the preceding code that
single-value and multivalue properties are handled slightly
differently.
Note:
You can find a full list of the different properties available
in an address book record in the ABPerson class documentation.
Make sure you’ve saved your changes and click the Build and Run
button in the Xcode toolbar to compile and deploy your application into
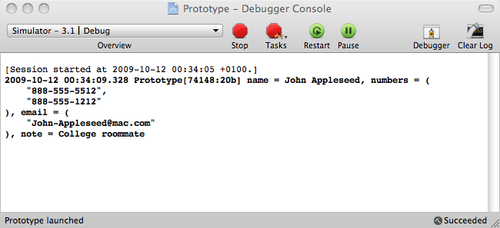
iPhone Simulator. When the application launches, click the Go! button
and then select a name from the list. You should see something similar
to Figure 2 logged to
the Console (select Run→Console from the
Xcode menu bar to display the Debugger Console).

What if we want to retrieve a specific phone number from the list?
It’s easier to let the user select the phone number he needs, and that’s
where the peoplePickerNavigationController:shouldContinueAfterSelectingPerson:property:identifier:
method would come into play (we returned NO from
this earlier in this section, so this example does not allow the user to
select a number).
A multivalue property is a list of values, but each value also has
a text label and an identifier associated with it. This second delegate
method provides you with both the property and the identifier for the
value (i.e., a specific phone number) that is of interest to the
user.
However, if you know which property value you’re looking for
inside the multivalue property, you can programmatically retrieve the
identifier for that value. For example, here’s how you’d select the
mobile phone number from the list of returned phone numbers:
ABMultiValueRef phones = ABRecordCopyValue(person, kABPersonPhoneProperty);

ABMultiValueIdentifier identifier;
for( int i = 0; i < numbers.count; i++ ) {
    if( CFStringCompare( ABMultiValueCopyLabelAtIndex(phones, i),
        kABPersonPhoneMobileLabel, 1 ) == 0 ) {
        identifier = ABMultiValueGetIdentifierAtIndex(phones, i);
    }
}
You can then retrieve the mobile phone number at any time by using
the identifier:
NSString *mobile =
  (NSString *) ABMultiValueCopyValueAtIndex(phones,
    ABMultiValueGetIndexForIdentifier(phones, identifier));
NSLog(@"Mobile = %@", mobile);
2. Programmatic People Picking
You do not have to use the ABPeoplePickerNavigationController to access
the address book; you can access it directly, as shown here:
ABAddressBookRef addressBook = ABAddressBookCreate();
CFArrayRef allPeople = ABAddressBookCopyArrayOfAllPeople(addressBook);

for (int i = 0; i < ABAddressBookGetPersonCount(addressBook); i++) {
    ABRecordRef ref = CFArrayGetValueAtIndex(allPeople, i);
    NSString *contact = (NSString *)ABRecordCopyCompositeName(ref);
     NSLog( @"%@", contact );
}
The preceding code will instantiate a copy of the address book,
retrieve references to all of the records, and then iterate through the
array of records. Then, in the same way we dealt with records after
interactively retrieving them with the picker controller, we print the
full name of each contact to the Debug Console.