13. Managing Videos Between PCs and PowerPoint Versions
PowerPoint 2010 handles videos very differently than
previous versions did, so there are some differences you may encounter
when moving a presentation to or from different versions of PowerPoint.
The following sections explain some basic techniques for minimizing the
likelihood of problems.
1.1. Working with Older Presentations in PowerPoint 2010
When you open a presentation created in an earlier
version of PowerPoint, the video clips continue to play. However, you
will probably want to update the file to PowerPoint 2010 format so you
can enjoy the additional capabilities.
After opening the file, choose File => Info =>
Convert to update it to PowerPoint 2010 format. In the Save As dialog
box that appears, specify a name for the new converted version (the
original remains intact) and click Save.
After saving the presentation in 2010 format, all
PowerPoint 2010 video editing features are available, just as if you had
started this presentation in version 2010 from scratch.
1.2. Working with PowerPoint 2010 Presentations in Older Versions
Older versions of PowerPoint did not allow videos to
be embedded, and supported a smaller number of file formats, so you may
run into problems when you move a PowerPoint 2010 presentation to a PC
that uses an earlier version. This may come as a surprise to some
people, because in most ways PowerPoint 2007 and 2010 are very similar.
Videos are the one area in which they differ greatly.
To minimize the impact of such problems, there are two things you can do:
Link all videos, rather than embedding them.
Delete the embedded version and re-insert them, choosing Link to File
from the Insert button's drop-down menu in the Insert Video dialog box.
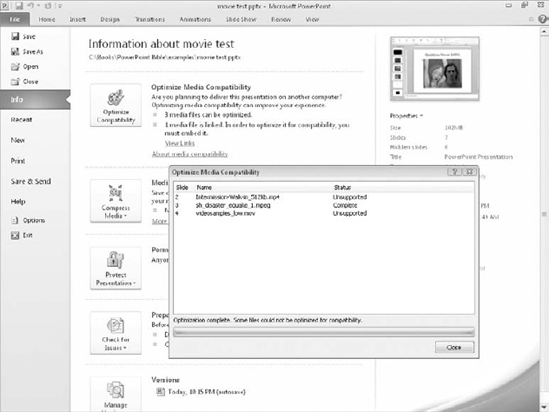
Run the Optimize Media Compatibility utility. To do so, select File => Info => Optimize Media Compatibility. See Figure 1. When the utilities has finished, click Close.
Some clip types may show Unsupported in the Status
column of the Optimize Media Compatibility dialog box. This means that
that clip's format may not be playable in an earlier PowerPoint version;
you might need to convert that clip to some other format using a
third-party video editor and then reinsert it into PowerPoint.
Other clip types may show Complete in the Status
column. This means that the clip has been modified for greater
compatibility, and should work in an earlier PowerPoint version.
NOTE
If you back-save a presentation file
(that is, save it in PowerPoint 97–2003 format) that contains videos,
any videos that are in formats unsupported by that version will be saved
as static graphics (of the first frame of the video).
2. Changing the Video's Formatting
The formatting
for a video clip refers to the size, shape, position, and effects of
the frame in which the video appears. It doesn't have anything to do
with the playback of the video itself. The following sections explain
how to affect the formatting of a video clip in various ways.
2.1. Choosing the Size of the Video Clip Window
You can resize a video clip's window just like any
other object. Simply drag its selection handles. Be careful, however,
that you do not distort the image by resizing in only one dimension.
Make sure you drag a corner selection handle, not one on a single side
of the object. To set an exact size, enter the dimensions in the Height
and Width text boxes on the Format tab.
Also be aware that when you enlarge a video clip's window, the quality of the clip suffers.
If you make the clip large and are unhappy with its quality, you can reset it to its original size by following these steps:
Right-click the clip and choose Size and Position.
2.2. Setting the Initial Image (Poster Frame)
The poster frame is
the image that appears when the clip is not playing. By default it is
the first frame of the video clip. However, if the first frame of the
video is a blank screen, you may want to use something else instead.
You can choose an external image file for the poster frame, or you select a frame from the video itself.
2.2.1. Choosing an External Poster Frame
To use an external still image as the poster frame, follow these steps:
In Normal view, select the image.
Choose Format => Poster Frame => Image from File. The Insert Picture dialog box appears.
Select the picture you want to use.
2.2.2. Choosing a Video Frame as the Poster Frame
To use a frame from the video itself as the poster frame, do the following:
In Normal view, select the video clip.
Verify
that playback controls appear below the clip in Normal view. (They do
for most file types, but not for Flash, animated GIFs, or linked files
from Web sites.) If there are no playback controls, you cannot proceed
with these steps.
Click the Play button (right-pointing triangle) on the controls below the clip.
When the video displays the frame you want to use, click the Pause button (two vertical bars) on the controls below the clip.
Choose Video Tools Format => Poster Frame => Current Frame.
2.2.3. Resetting the Poster Frame
To return to the default poster frame (the first frame of the video clip), select the clip and then choose Format => Poster Frame => Reset.
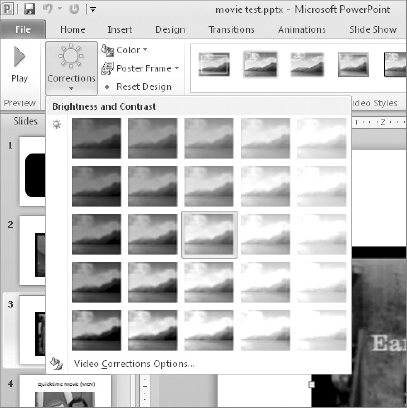
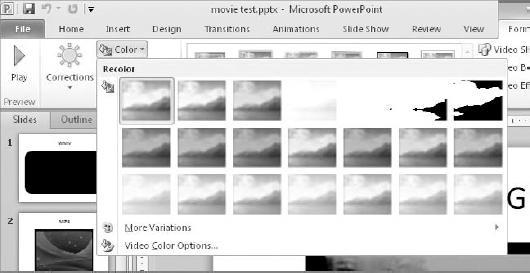
2.3. Applying Corrections and Color Washes
You can apply brightness and contrast corrections to a
video clip in the same way as you do photographic images.
Click the Color button and
choose a color wash, or choose More Variations for more color choices.
Choosing a color from the Color button's menu (see Figure 3) will set the video to play as a monochrome (single-color) clip, using the color you chose.
2.4. Applying Video Styles and Effects
On the Video Tools Format tab, you'll find the same style and effect options as for photos.
Here's a sampling of what you can do.
Styles: Open the Styles palette and pick one of the presets there to apply a combination of frame shape and image effects.
Video Effects:
Click this button for access to the same formatting options as for
images: Shadow, Reflection, Glow, Soft Edges, Bevel, and 3-D.
Video Border: Click this button to choose a border color and thickness for the video clip's outer frame.
Video Shape:
Click this button and then choose one of the built-in shapes to alter
the shape of the video clip's frame. You might choose to make it a
rounded rectangle, for example, or an oval.
Crop: You can crop the window of the clip so that part of the clip does not appear (uncommon).
Send Backward:
You can send the clip behind other objects on the slide. This makes it
possible to use overlapping lines, shapes, and textboxes to annotate the
video clip window.
NOTE
The Reset Design button on the Format tab resets
everything you have done to a clip's formatting except the setting of
the poster frame. To reset the poster frame, choose Format => Poster Frame => Reset.
2.5. Compressing Media Clips
If disk space is an issue, you may want to compress
the media clips in the presentation so that the overall size of the
PowerPoint file is decreased. This results in a loss of clip quality, so
don't do it unless you have to.
NOTE
Save a copy of your presentation with another
name before you compress the media clips. That way if the playback
quality suffers too much, you can revert to the higher quality version.
This also gives you the high-quality version to play back locally.
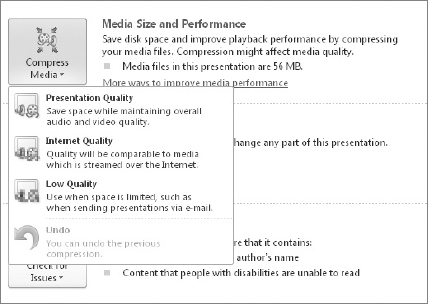
To compress the media clips, choose File => Info =>
Compress Media. On the menu that appears, choose a playback quality;
Presentation Quality (high-quality, for playback on a local PC),
Internet Quality (medium, for sending via e-mail or playback on a Web
page), or Low Quality (for situations where available disk space is very
limited and playback quality is not important). See Figure 4.
When you issue the command, the Compress Media dialog
box opens, and the compression begins automatically. Wait for it to
finish and then click Close.