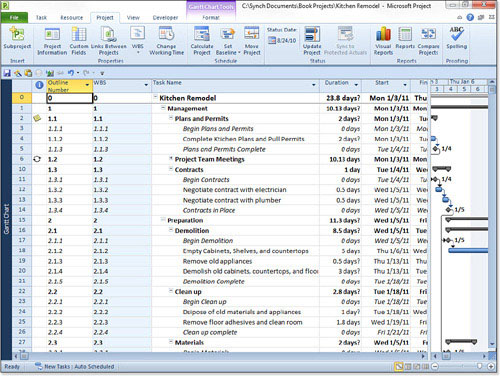
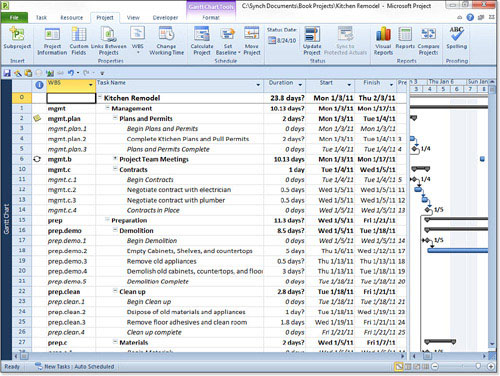
Project has a field called WBS that can be customized to fit the organization’s WBS numbering schema. The default WBS code is identical to the outline numbers that Project generates and stores in the Outline Number field. You can display both of these fields in a table by inserting the columns, as shown in Figure 1.
Figure 1. The Outline Number field and the default WBS code are identical.
To insert these fields onto your screen, follow these steps:
|
1.
|
Right-click on the column header where you want to insert the column (field), and choose Insert Column. This opens the Column Definition dialog box. All columns to the right, including the column in which you right-clicked, shift to the right to make room for the new column insertion. |
|
2.
|
In the Column Definition dialog box, choose either Outline Number or WBS from the drop-down list in the Field Name field. |
|
3.
|
Click OK to close the Column Definition dialog box and insert the column. |
Repeat these steps to insert the other column (the one you did not just insert), either Outline Number or WBS.
If your team chooses to use these fields, you must be aware that the Outline Number field and WBS field are identical in Microsoft Project’s default mode and the number associated with a work package will change if the package is moved within the project schedule. If the WBS numbering schema must remain the same throughout the life of the project, use a custom field that you must then maintain instead of the automatic WBS field provided by Project.
Note
|
By default, the value in the Microsoft Project WBS field will automatically change if a work package is moved from one location to another within the schedule. |
Creating Custom WBS Codes
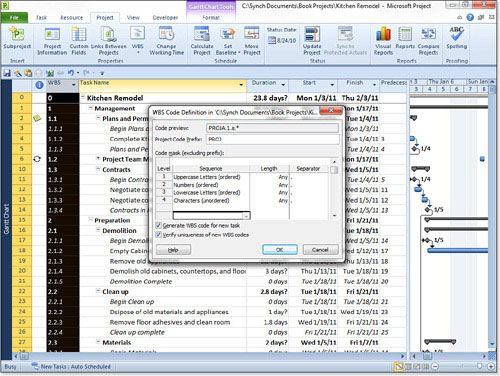
To customize the WBS code format in the Microsoft Project WBS field, you can generate custom codes using a WBS code mask. The mask contains numbers or characters for each outline level, with separators between the levels. There is a total limit of 255 characters, which is sufficient to handle even the most complex WBS structure. For projects that are part of a larger program, you can also include a project-level code that will be a prefix for all tasks within the project, or you can leave it blank.
To create a custom WBS code, follow these steps:
|
1.
|
|
|
2.
|
Enter a code prefix for the project, if needed, in the Project Code Prefix box. Identify a separator, such as a colon or period, to make it easier for the reader to identify the levels. |
|
3.
|
Click the first blank row under the Sequence column in the Code Mask table and select the option from the drop-down menu for numbers or letters, as appropriate for your organization. You can display your options with the pull-down arrow, which are as follows:
|
|
4.
|
Specify the length of the field or choose Any to allow flexibility in the number of characters. Use the pull-down arrow in the Length column to show the options for the number of characters you can use for this part of the formatting:
|
|
5.
|
Identify a separator from the choices in the drop-down menu or type another symbol directly on the keyboard. |
|
6.
|
Repeat steps 3, 4, and 5 for each additional level of the WBS. The Code Preview field at the top of the dialog box will show you what the custom WBS code will look like as you are creating the mask. |
|
7.
|
If you want Project to automatically generate the WBS codes for you, select the box Generate WBS Code for New Task. If this box is cleared, you will need to enter the codes manually but will be required to follow the format defined in this process. |
|
8.
|
If you want Project to check for duplicate codes, select the box Verify Uniqueness of New WBS Codes. The check only occurs when you edit the codes, and you need to modify the codes manually to make them unique. It is generally a good idea to have this box selected to avoid confusion with the WBS codes. |
|
9.
|
Click OK to save the mask. Project automatically replaces the default WBS code with the new codes you have designed. If your project is complex and has many levels, you may need to widen the column to see the entire code. Select the column header and double-click the right-hand column border. |
Note
|
If you have not defined enough levels in the mask for all of your WBS, Project will use the default numbering system for the lower levels. You can force Project to renumber all of the codes in your WBS, but you will lose any special coding that you have done manually. |
If you use the check box to verify the uniqueness for new codes, Microsoft Project only checks the code when it is created or edited. If your project file has custom WBS codes that were set up when this feature was disabled, and you then decide to enable unique codes, Project will not check the existing codes for uniqueness. If necessary, you can force Project to renumber all of the codes, which is to say generate new codes for the task, to correct your non-unique ones. This also causes you to lose any codes you have entered manually.
If you want to reduce the number of defined levels in the mask, you can delete only the bottom-most level of the Sequence table. Start with the bottom-most level and use the Delete key to clear your mask, then work your way up the list, deleting from the bottom up.
Tip
|
If necessary, you can edit every task’s code, forcing Project to check each task’s uniqueness. You can do this quickly and easily by choosing the WBS column, so all of the cells are selected, and pressing F2 to edit the first cell. Then press Enter to force Microsoft Project 2010 to make a uniqueness check. If your code is unique, Project will move onto the next cell in the selection. Press F2 and Enter again to process the next cell. It is easy to move down the column this way quite quickly, provided the codes are unique. If not, you will have to stop and change the code before you finish. |
Inserting, Deleting, and Moving Tasks with Custom WBS Codes
You should stabilize your WBS and your schedule before adding the custom WBS codes so that you do not have to spend too much time making changes to them. On occasion, however, you will find that you need to add or delete tasks and perhaps move entire work packages to different areas of your WBS. Project makes some automatic numbering changes, and you need to be aware of how these changes work if you use custom WBS codes.
When you insert a new task into a work package (summary task group), Project automatically gives it the next highest codes for the level. If you delete a task, Project renumbers the tasks that follow. If these are not the behaviors that you want, you will need to manage the addition and deletion carefully.
If you move a task to another row within a work package, it keeps its original code even though it will no longer be in sequence. If you move a task from one work package to another (not a recommended practice), it acquires the correct prefix code for the new work package. The final part of the code may change if it would be a duplicate of an existing task within the package.
Editing Custom WBS Codes
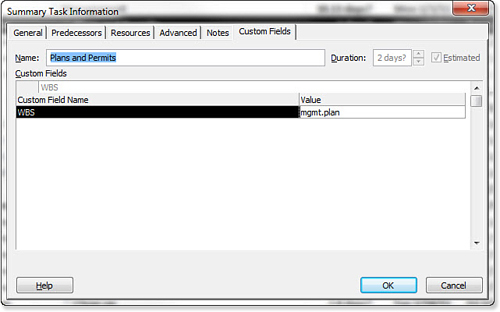
Editing custom codes after the code mask is created is straightforward. Select a summary task by double-clicking any field in the row except the row number. The Summary Task Information window appears. Because you have created a WBS code mask, under the Custom Fields tab, a custom field called WBS should be visible. Select the value field for WBS. Make your change in the entry bar immediately above the custom field name list box.
Figure 3. You can use the Custom Fields tab of the Summary Task Information dialog box to edit the WBS code.
You will be editing only the last segment of any of the custom codes; all the higher-level segments are derived from the higher levels (summary task levels). You can change the segment codes at the summary task level if the assignment made by Project does not fit with what your organization would like to see.
For instance, in Figure 4, the major phases have been edited as abbreviations or acronyms for the name of the phase. AA was the default WBS code for the Planning the Move phase, but it has been changed to PLAN. It makes it easier to realize a task’s place within the WBS code.
Figure 4. Editing the default letters assigned by Project in the custom WBS codes lets you describe how a task fits into the task list.
If you want to show the tasks in their WBS code order, select the View tab, Sort, Sort By and then select the WBS field in the Sort By box.
You lose your edited codes if you edit custom codes for summary tasks and then tell Project to renumber the tasks. Use the following steps to prevent that from happening:
|
1.
|
Using the Gantt view, select the Format tab. |
|
2.
|
Clear the Show Summary Tasks check box. Only the normal and milestone tasks should be displayed. |
|
3.
|
Choose one of the column headings to select all displayed tasks. |
|
4.
|
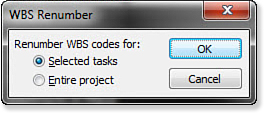
Select the Project tab, WBS, Renumber to bring up the WBS Renumbering dialog box (if Renumber is grayed out, a custom WBS code mask has not been created). |
|
5.
|
Click the Selected Tasks button instead of the Entire Project button. |
|
6.
|
Click OK to begin renumbering. |
|
7.
|
You can then restore the display of summary tasks by selecting the Format tab, Show Summary check box. Click any cell to unselect all tasks. |
Your entire task list will be displayed again. Your summary tasks have not lost their edited codes, but all of your other tasks have been renumbered to the current order of the outline.
Renumbering the Custom WBS Codes
As you are planning your project, you are likely to revise the task list somewhere along the line. If you have already defined the custom WBS codes by this time, they might not be in sequence after the editing. Microsoft Project will recalculate the WBS codes for the whole project, putting them into sequence for you. Follow these steps to renumber the WBS codes:
|
1.
|
If you are only renumbering a small, selected set of tasks, choose those tasks first (they must be adjacent to one other). The first selected task will not be renumbered, but will be the starting point for renumbering the rest of the selection. |
|
2.
|
|
|
3.
|
Pick either Selected tasks or Entire project. |
|
4.
|
Click OK to begin renumbering. |
|
5.
|
If you decide to renumber the whole task list, Project will ask you to confirm your decision. Click Yes or No as necessary. |
If, even with a warning to confirm your decision, you still end up realizing that you did not want to renumber, you can go back and use the Undo feature to restore your original codes.