By now, you’ve noticed that several independent factors influence your printed output. If you understand them, you will have an easier time solving printing problems and properly printing your diagrams.
Keeping Print Variables in Mind
First, notice the vocabulary. The words printer, paper, and sheet are used for the physical output. The words drawing and page are used for the virtual canvas inside Visio.
You also need to keep the following variables in mind for each page in your document. They can be adjusted in numerous ways, offering rich and complicated printing possibilities:
-
Printer paper size
-
Drawing page size
-
Printer paper orientation (Landscape or Portrait)
-
Drawing page orientation (Landscape or Portrait)
-
Print zoom settings (Adjust to % or Fit to X by Y sheets)
The Page Setup dialog, which is accessible from many places in Visio, enables you to control these settings. Paper and print zoom settings are set on the Print Setup tab, and the Page Size tab controls page configuration.
On the Ribbon, the Design tab also has the Page Setup group, which enables you to set orientation and size. These controls differ from the Page Setup dialog in that they set the size and orientation for both printer paper and the page at the same time. This capability is a great convenience but can be confusing if you are accustomed to setting paper and page settings independently via Page Setup.
|
If you use the Page Setup dialog to independently size and orient page and paper, you might occasionally configure a mismatch. A common misstep is to have paper and page settings with different orientations. Visio helps in two ways. First, the Print Setup and Page Size tabs in the Page Setup dialog have preview areas on the right that illustrate the relationship between page and paper. Second, when you send the job to the printer, Visio will warn you about mismatched orientations with this pop-up: “One or more drawing pages is oriented differently from the printed page setup. Click OK to print your drawing across multiple pages. To match orientations, change the printed page orientation.” This warning enables you to cancel the print command and reconfigure your settings before any paper is harmed. |
Looking at a Complicated Print Job from a Simple Document
The IT Asset Management sample drawing is a fairly simple document with three pages (see Figure 1), all of which are oriented horizontally and have typical page and paper sizes.
By playing with paper and page sizes and orientations, you can create a complicated set of printings, such as the example shown in Figure 9.8, without altering the shapes in the drawing.
Figure 1. After manipulating printer and page settings, the IT Asset Management sample’s three pages printed on six sheets of paper with various sizes and orientations.
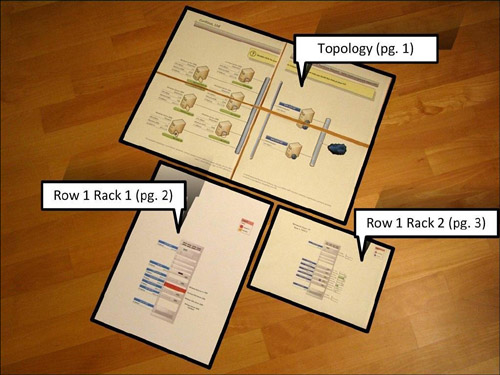
Let’s go over each page shown in Figure 1, look at the paper and page settings, and point out interesting features for each case.
| Page 1: Topology | |
|---|---|
| Scale | 1:1 |
| Paper size | A4 |
| Paper orientation | Landscape |
| Page size | Letter |
| Page orientation | Landscape |
| Print zoom | Fit to two sheets across by two sheets down |
Page 1 is enlarged and spread across four sheets of paper. Because I am an American living in Germany, I still like to work with U.S. Units templates, but I print on metric-sized paper. Notice in the preceding table that the page is Letter-sized, but the paper size is A4. A4 is a metric size that is very close to Letter (see the note at the end of this section for more information on paper sizes around the world).
I used the Print Zoom setting to spread it across four sheets of paper. With some scissors, tape, and a bit of patience, I can piece together a large rendition of the Topology page.
| Page 2: Row 1 Rack 1 | |
|---|---|
| Scale | 1:12 |
| Paper size | A3 |
| Paper orientation | Portrait |
| Page size | Letter |
| Page orientation | Portrait |
| Print zoom | Fit to one sheet across by one sheet down |
For page 2, I changed settings for both page and printer paper. First, I set the page orientation to Portrait but left the page size as Letter. I then set the paper size to A3, Portrait. A3 paper is twice the size as normal office paper and similar to US Tabloid size paper.
It’s important to note that the printer paper is much bigger than the page size. The Fit to 1 Sheet Across by 1 Sheet Down print zoom setting effectively magnifies the output, doing its best to fit the page contents to the paper.
If your printer has several trays that can hold different-sized paper, you might be able to send the whole document to one printer in one step. For this example, however, I had to print each page separately. Page 1 and page 3 went to my normal laser printer, but page 2 was sent to my large-format inkjet.
| Page 3: Row 1 Rack 2 | |
|---|---|
| Scale | 1:12 |
| Paper size | A4 |
| Paper orientation | Landscape |
| Page size | Letter |
| Page orientation | Landscape |
| Print zoom | Fit to one sheet across by one sheet down |
The last page has pretty much an unchanged setup, except that the page size is Letter and the printer paper is A4. Although these are nearly the same size, Print Zoom still plays a small role.
If I use Adjust to 100% instead of Fit to 1 Sheet Across by 1 Sheet Down, I get two pages, one of which is blank. The Fit To setting squeezes the fatter Letter-sized page onto the skinnier A4 paper, with a slight reduction in size to make it work. Using 100% tells Visio that you don’t want any resizing to happen in the printout, and the slight mismatch between A4 and Letter results in page tiling.
Another option is to change the drawing page size to A4, too. Because no details of this drawing are against the edge of the page, this is a harmless modification. Matching page size and paper size simplifies things and reduces confusion.
|
The standard paper size in the United States is called Letter and is 8.5 × 11 inches. In the rest of the world, A4 is common, measuring 210 × 297 millimeters. To put the most common paper sizes in perspective, U.S. Letter is 0.2 inches (6 mm) wider than A4 paper, but 0.7 inches (18 mm) shorter. If your company has offices across the globe, it may be helpful to know about the paper sizes that your overseas colleagues use.
|
Headers and Footers and Print Margins
Print Preview is the place to edit and see headers and footers. Just click the Header & Footer button on the Print Preview Ribbon.
Inside the Header & Footer dialog, you see two Margin fields for controlling the distance of the header and footer from the top and bottom of the page, respectively. These settings are independent of the print margins. Although it is nice to have headers and footers as out of the way as possible, make sure that you don’t get too close to the edges of the paper; otherwise, they get cut off by the printer.
You can set print margins via the Page Setup dialog. Just go to the Print Setup tab and then click Setup. The Print Setup dialog appears and contains left, right, top, and bottom print margin fields. The default values are 0.25 in. or 6.28 mm. Your actual printer might have different capabilities. Visio does its best to understand the specified printer’s capabilities and not let you set smaller values than the printer can handle. In Print Preview, you see a border around the page that represents the print margins. This is a helpful guide when checking header and footer margins and checking whether details of your drawing are likely to be cut off by the printer.
The print margins are also visible in the drawing window if page breaks are turned on. Go to View, Show and check the Page Breaks box. Figure 2 shows print margins in the drawing window, as well as the settings in the Print Setup dialog.
Figure 2. Going wild with print margins in the Print Setup dialog.
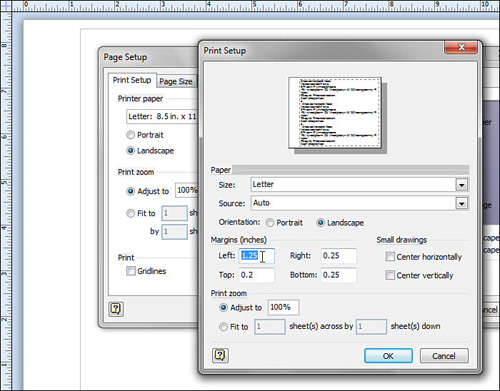
If you are printing drawings that are tiled across multiple sheets of paper, you actually want your print margin values to be a bit larger than your printer’s limit so that you get some overlap from tile to tile. Having this overlap makes it easier to trim each sheet and paste them together.