Previous versions of Visio allowed you to insert photographs into organization chart shapes—but only one shape at a time! Visio 2013 allows you to import multiple photographs at once, either into an existing org chart, or as you create one from externally stored data. In the latter case, you can import photos from a folder on your computer or a server. In addition, if you import organization data from Microsoft Exchange Server, you can import the same photos that people use in their Microsoft Outlook profiles.
In this exercise, you’ll create an org chart using data from Excel and will import photographs at the same time. You will also use styles to change the appearance and layout of your org chart.
Important
Some of the steps in this exercise are based on the specific placement of shapes using the US Units version of the Org Chart template. If you are using the Metric version of the template, you may need to make small adjustments in the exercise steps.
- Repeat steps 3 through 10 from the preceding exercise.
- On the Picture Import page, click the Locate the folder that contains your organization pictures radio button and then use the Browse button to navigate to and select the Photos folder. After clicking Open, the folder name appears in the text box.
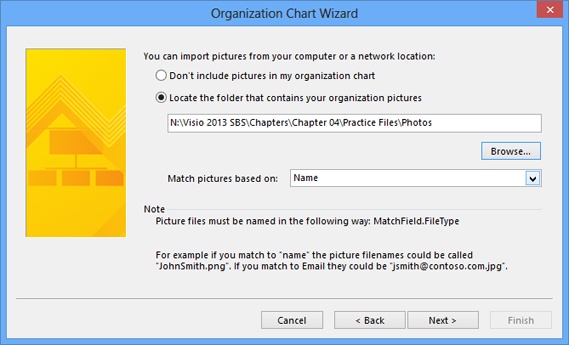
- Use the arrow to the right of Match pictures based on to select Name, click Next, and then click Finish on the final wizard page. The new org chart will look very similar to the one you created in the previous exercise, but this one will contain photographs.
Tip
The image files in the Photos folder are named as described at the bottom of the wizard page in the preceding graphic: each file name includes “FirstnameLastname” and an image file extension (“Firstname Lastname” is also acceptable) and matches a person listed in the Excel data file.
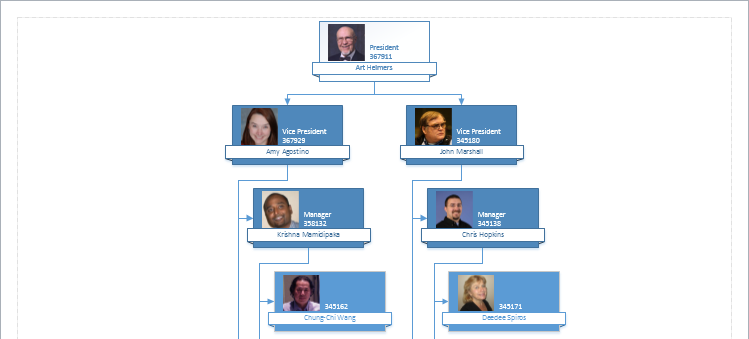

- On the Org Chart tab, in the Shapes group, click Shapetacular style in the shapes gallery.
Tip

Notice that the Shapetacular org chart style uses both color shades and the geometry of the shape containing the photograph to indicate different position levels in the organizational hierarchy. Each style uses various combinations of shape geometry, fill color, fill gradients, line style, and ornamentation to differentiate position levels.
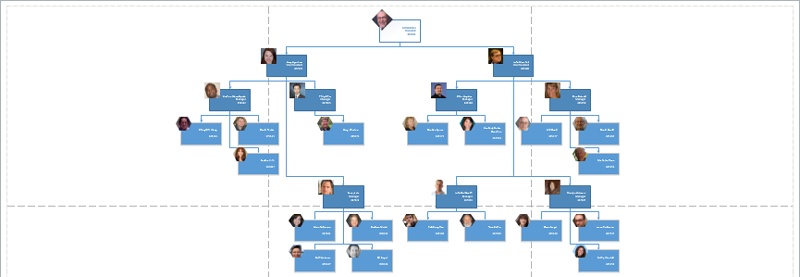

The Shapetacular style highlights the photographs you’ve imported, but the layout doesn’t show very much of the chart.
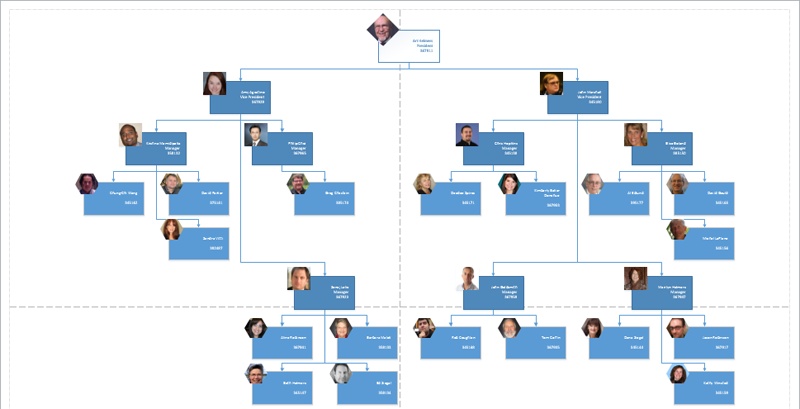
- On the Org Chart tab, in the Layout group, click Single Top. Notice that Visio has added new pages automatically to accommodate the new layout.
- Press Ctrl+Shift+W to show the whole page.

- Select the Art Helmers shape at the top of the page and hold down the Shift key while dragging it to the left. (Holding Shift while dragging a Visio shape constrains motion to a single direction, either horizontal or vertical.) Position it anywhere near the dashed tile boundary line separating the two upper-leftmost pages. Notice that Visio removes pages that are no longer required.
Tip
Moving an Executive shape also moves all subordinate shapes. The same is true if you relocate a Manager shape.
- On the Org Chart tab, in the Arrange group, click Best Fit to Page. Visio centers the entire organization chart on the pages.
Tip
You may want to press Ctrl+Shift+W again to center the set of pages in the drawing window.
At this point, the organization chart looks reasonably good, but it will require four sheets of paper to print. In the remaining steps of this exercise, you’ll use several additional org chart features to position and size the chart to fit the fewest number of sheets. You’ll begin with buttons that allow you to reduce either the horizontal or vertical space required for each shape (refer to the following graphic).
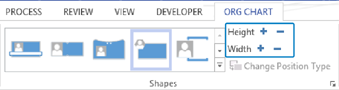

- Ensure that no shapes are selected, and then on the Org Chart tab, in the Shapes group, click Decrease the Height button twice.
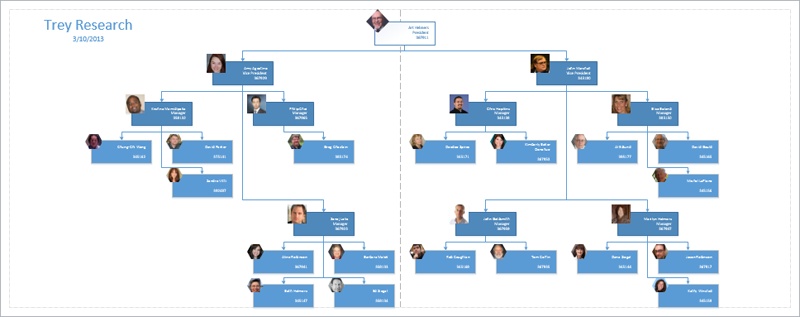
- Select and drag the Art Helmers shape upward so the top edge of his photo is at the top margin of the page.
- On the Org Chart tab, in the Layout group, click Re-Layout. The organization chart now fits comfortably on two printer pages.
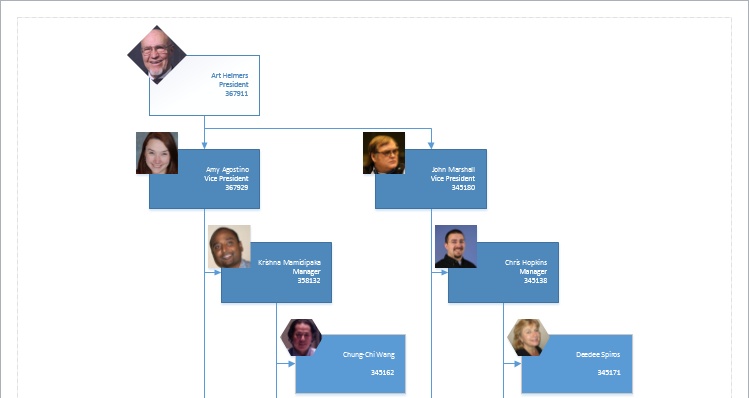
- To finalize your organization chart, drag the Title/Date shape from the stencil into the upper-left portion of the drawing page. Double-click the Company Name text box and replace Company Name with Trey Research. The resulting organization chart should look like the following graphic.

Note
CLEAN UP Save your drawing as Org Chart using Wizard-Photos and then close it.
Depending on the size and position of peoples’ heads in the photographs you import into your org chart, you’ll find that most are positioned reasonably well within the photo frame provided by the various Visio org chart styles. However, there may be cases where you’ll want to reposition the photo. You can do so by selecting the photo, and then on the green Picture Tools Format tab, in the Arrange group, click Crop Tool. A preview of the entire image is displayed and the portions that are outside the photo frame will be grayed out.
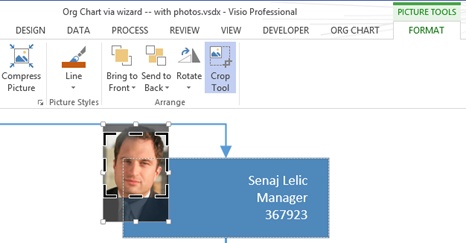
Simply drag the picture to position it the way you want it, and then click outside the picture to complete your changes.