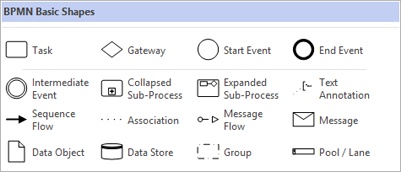
Microsoft provides 16 shapes in the BPMN Basic Shapes template as shown in the following graphic. This may not seem like a sufficient number considering the BPMN shape variations described in the previous section. However, as you will discover in this exercise, most shapes offer one or more right-click menu options that produce a total of several hundred variations of these basic shapes.
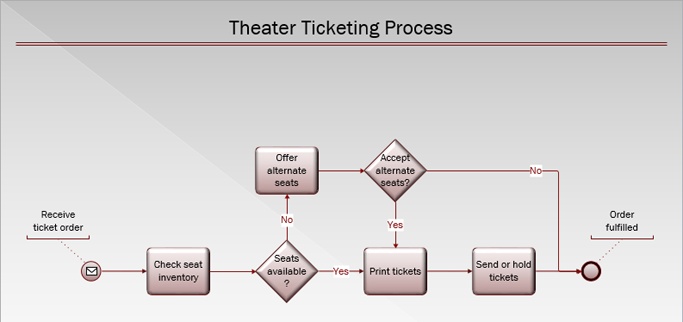
In this exercise, you will start with a partially completed BPMN diagram of a theater box office ticketing process. You will set a trigger for the start event that launches the process, add a task and a gateway to offer the purchaser alternatives if the requested seats are unavailable, and set BPMN task types for various shapes.
Tip
The appearance of the document you just opened is based on Variant 4 of the Ion theme. In addition, the author applied the Whist effect and Bevel shape style, and also increased the font size to 12 pt.
- Right-click the Start shape. The shortcut menu includes two BPMN entries at the top that enable you to alter the appearance of the shape to convey the proper BPMN information. The Event Type entry lets you change the current shape to any other event type. The Trigger/Result entry lets you select a subtype for the Start event.
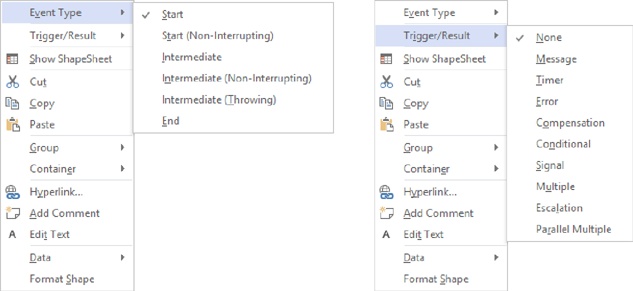

Each type of BPMN shape has its own set of shortcut menus.
- With the shortcut menu open, point to Trigger/Result, and then click Message. The Start shape displays a white envelope, indicating that a message triggers the launch of this process.
- Drag a Task shape from the BPMN Basic Shapes stencil, position it above the Seats available? shape, and drop it on the connector labeled No. The Visio 2013 AutoAdd feature splits the connector and inserts the new shape.
- With the new task still selected, type Offer alternate seats, and then press Esc.
- Drag a Gateway shape from the BPMN Basic Shapes stencil, position it above the Print tickets shape, and drop it on the unlabeled connector.
- With the new gateway still selected, type Accept alternate seats? and then press Esc.
- Use the AutoConnect arrow under the Accept alternate seats? shape to draw a connector to the top of the Print tickets shape.
- Click the new connector to select it, and then type Yes.
- Click once on the connector from the Accept alternate seats? shape to the End shape, type No, and then press Esc.

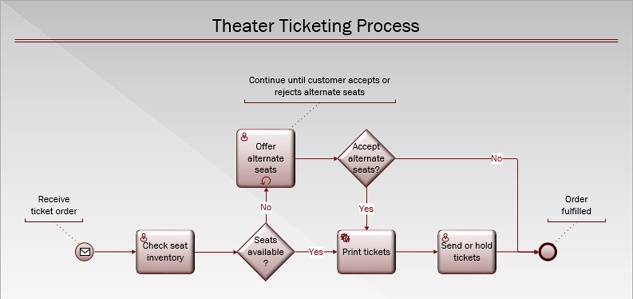
To finish this exercise, you will mark each task with a BPMN symbol to designate the task type.
- Right-click the Check seat inventory shape, point to Task Type, and click User. A person icon appears in the upper-left corner of the shape.
- Right-click Offer alternate seats, move to Task Type, and click User.
- Right-click Offer alternate seats again, point to Loop, and click Standard. A loop symbol appears in the Task shape, indicating that this task will be repeated until certain conditions are met. You will describe those conditions with a text callout in the next step.
- Drag a Text Annotation shape from the BPMN Basic Shapes stencil, attach the tail to the Offer alternate seats shape, type Continue until customer accepts or rejects alternate seats, and then press Esc.
- Right-click the Print tickets shape, point to Task Type, and click Service to indicate that this activity is performed by a system.
- Right-click the Send or hold tickets shape, point to Task Type, and click User.

You validated a flowchart using built-in rules supplied by Visio Professional 2013. Visio also provides rules—a total of 76—for validating BPMN diagrams. The BPMN rule set shares some of the connectivity rules used for flowcharts, but it also includes many BPMN 2.0–specific rules.
In the final step of this exercise, you will validate your BPMN drawing.
- On the Process tab, in the Diagram Validation group, click the Check Diagram button. Visio displays a dialog box reporting “Diagram validation is complete. No issues were found in the current document.”
Note
CLEAN UP Save your changes to the Theater Ticketing Process drawing but leave it open if you are continuing with the next exercise.
The ticketing process used in this exercise is deliberately very simplistic. You could easily argue that more of the steps are automated in most theater box offices and that there should be other tasks involved. All of that is true, but the purpose of this exercise is to learn a bit about BPMN and not to create the ultimate theater ticketing process.