WHEN YOU SPEAK, the tone of your voice conveys how you feel. You can convey your enthusiasm (or lack of it), be friendly, or be sarcastic. In a similar way, fonts, which are families of design styles for the numbers, letters, and symbols that make up text, can provide additional information to the reader. Fonts can, for example, make your document appear mature and businesslike or young and casual.
Choosing a suitable font size can make a document easier to read. Other text attributes you might use to set the document tone include style settings, such as bold, underline, italics, or even color.
For many text attributes, Word offers a chance to “try before you buy” with its Live Preview feature. By pointing to various formatting choices, you can see the effect the option has on your document before you actually choose the format option. If you like it, you can simply click your mouse to choose the option. For example, if you pause your mouse over a font choice, the text appears deselected (it isn’t) and displays with the font you are pointing to. Live Preview works with most font and paragraph formatting choices as well as styles and picture formatting changes.
Tip
If you don’t like the Live Preview option, you can turn it off. Click the File tab and choose Options. Click General and remove the check mark from Enable Live Preview.
Choosing a Font
In addition to the many fonts you already have on your machine, Word comes with additional fonts. The default font used with Word 2010 is called Calibri. Fonts generally fall into two different categories: serif and sans serif. Serif fonts usually have details on the ends of some of the strokes that make up letters and symbols. A font that has serifs is called a serif font and a font without serifs is called sans-serif, from the French word sans, meaning “without.”
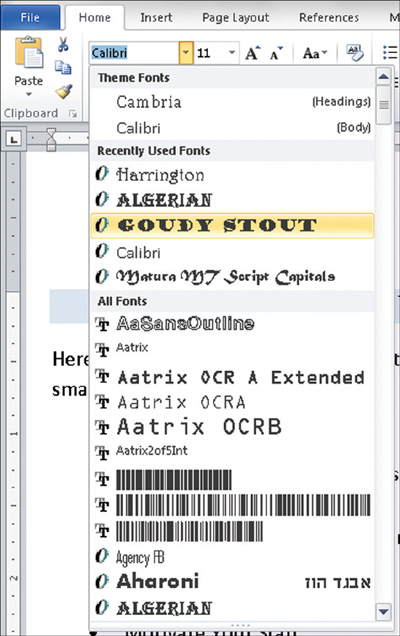
Changing fonts is a very simple process. Select the text you want to modify and choose Home > Font, and from the Font drop-down list select the font you want to use (see Figure 1).
Figure 1. Choose a font from the list.
Selecting a Font Size
You can use any size for any font. Font sizes are measured in points, where a point is approximately 1/72 of an inch tall. Therefore, a 72-point font is approximately 1 inch tall.
Select the text you want to format and then choose Home > Font. Click the Font Size drop-down list arrow. You see a drop-down list of available sizes similar to those shown in Figure 2. Choose the size you want from the drop-down list, or type your own measurement in the Font Size box. While you can enter a value between 1 and 1638, don’t expect to be able to read a 1-point font, and a character as large as 1638 points won’t even begin to fit on a standard page!
Figure 2. Changing font sizes.
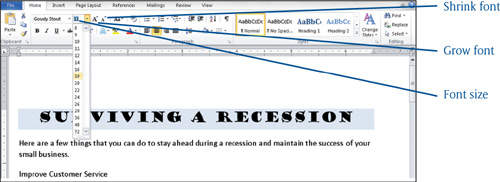
Optionally, you can click the Grow Font or Shrink Font button to increase or decrease your font size. Figure 2 illustrates a document with a title font size of 24 points.
Tip
The keyboard shortcut for Grow Font is Ctrl+> and for Shrink Font it’s Ctrl+<. (Hold down the Shift key to access the > or < key.)
Applying Formatting Attributes
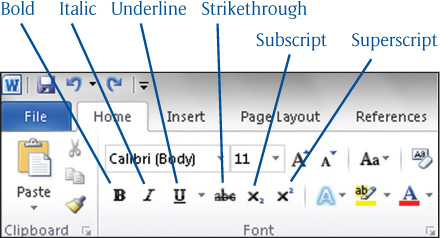
Applying formatting attributes such as bold, italic, or underline calls attention to particular parts of your text. Additionally, you can assign a superscript or subscript notation to any text that makes it appear above or below the standard text, such as a copyright or trademark symbol. You can easily access these choices and others with the Home tab of the Ribbon.
Select the text you want modified and from the Home tab (see the Font group shown in Figure 3) choose the attribute you want to apply.
Figure 3. Applying special text attributes.
Formatting Shortcut KeysSome formatting shortcuts include Ctrl+B for bold, Ctrl+I for italic, and Ctrl+U for a single underline. |
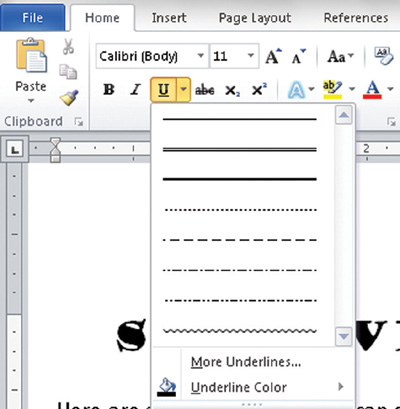
If you want your text underlined, you can click the down arrow next to the Underline button and select an underline style and color from the dropdown list shown in Figure 4.
Figure 4. Choosing an underline style.
Tip
Choosing More Underlines displays the Font dialog box where you can select even more underline styles.
Adding Color
Another way to add impact to your document is by adding color to your text. Color becomes very effective when printing to a color printer or viewing your document on screen. Follow these steps to apply color to your text:
-
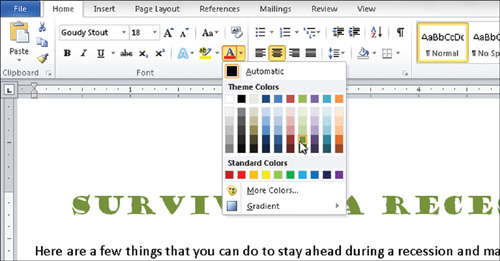
Choose Home > Font > Font Color, or if you want to select a specific color, click the down arrow next to Font Color and make a choice from the resulting gallery, as shown in Figure 5.
Figure 5. Add WOW to a document with color.
Highlighting Text
You can highlight text in your document in the same manner you highlight text with a marker in a book. You can even choose the color of highlighter you want to use. While on a monitor or with a color printer, you see the highlight color, on a black and white printer, highlighting prints as gray shading over the text. Highlighting calls attention to specific areas of your document.
Select the text you want to format with highlighting and then choose Home > Font > Text Highlight Color, or if you want to select a specific color, click the down arrow next to Text Highlight Color and make a choice from the resulting gallery. Word deselects the text and applies the highlighting. Figure 6 shows text with pink highlighting.
Figure 6. Call attention to special areas with highlighting.

Adding Text Effects
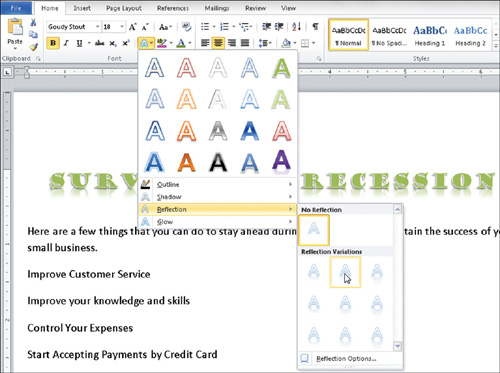
New to Word 2010, you find the ability to add spectacular special effects to your text. With just a few mouse clicks, your text can illustrate shadows, glows, reflections, bevels and many other great formatting features.
Select the text you want to work with, and then choose Home > Font > Text Effects. A gallery of text effects appears as you see in Figure 7. Select the effect you want, or click one of the options at the bottom for even more text enhancements.
Figure 7. Add lots of pizzazz with text effects!
Using the Mini Toolbar
Word (along with Excel and PowerPoint) contains a semitransparent Mini Toolbar designed to provide quick access to many text and paragraph formatting features so you don’t have to move your mouse so far to select the commands from the Ribbon.
The Mini Toolbar appears whenever you select some text. As your mouse points to the selected text, the transparent toolbar appears. As you move your mouse pointer so it rests on top of the toolbar, the Mini Toolbar appears in full opacity (see Figure 8).
Figure 8. Save mouse movement by using the Mini Toolbar.

Available choices on the Mini Toolbar include the following:
-
Font
-
Font Size
-
Grow Text
-
Shrink Text
-
Increase Indent
-
Decrease Indent
-
Bold
-
Italic
-
Underline
-
Center
-
Text Highlight Color
-
Font Color
-
Format Painter
Tip
If you find the Mini Toolbar distracting, you can turn it off. Click the File tab and choose Options. Click General and remove the check mark from Show Mini Toolbar on selection.
Using the Font Dialog Box
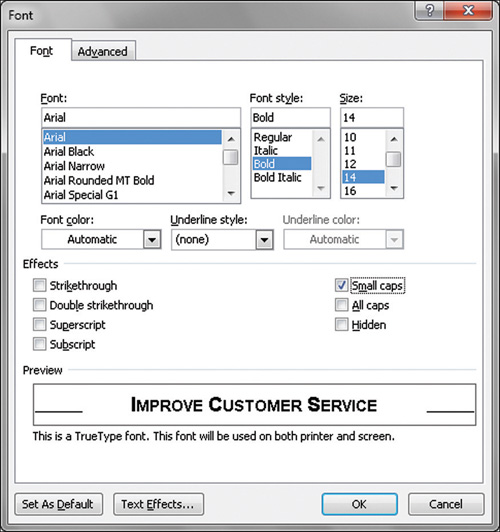
Another way to apply formatting to your selected text is through the Font dialog box, where you can make all your font choices via a single box. Also, you’ll find that the Font dialog box offers additional attribute options not available on the Ribbon. Use the following steps to work with the Font dialog box:
-
Select the text you want formatted.
-
From the Home tab, click the Fonts group Dialog Box Launcher or press Ctrl+Shift+F. You see the Font dialog box displayed in Figure 9.
Figure 9. The Font dialog box.

-
Click the OK button.
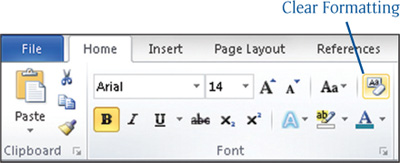
Removing Formatting
If you decide you really liked the original formatting in your document, you can easily return it to the default document settings. After selecting the text from which you want to remove formatting, choose Home > Font > Clear Formatting. (See Figure 10.) All text and paragraph formatting choices return to the default setting with the exception of highlighting. Any applied highlighting remains on the selected text.
Figure 10. Easily remove unwanted formatting.
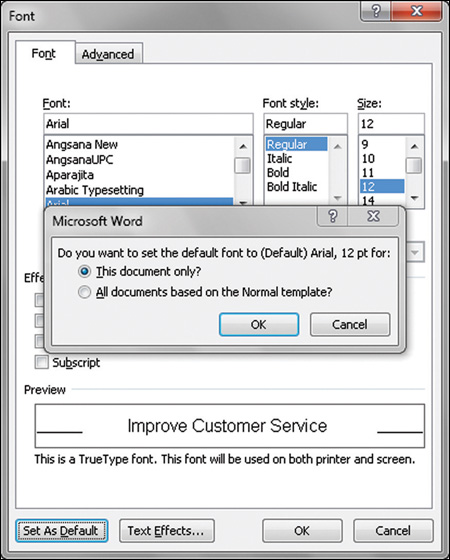
Changing the Default Font
Word 2010 begins with an 11-point Calibri font. If your company has a different font as its company standard, or you just prefer a different font for most documents, you can change the default font for any new Word documents that you create. Changing the default font does not affect any existing documents.
You can set the default font from any blank document, or any currently open document. Just follow these steps:
-
Click the Default button. A confirmation message like the one shown in Figure 11 appears.
Figure 11. Confirm the Default font change.