With the powerful capabilities of IIS at
your disposal, you’re not stuck with using just the default Windows
Home Server website. For all practical purposes, you can create
as many websites as you want. You can create a website for each member
of the family; you can create a website to display family photos; or
you can create a website that hosts the family blog, which might be a
record of your family’s activities (a sort of year-round Christmas
newsletter).
You can do all this and much more because IIS is
capable of hosting multiple sites on a single Windows Home Server PC.
The secret behind this is that you can use one or more of the following
items to construct a unique address for each site:
| IP address | You can assign multiple IP addresses to the Windows Home Server computer and then apply each address to a new website. |
| Port number | The
Windows Home Server site uses ports 80, 443, 808, 5010, 8001, 55000,
and 56000, but you can assign port numbers such as 81, 82, 8080, and so
on to each new website. This enables you to host multiple websites on a
single IP address. |
| Host header name | This
is a unique name that you assign to each new website. This name enables
you to host multiple websites on a single IP address and port number. |
You can mix and match these techniques, as needed. For example, you could use nothing but unique IP addresses or port numbers
for each website, or combinations of IP addresses and port numbers. The
method you use depends on the number of websites you want to set up and
the number of computers on your network. As you can see over the next
few sections, the methods require varying amounts of effort on your
part and varying levels of complexity for users to access the sites.
Read through and try each method before deciding which one to implement.
1. Creating a New Website Using a Different IP Address
This enables you to
consistently access the server using an IP address that you know will
never change, and it enables you to set up your router to forward ports
to the server’s IP address.
However, there’s nothing to stop you from assigning
a second (or a third or a fourth) static IP address to Windows Home
Server. This means that you can have the same benefits that come from a
static IP address for your own websites (plus get the capability to
host multiple sites on a single server in the first place) by adding
more IP addresses to Windows Home Server and then using those addresses
to define the location of your new websites.
Assigning an Additional IP Address to Windows Home Server
The first step here is to assign another IP address to Windows Home Server. Here are the steps to follow:
1. | Right-click
the Network icon in the notification area, click Network and Sharing
Center, and then click Change Adapter Settings to open the Network
Connections window.
Tip
You can also open Network Connections by clicking Start, typing network conn, and then clicking View Network Connections.
|
2. | Right-click
the icon for the connection to your local area network (LAN), and then
click Properties. The connection’s property sheet appears.
|
3. | In
the Networking tab, double-click Internet Protocol Version 4 (TCP/IPv4)
to display the Internet Protocol Version 4 (TCP/IPv4) Properties dialog
box.
|
4. | Make sure the connection is set up to use a static IP address .
|
5. | Click Advanced to display the Advanced TCP/IP Settings dialog box.
|
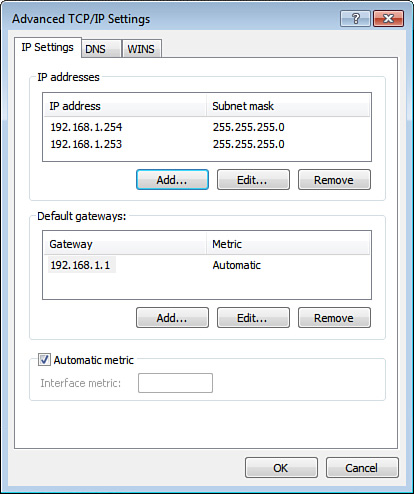
6. | In the IP Settings tab, click Add to display the TCP/IP Address dialog box.
|
7. | Type
the IP address you want to use. Be sure to use an address that doesn’t
conflict with an existing static IP address on the server or with the
other DHCP clients on your network. A good idea is to start with the
highest possible address (usually 192.168.1.254) for the first static
IP address and then work down (so the second static IP address would be
192.168.1.253, the third would be 192.168.1.252, and so on).
|
8. | Type the subnet mask. (Windows Home Server should fill this in automatically.)
|
9. | Click
Add. Windows Home Server returns you to the Advanced TCP/IP Settings
dialog box and displays the new IP address in the IP Addresses list, as
shown in Figure 1.
|
10. | Click OK in all the open dialog boxes to put the new settings into effect.
|
Note that you can repeat these steps as often as you
like (with the only practical limit being the number of available IP
addresses) to add more static IP addresses as you need them.
Creating a Website Using a Different IP Address
With your newly minted IP address at the ready, you can now create your website. Here are the steps to follow:
1. | In IIS Manager, open the SERVER, Sites branch (where SERVER is the name of your Windows Home Server PC).
|
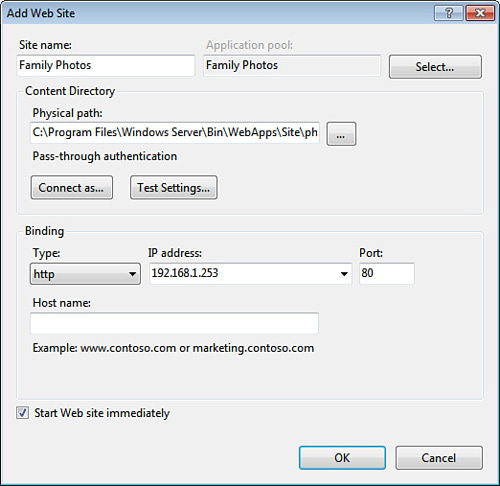
2. | In the Actions pane, click Add Web Site. IIS Manager opens the Add Web Site dialog box.
|
3. | Use
the Site Name text box to type a name for the website. This is the name
that appears in IIS Manager, within the Sites branch.
|
4. | Either
type the full pathname (drive and folders) in the Physical Path text
box, or click Browse and use the Browse for Folder dialog box to select
the folder or create a new folder.
|
5. | In the IP Address list, select the IP address you created in the previous section, as shown in Figure 2.
|
6. | Leave the Port value at 80.
|
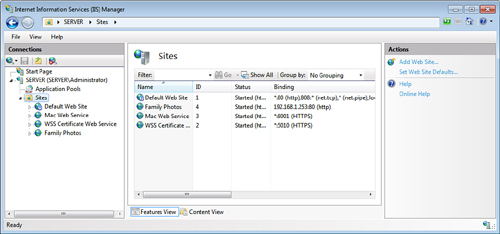
7. | Click OK. IIS Manager adds the new site to the Sites branch, as shown in Figure 3 (see the Family Photos site).
|
From here, add content to the folder you specified in step 4, including a file that uses one of the IIS default names.
Associating the IP Address with a Hostname
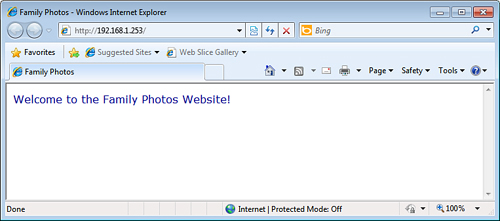
Your new website now works, but the only way you can access it is to browse to http://IP, where IP is the IP address that you created earlier, as shown in Figure 4.
That’s fine, but you probably don’t want some
members of your family having to deal with the complexities of IP
addresses. To avoid that, you can associate a hostname (such as FamilyPhotos) with the IP address.
The easiest way to do this is to make a manual adjustment to the hosts
file, which you use to map IP addresses to hostnames. (Windows Home
Server can be configured to use its built-in DNS server, but this is a
hideously complex process, so I don’t recommend it.) The only downside
to this technique is that you must edit the hosts file on Windows Home Server and every computer that you want to give access to the site.
Before proceeding, note that you can use the hosts file to set up both local and remote (that is, Internet) mappings:
A local mapping associates an IP addresses with a simple hostname, such as FamilyPhotos or KarensWeb.
A
remote mapping associates an IP address with a subdomain name. For
example, suppose you’re using the Windows Live Custom Domains service
and your domain name is ourfamily.homeserver.com. You can use the hosts file to map an IP address to a subdomain name, such as photos.ourfamily.homeserver.comkaren.ourfamily.homeserver.com. or
Note
It’s worth pointing out here that this technique of modifying the hosts
file is only viable for the computers on your network. Obviously, you
can’t expect others trying to access your site from the Internet to
modify their hosts file.
Follow these steps to open the hosts file on computers running Windows XP or earlier:
1. | Select Start, Run (or press Windows Logo+R) to open the Run dialog box.
|
2. | Type the following command in the Open text box:
notepad %systemroot%\System32\drivers\etc\hosts
|
3. | Click OK. The hosts file opens in Notepad.
|
Windows 7 and Vista require elevated permissions to edit any file in the %SystemRoot% folder or any of its subfolders. Therefore, you need to follow these steps to open hosts in Notepad:
1. | Select Start, All Programs, Accessories.
|
2. | Right-click Command Prompt, and then click Run as Administrator.
|
3. | Enter your UAC credentials to continue.
|
4. | At the command prompt, type the following:
notepad %systemroot%\system32\drivers\etc\hosts
|
5. | Press Enter. The hosts file opens in Notepad.
|
With the hosts file open, start a new line at the end of the file. Then enter the mapping using the following general format:
Here, replace IP with the address you assigned to your website, and replace hostname
with the hostname you want to associate with the IP address. In the
following example, I’ve assigned both a local name and a subdomain name
to 192.168.1.253:
192.168.1.253    photos
192.168.1.253    photos.ourfamily.homeserver.com
Figure 5 shows the website from Figure 4 being accessed using the local hostname as the address (http://photos).
