You’ve seen how to connect to a business
system using SharePoint Designer. The wizards make it simple to connect
to SQL Server databases or appropriately designed WCF services. But
what happens if you want to connect to something a bit more exotic? The
answer is to create a .NET connectivity assembly. By creating a
connectivity assembly, you can write code to
handle any of the operation stereotypes supported by the BDC service.
As mentioned earlier, BDC itself doesn’t read or write to the external
data store; it simply delegates to an appropriate endpoint. By creating
a connectivity assembly, you can effectively create custom endpoints to
do whatever is appropriate for your application.
1. Pluggable Connector Framework
As briefly covered earlier in the section “Connector
Framework,” BCS makes connections to external systems via a pluggable
connector framework. It is therefore possible to create custom
connectors to interface with external systems.
Connectivity assemblies encapsulate an entire data
access model. In the preceding section, we worked through configuring
the metadata for the database connector; with connectivity assemblies,
such configuration isn’t required since the metadata is installed with
the connectivity assembly. Naturally, this lack of configurability can
also be considered a drawback where the APIs for the external data
store are likely to change frequently.
When you’re building custom connectors, you should
be aware of some installation considerations. Connector assemblies must
be manually installed in the Global Assembly Cache (GAC) on each server
or rich client that intends to use the connector. By contrast, a
connectivity assembly is stored within the BDC data store and is
therefore automatically available to the BDC service on every server.
Where the assembly is required by a rich-client interface, it is
seamlessly installed via ClickOnce.
2. Business Data Connectivity Model Project
From our demonstration scenario, we require the
functionality to attach product information retrieved from Internet
search results to our competitive analysis reports. Of course, we could
achieve this result by using a web browser and simply cutting and
pasting the URL into a text field, but in the age of the mash-up,
switching between applications in such a fashion would almost certainly
lead to a disciplinary hearing of the International Association of
Mash-up Artists—not to mention the fact that it would deprive us of the
opportunity to explore Business Data Connectivity Model projects in
Visual Studio 2010.
2.1 Create a New Project in Visual Studio 2010
To create a new Business Data Connectivity Model project, take the following steps:
Open Visual Studio 2010. Choose File | New | Project.
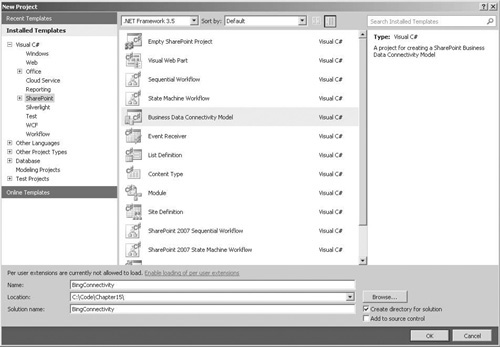
In
the New Project window, select SharePoint in the left pane and Business
Data Connectivity Model in the middle pane, as illustrated next. In the
Name text field, type BingConnectivity.

In the SharePoint Customization Wizard, select your local server for use when debugging.
Click
Finish to create the project. A new project will be created containing
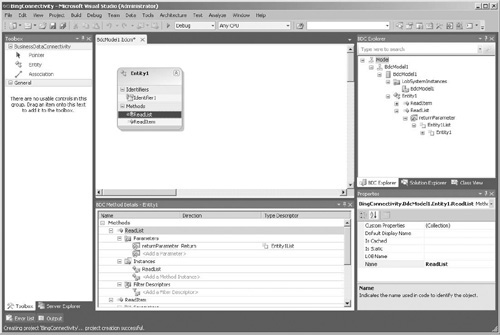
a BDC Model and a single sample entity, as shown in Figure 2.

The Visual Studio 2010 design surface for creating
connectivity assemblies includes a number of specific tools. First, the
entity view, shown in the middle of the page in Figure 2,
lets you see all of the entities defined in your data source and the
identifiers and methods defined on them. By clicking a method or
identifier in the entity view, the BDC Method Details pane, shown below
the entity view in the figure, is populated with details about the
methods and identifiers defined in the entity. Finally, the upper-right
pane in Figure 2 is the BDC Explorer pane. This control presents a hierarchical view of your BDC model.
Note
At the time of writing, the BDC design tools are visible only when you’re viewing files with a .BDCM extension.