Configure a management point for any site
to which you plan to assign clients. Before installing an MP. Use the following steps to install the management point on a primary site:
1. | In the ConfigMgr console, navigate to Site Management -> Site Database -> Site Management -> <Site Code> <Site Name> -> Site Settings -> Site Systems. Expand Site Systems, right-click the site server, and select New Roles.
|
2. | The first page of the New Site Role Wizard should already be configured. Click Next and then select the Management Point role.
|
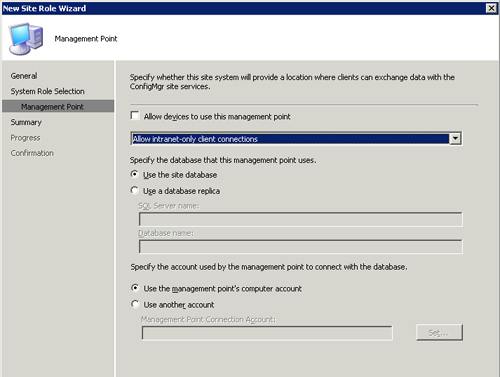
3. | After clicking Next, configure the MP, an example of which is displayed in Figure 1. Specify the following options:
Select “Allow devices to use this management point” if you have devices that you want to manage. Select the type of connections to allow from clients—intranet only, Internet only, or both. If you are using a SQL Replica, specify the database information. You
will need to specify an MP connection account if you cannot configure
the management point’s computer account to access content. If the MP needs access to a site database in a different domain (regardless of forest), you must use an MP connection account.

|
4. | Review the Summary page. Click Next and then Finish to complete the setup.
|
5. | Review mpsetup.log and mpmsi.log on the ConfigMgr site server to check for any errors.
|
|
When looking for errors in the mpmsi.log file, open the file and search for value 3. If it exists, look several lines above that for the error. The text will provide a beginning point for troubleshooting.
|
The
process just completed described creating a management point on a
primary site server. Depending on the size of your site, you may
consider offloading the management point to a second server to remove
some of the processes required of your primary site.