1. Choosing an Email Client
From
the start, the Internet has been touted as a means for enhancing human
communications, and among the many communication protocols available in
the online world, few have had the impact of electronic mail (email).
You already know email and Web (its official protocol name is HTTP), but
do you remember FidoNet, NNTP, Gopher, UUCP, Archie, Jughead, Veronica,
or WAIS? All of these are, in one form or another, antiquated methods
of communicating over the Internet. AOL had its own technologies, which
weren’t compatible with CompuServe’s or Prodigy’s technologies. Email
was the great level playing field which was available to all, so it
became the standard we now know.
To fully understand the nature of email, keep in
mind that, at its most basic level, it is simply a way for users to send
messages to each other over a network. This network could be a local
area network (LAN) run by your company using Microsoft Exchange Server
software. In this situation, the network server manages all message
traffic. The server can also act as a gateway to other servers, allowing
you to send mail beyond the LAN. If you have an email account with an
Internet service provider (ISP) or other Internet-based service, the
provider’s server acts as your gateway to other mail servers across the
Internet.
Given that email is here to stay, you must decide
which email client you plan to use for reading, composing, and sending
messages. A number of options are available to you, and which one you
ultimately choose will depend not only on your personal preferences but
also on professional needs. This choice is made all the more critical
because Microsoft has removed
Outlook Express from Windows 7. In fact, Windows Mail, MSN Messenger,
and Photo Gallery are no longer part of Windows 7. To have access to
these programs, you must download the Windows Live Essentials package of
applications from Microsoft.
Note
While it is neither
convenient nor intuitive to have to download it, Windows Live Essentials
is an excellent set of programs, and it’s free. Windows Live Essentials
includes: Messenger for IM, Mail for email, Writer for blogging, Photo
Gallery for image management, Movie Maker for making movies, Toolbar for
Internet Explorer, and Family Safety to help keep your kids safe. |
Windows Live Mail is a multifeatured program
designed to appeal to a variety of email users, but it isn’t for
everyone, especially if you work in a corporation that requires tight
integration of email with its communications infrastructure (for
example, mobile communications devices such as the iPhone, BlackBerry,
Palm OS or WebOS, Symbian, and Windows Mobile smartphones). Windows Live
Mail can also function as a newsgroup client, making it a “one-stop”
program if you routinely communicate via email and use newsgroups.
Windows Live Mail includes some important
improvements over its predecessor, Windows Mail from Windows Vista,
although it is essentially an update of the same program. One of the
most significant additions to Live Mail is the inclusion of a
calendaring system, which makes Live Mail more like Outlook than ever
before.
Tip
If you use a Windows
Mobile device as your smartphone, you also have received a copy of
Outlook along with your handset. You’ll need this copy because
ActiveSync, the software that synchronizes your desktop to your handset,
won’t work with anything else. If you prefer, however, you can still
install Windows Live Mail and use it for other email accounts. |
2. Windows Live Mail Quick Tour
Getting Windows Live Essentials
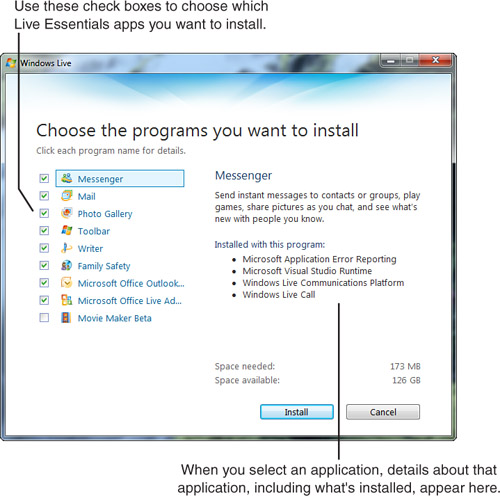
Once you have an Internet connection configured and can access websites, go to www.windowslive.com
and download Windows Live Essentials for free. The initial download is
just the installer (1.08MB). The speed of your Internet connection and
the components of Windows Live Essentials you choose will determine how
long it takes for the installation. By default, all components are
selected (see Figure 1)
except Movie Maker Beta, for a total of 164MB. If you have Outlook
installed, it will also offer you the Outlook Connector and the Office
Live Add-in (which requires a free Office Live account). If you choose
everything, including Movie Maker Beta, the download is 184MB. If you’re
still on dial-up, I would start the process before you “close shop” for
the night. It should be done by morning.
Launching Windows Live Mail
After
Windows Live Essentials is installed, it will be located in your Start
menu. You can launch it by clicking Start, All Programs, Windows Live,
and selecting the Windows Live Mail item. Once it’s running and you can
see its icon on the taskbar, right-click the icon and select Pin This
Program to Taskbar so that it will always be available there.
Setting Up an Email Account
Before you can send or receive email, you need
to have an email account. Microsoft assumes that when you download
Windows Live Essentials you have a Windows Live account. There is also a
good possibility that your account has already been set up for you by
your ISP. You’ve likely been using an email account for some time. If
that account happens to be from one of the numerous free online
providers, all the better.
Wherever
you get your email from, Windows Live Mail can likely handle it rather
easily. If you have a Hotmail, Messenger or MSN Messenger, Windows Live,
Xbox Live, or even an old Passport account, you can log in to Windows
Live. If you don’t have any of these accounts, you can create one for
free at www.windowslive.com.
You can sign up for an @live.com or @hotmail.com address or, such as
Passport used to allow, you can use your own email address.
Note
As you likely know,
Windows likes to have default programs for certain tasks. If you use
Internet Explorer and then install Firefox, the new application will ask
you if you want to make it the default application for web browsing. If
you make that change and then go back to IE, it will ask if you want to
make it the default again or to just stop asking. Email works the same
way. Windows 7 doesn’t come with a mail client, so the first one you
install becomes the default. Since you’re installing Windows Live Mail
as part of the Essentials package, Windows Live Mail becomes the
default. You can even manage the applications Windows uses as default
for various file types and tasks by going to Start, Control Panel, and
opening the Default Programs item. Once that opens, click the Set Your
Default Programs link. |
When you run Windows Live Mail the first time,
the New Account Wizard will run to walk you through setting up access to
your account. These steps also work for setting up a second or third
account on the same machine:
1. | If
this is your first time starting Windows Live Mail, skip to step 2. If
you have already configured Windows Live Mail for an email account and
would like to add another, click the Add Another Email Account link in
the sidebar. You’ll see the dialog box shown in Figure 2.
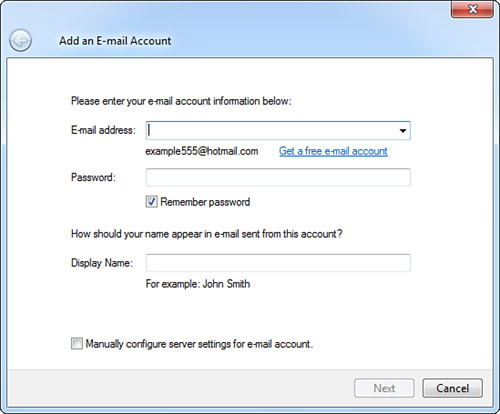
|
2. | Enter
your email address, that account’s password, and your display name (for
example, Simon LeBon, Eric Idle, or Darth Vader), and then click Next.
|
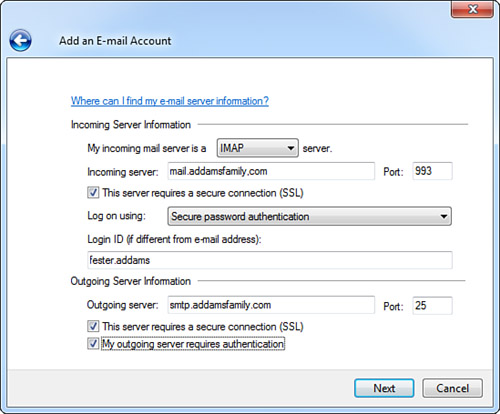
3. | If
Windows Live Mail recognizes the service provider you have entered, it
already knows how to reach those servers and will complete the
configuration automatically. In most cases, however, Live Mail can
generally figure out your mail server settings by using a kind of “best
guess” technology. If it is capable of doing so, click Finish. If not,
you will receive the server configuration pages and jump to step 4. You
should have this information from your ISP or email service provider
(you may also choose to do this manually if you prefer).
Tip Most ISPs provide this
information on their websites. So if you cannot locate the documentation
you received when you signed up for service, your easiest option is to
visit your ISP’s website to find your incoming and outgoing email server
names. |
|
4. | The
next wizard box asks for your incoming mail server type (either POP3,
IMAP, or HTTP), the address of your mail server and whatever settings it
requires to allow you access, what your username is, and how to connect
to the outgoing server (see Figure 3) as well as any other settings specified by your provider. Click Next.
|
5. | If
you have successfully configured the account by filling out the dialog
box, you will be informed that you have completed the setup. Click
Finish. You will know for sure once you click Finish and Windows Live
Mail tries to connect to the server (see Figure 4).
|
6. | If
any settings were not correct, you will not be logged in and you will
receive warning dialog boxes alerting you to check your settings again.
You can find these settings by right-clicking the account name in the
sidebar and selecting Properties.
|
If
the server will not accept your password, you might’ve used the wrong
letter case. Many email servers are case sensitive. If the Caps Lock key
on your keyboard is on, you might have entered the password in the
wrong case. Sometimes, an inadvertent space can be the culprit as well. |
|
Reading and Processing Incoming Messages
Note
Secure Password
Authentication (SPA) is used by some email services to prevent
unauthorized users from getting or sending your email. When you attempt
to receive your mail in Windows Live Mail, a screen will pop up asking
for you to enter a username and password. Both Windows Live Mail and MS
Outlook have this feature. Most email (POP) servers do not use this
feature, so you should probably leave it turned off. |
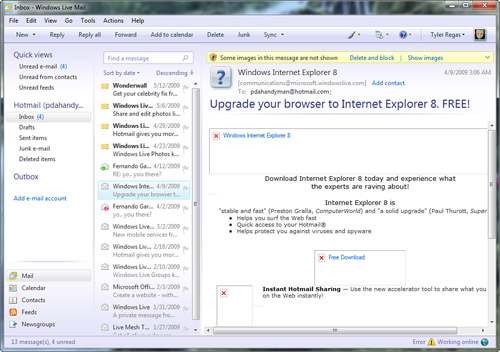
After you have an account set up, you are ready
to begin downloading and reading mail. To get started, open Windows Live
Mail and go to the Inbox. By default, Windows Live Mail automatically
checks for new mail when it first opens. If your installation is
configured otherwise, click the Sync button on the toolbar. As your mail
is coming in, a dialog box appears indicating which account is being
checked and shows the progress of the sending and receiving. It will
also tell you how
many messages are being transferred. New messages will then appear in
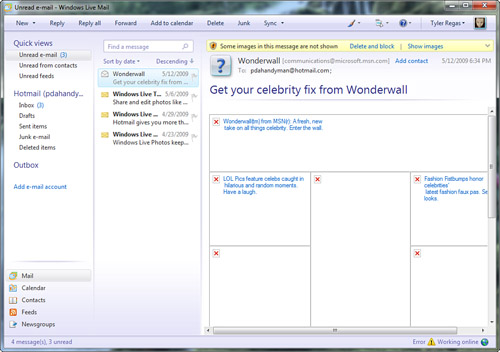
your inbox as well as in the Unread E-mail Quick View folder, as shown
in Figure 5.
When you reply to a message, you need to be wary
of a few things. First, note that if the incoming message was sent to a
group of people, clicking the Reply button will send your message to
the single person who sent it to you; clicking Reply All will send your
message to the entire list of people who received the original message.
Although this can be a helpful tool when communicating with a group of
people, it could get you in trouble if you think you are writing to a
specific person and accidentally click the Reply All button. Before you
send any message, make sure the correct person or persons are listed in
the To: and Cc: fields. Anyone listed in those two fields will receive a
copy of the message as well as a list of the other recipients and their
email addresses, so make sure you aren’t airing your dirty laundry more
publicly than you intended.
Tip
Windows Live Mail does
not show the menu bar by default; instead, it shows a small icon on the
toolbar that sits between the icon of a paintbrush and a question mark
on a small, round disc, all just left of the active email account
selector. Just click and you will see Options and other items. You can
make the menu bar appear from this menu, as well. |
The rest of the reply process is
straightforward. You just type in your own text and click Send on the
toolbar when you are ready to deliver the message. By default, Windows
Live Mail automatically places the text of the original message in the
reply.
When you’re composing your reply, keep in mind these important points:
Consider editing the quoted text in the
reply by cutting it down to the text you actually intend to respond to.
Most people don’t appreciate reading four pages of quoted text followed
at long last by “Me too.”
Include enough
of the original text to help the recipient understand exactly what you
are replying to. If the recipient doesn’t read your reply for several
days, he might not remember what the original statements were.
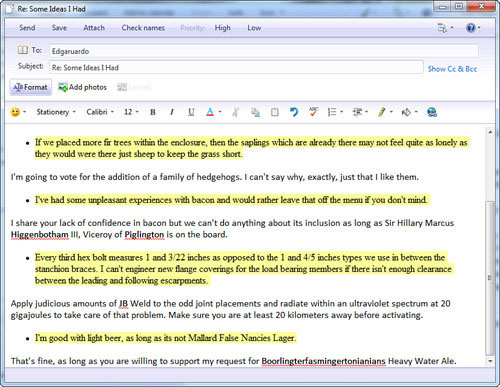
Breaking
up quoted text with your own inserted comments is usually acceptable,
but make sure it is obvious which words are yours. Figure 6
illustrates this reply technique in a plain text message. Windows Live
Mail inserts the > sign before each line of the email you’re
responding to. In an HTML email (sometimes mistakenly called rich text),
a solid vertical bar runs down the left side of the original text, and
writing new text between paragraphs doesn’t break that bar, so it’s
difficult to tell what text is newly written. In that case, use colored
text or another font (choose Format, Font).
Deleting Messages
How
and when messages are deleted depends on what kind of mail server you
use. If you receive mail from a POP server, deleted messages remain in
the Windows Live Mail Deleted Items folder indefinitely, similar to
“deleted” files in the Windows Recycle Bin. You can permanently delete
messages by right-clicking the Deleted Items folder and choosing Empty
‘Deleted Items’ Folder from the shortcut menu that appears.
Note
Note that the term
“delete” means that the message is removed from the server permanently
and that “purge” means that it is removed from the current view and
dealt with as determined by any rules you may have in place. For
example, if you opt to have deleted messages moved to the Trash folder,
it will be marked as deleted from the Inbox, but will appear in the
Trash folder after it is purged. |
You can change the way Windows Live Mail handles
items in the Deleted Items folder. To do so, choose Tools, Options, and
select the Maintenance tab to customize when and how mail messages are
deleted.
If you have an IMAP mail server, deleted
messages are moved to an online Deleted Items folder or Trash folder,
depending on what it’s named on the server itself.
If
you have several mail accounts, but Windows Live Mail doesn’t check all
of them when you click Sync, open the Properties dialog box for each of
your mail accounts. On the General tab is an option labeled Include
This Account When Receiving Mail or Synchronizing. Make sure a check
mark appears next to this option for each of your mail accounts. |