As you likely already know
from using Windows in the past, a number of other freebie accessories
come with Windows. Some are useful and some end up lying fallow for many
PC users who never even know they exist. These little apps have been
carried forward from generations of Windows going back to when I started
writing about it with Windows 3.0. Because they are so well known by
this point, we won’t tie up book pages here with the detailed
descriptions used in our past books. It will suffice here to briefly
tell you what each does. Some of them, such as Calculator, Paint, and
WordPad, deserve extra merit here because they were seriously updated
for Windows 7.
The following sections provide a brief rundown of each program.
Narrator
This is an Accessibility tool that helps the
visually impaired read text on the screen, because the computer reads
aloud to you, in a synthesized voice. Obviously, you need speakers or a
headset to hear this. Run Narrator by typing narr
at the Start menu and clicking Narrator. Be careful, because the
program will describe every item on the screen, and say the name of
every key you press. Fine-tune the categories of events and text that
this utility reads aloud via the Preferences menu.
Magnifier
This is an Accessibility tool that helps the
visually impaired see a selected portion of the screen or all of the
screen better by increasing the size of text and graphics. Simply press
the Windows key (or click the Start button) and type mag and you will see the application name pop up. Click it. A small application window will appear, as shown in Figure 1.

There are two modes of operation: Full Screen
and Lens. The first magnifies the whole screen, and the screen will pan
and scan as you move the mouse beyond the edge of the screen. Lens mode
will enlarge only the screen area under the mouse as it moves. See Figure 2 for an example. We have turned on the Color Inversion option in the Options dialog box for this effect.
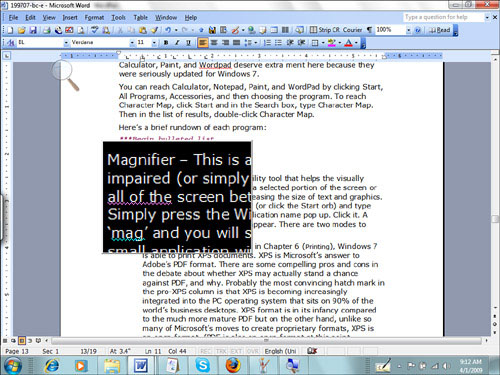
In
Lens mode, there is a magnifying glass icon on the screen. Mousing over
that will reveal a >> symbol. Click that to reveal the Magnifier
window again in order to increase or decrease magnification with the +
and − buttons. Click the gear icon to set options. Options include
specifying the size of the lens (in height and width) and setting the
multiplier for magnification when you click the + or − button. A nice
feature for typists is that the magnifier lens can be set to follow the
text insertion point.
Tip
With the advent of the
little-screened “netbooks” that have become increasingly popular,
Magnifier is a timely tool. Screens on netbooks are very small and often
sport high resolution (translate: everything on the screen is
miniscule!). Everyone who uses a netbook can potentially benefit from
using this tool. |
XPS Viewer
There are some compelling pros
and cons in the debate about whether XPS may actually stand a chance
against PDF, and why. Probably the most convincing hatch mark in the
pro-XPS column is that XPS is becoming increasingly integrated into the
PC operating system that sits on 90% of the world’s business desktops.
XPS format is in its infancy compared to the much more mature PDF, but
on the other hand, unlike so many of Microsoft’s moves to create
proprietary formats, XPS is an open format. (PDF is also an open format
at this point, although many people are under the misconception that PDF
is a proprietary Adobe
format.) This should assist XPS in getting a toehold in the otherwise
PDF-dominated world of portable documents.
What this means is that you can simply print a
document to the Microsoft XPS Document Writer and name the output file.
You can then email or otherwise send that file to other computers or
users who have the XPS Viewer installed (for XP users it is a download).
In Vista, you were able to view XPS documents either in a viewer that
was hosted within Internet Explorer 7 or in the supplied XPS Viewer. In
Windows 7 the same is true except that the XPS Viewer has been updated.
Not as sophisticated as Adobe Reader or Acrobat by far, the XPS Viewer
in Windows 7 only allows you to search an XPS document for a word or
phrase, zoom in and out, digitally sign documents, and set document
permissions. Adobe isn’t quaking in its boots yet, but it took over a
decade for PDF to mature, so XPS has some catching up to do.
To run the XPS Viewer, click the Start button and type XPS.
You should see it listed. Alternatively, click All Programs and click
XPS Viewer. Of course, because of the file association set up for XPS
files, clicking one will open the document in the XPS Viewer. Trying to
digitally sign a document will fail unless you own a digital signature.
Choose Permissions, Set Permissions, and this will lead you to Windows
Live ID and the Windows Rights Management Wizard, where you can sign up
for one. This will activate your machine. You can then specify
permissions for the file. If you are a viewer of the document, you can
see what permissions you have been granted.
Calculator
Up until Windows Vista, Calculator was a
quick-and-dirty onscreen version of two traditional pocket calculators: a
standard no-brainer calculator (Standard mode) and a more complex
scientific calculator (Scientific mode) used by statisticians,
engineers, computer programmers, and business professionals. These two
modes were good for calculating your lunch bill, a list of inventory
items, or the mortgage payment on your office building, but neither
sported a running tape that you could use to backtrack through your
calculations. Now, in the new version of Calculator that is completely
updated for Windows 7, there are additional modes, views, and options.
While most users will only require standard calculations, there is the
previously available Scientific mode as well as a Statistics mode and a
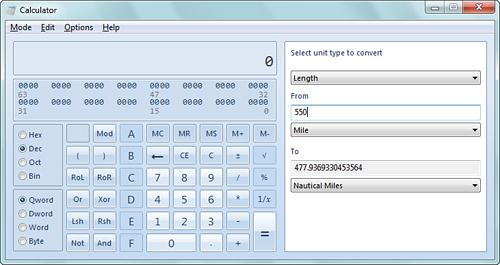
Programmer mode. Calculator will also do unit conversions for you—both
date conversions and measurement conversions. For example, you can enter
two dates and the application will calculate the number of years,
months, weeks, and days between them. Unit conversion is extensive,
including options for angle, energy, length, power, pressure,
temperature, time, velocity, volume, and weight. Each of these
categories has between 5 and 14 different target conversion units. For
example, you can convert between foot-pounds/min to watts.
One of the best features of the new Calculator
is that it has a larger screen that displays the history of calculi and
lets you clear as well as edit them. We have all waited a long time for
this. How many times have you been adding a list of numbers and wondered
if you made an error in entry? One of the best features of the running
“tape” is that you can backtrack and edit your entries after the fact by
double-clicking that entry’s line on the tape. If you do so, the
application will display the original calculation result and the altered
result when you press Enter, so you can easily compare them.
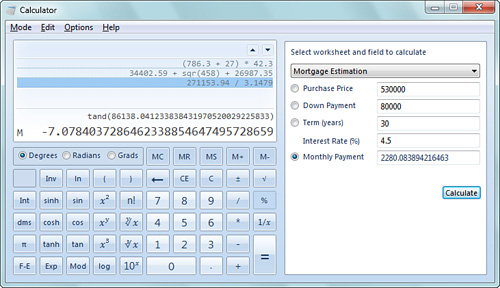
Finally, there is a Template mode that offers
three calculation templates: Gas Mileage, Lease Estimation, and Mortgage
Estimation. Plug in a few variables and click Calculate and you have
your result. For example, provide the values for distance and fuel
consumption, and your miles per gallon is calculated. With Lease
Estimation things are pretty much the same, only there are more fields
to fill in: lease value, period of time, number of payments per year,
residual value, interest rate, and periodic payment. The same principle
applies for Wage and Mortgage Estimation. Figures 3 and 4 show examples of two Calculator modes and templates.