IT tutorials
 
Windows
 

Windows 7 : Running Multiple Copies of One Program, Copying Your Screen Content

- Free product key for windows 10
- Free Product Key for Microsoft office 365
- Malwarebytes Premium 3.7.1 Serial Keys (LifeTime) 2019
12/13/2012 5:14:44 PM

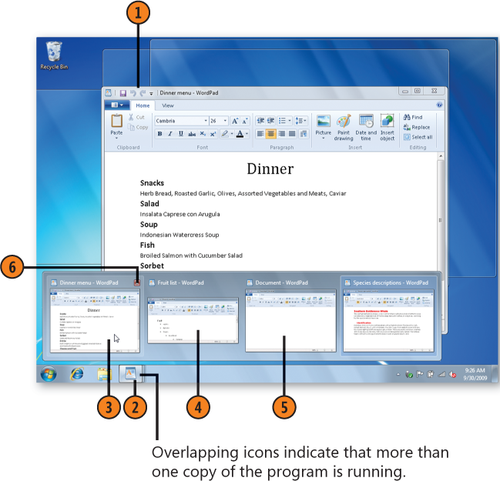
1. Running Multiple Copies of One Program

You might want to have more than one file open in the same program—two different documents in WordPad, for example. If you open an additional existing file from a Jump List, the file will appear in a new copy of the program. But if you want to open a blank version of the program, you'll need to take extra steps. With multiple copies open, Windows gives you some very nice tools to figure out which copy you want to access. The thumbnails of open windows and the full-screen previews are available only when your computer is set to use the Aero Glass feature. If it's set to use a basic theme, such as the Windows 7 Basic theme, you'll see a list of open windows instead of previews when you point to the program icon.

1.1. Open and Use Another Copy of a Program

  1. Right-click the program icon on the taskbar, and choose either of the following:

    • The program's name to open the program with a blank file.

    • The file you want open.

  2. Point to the program icon to see thumbnails of the open files.

  3. Point to the thumbnail of the file you think you want to show in a full-screen preview.

  4. If that isn't the file you want, point to a different thumbnail to see a full-screen preview of a different file.

  5. To switch to the file you want, click the thumbnail for that file.

  6. If you want to close a file without switching to it, point to the thumbnail and then click the Close button.


2. Copying Your Screen Content

You can use the Snipping Tool program to capture an image—or a snippet—of a Web page, or just about anything else on your computer screen. You can then e-mail the image, save it, or paste it into a file in another program.
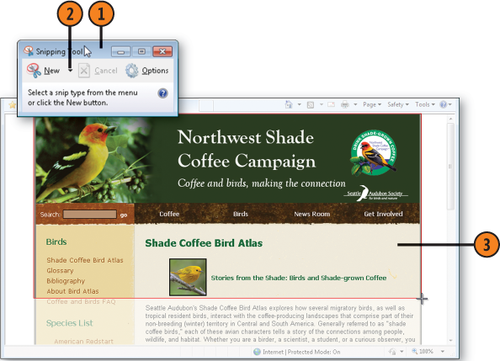
2.1. Snip an Image

  1. With the content you want to capture displayed on the screen, click the Start button, type snip in the Search box of the Start menu, and choose Snipping Tool from the menu to start the program.

  2. Click the down arrow next to the New button, and select the type of snip you want:

    • Free Form Snip to capture any shape

    • Rectangular Snip to capture a rectangular snip

    • Window Snip to capture a program or a folder window

    • Full-Screen Snip to capture everything on your screen
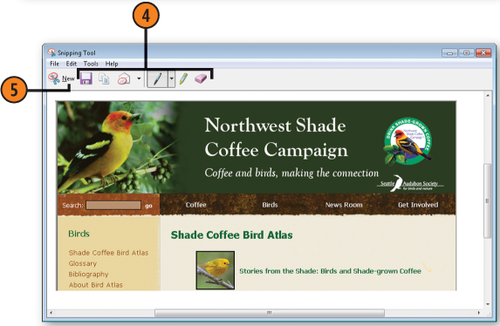
  3. Capture your snip. For free-form and rectangular snips, drag out the shape with the mouse (while holding down the left mouse button) or a stylus or finger, depending on your system. For a window snip, click or tap anywhere in the window. The full-screen snip is captured automatically.

  4. In the Snipping Tool window, use any of the tools to save, copy, send, or modify the snip.

  5. Click New to capture another image, or click the Close button to close the Snipping Tool.


Others
 
- Configuring Windows 8 Computers : Managing System Properties (part 3)
- Configuring Windows 8 Computers : Managing System Properties (part 2)
- Configuring Windows 8 Computers : Managing System Properties (part 1)
- Windows Server 2008 : Planning a Terminal Services Deployment (part 2)
- Windows Server 2008 : Planning a Terminal Services Deployment (part 1) - Terminal Services Licensing
- Configuring Windows 8 Computers : Using System Support Tools (part 2) - Managing System Configuration, Startup, and Boot
- Configuring Windows 8 Computers : Using System Support Tools (part 1) - Working with Disk Cleanup, Verifying System Files with File Signature Verification
- Windows Server 2008 Server Core : Working with Data - Working with File Associations and Types, Working with ODBC Data Sources
- Windows Server 2008 Server Core : Working with Data - Performing Bulk File Transfers with the XCopy Utility
- Windows Server 2008 Server Core : Working with Data - Validating File Operations with the Verify Command, Performing Backups with the WBAdmin Utility
 
 
Top 10
 
- Microsoft Visio 2013 : Adding Structure to Your Diagrams - Finding containers and lists in Visio (part 2) - Wireframes,Legends
- Microsoft Visio 2013 : Adding Structure to Your Diagrams - Finding containers and lists in Visio (part 1) - Swimlanes
- Microsoft Visio 2013 : Adding Structure to Your Diagrams - Formatting and sizing lists
- Microsoft Visio 2013 : Adding Structure to Your Diagrams - Adding shapes to lists
- Microsoft Visio 2013 : Adding Structure to Your Diagrams - Sizing containers
- Microsoft Access 2010 : Control Properties and Why to Use Them (part 3) - The Other Properties of a Control
- Microsoft Access 2010 : Control Properties and Why to Use Them (part 2) - The Data Properties of a Control
- Microsoft Access 2010 : Control Properties and Why to Use Them (part 1) - The Format Properties of a Control
- Microsoft Access 2010 : Form Properties and Why Should You Use Them - Working with the Properties Window
- Microsoft Visio 2013 : Using the Organization Chart Wizard with new data
Technology FAQ
- Is possible to just to use a wireless router to extend wireless access to wireless access points?
- Ruby - Insert Struct to MySql
- how to find my Symantec pcAnywhere serial number
- About direct X / Open GL issue
- How to determine eclipse version?
- What SAN cert Exchange 2010 for UM, OA?
- How do I populate a SQL Express table from Excel file?
- code for express check out with Paypal.
- Problem with Templated User Control
- ShellExecute SW_HIDE
programming4us programming4us