Moving Gadgets Around
Gadgets are flexible and can be moved all around the screen. They can be dragged onto another monitor. To move gadgets:
Grab
a gadget and drag it to the spot where you want it. To drag the gadget,
click and drag the little Move Gadget button that looks like a grid.
This shows up when you hover over the gadget. (See Figure 7.5,
in which the grid or Move Gadget button is showing.) (With most
gadgets, you can drag them from any spot on the gadget, but this is the
official spot to drag with to avoid making other changes or clicking
links on the gadget.)
Drop
it where you want it. As you move a gadget around on the desktop, it
can obscure another gadget. This is different from how gadgets worked in
Windows Sidebar under Vista, where they automatically adjusted to make
room for each other in a graphically smooth and groovy way. So you will
have to manually position your gadgets. Unfortunately, the View, Auto
arrange icons command reached by right-clicking the desktop doesn’t
arrange gadgets, only icons.
Adding a Gadget More Than Once
There
is nothing to prevent you from adding a gadget to the desktop more than
once. Want a pile of notepads? Lots of slideshows running at the same
time? A passel of stock tickers or news feeds all visible at once? No
problem. Just add them, make the adjustments, and position them as you
want.
If you deal with businesses or associates in
multiple time zones, for example, it would be useful to have multiple
clocks on your desktop, one for each time zone. Figure 7 shows an example. I named the clocks using the adjustment dialog box for each one.

Changing Opacity of Gadgets
When you right-click a gadget, the pop-up menu
includes an Opacity option, which determines whether you can see through
the object. This is a nifty feature, owing once again to the advanced
video architecture of Windows 7. What do you do with a transparent
gadget? Suppose, for example, that you don’t want to have to keep
peeking at the desktop to see a clock but you don’t want that clock to
completely obscure what is behind it, as shown in Figure 8. Here’s what you do:
Set the gadget to always be on the screen by right-clicking it and choosing Always on Top.
By
default, the gadget is 100% opaque. You want to be able to see through
it a bit, so opacity to the rescue. Right-click on the gadget, choose
Opacity, and choose the desired level of opacity.

Note
that even though a gadget is transparent, moving the cursor over the
gadget makes it opaque, and you cannot click something behind it. You’ll
have to move the gadget first.
Removing Gadgets
Gadgets you install will remain active until you
close them and will persist on subsequent reboots. Likewise, if you log
off and log back on, they will be reloaded.
Gadgets you download will be added to your
Desktop Gadget Gallery. They will live there until you right-click them
and click Uninstall. This makes it easy to activate and deactivate
gadgets and still have them readily available.
As mentioned earlier, you can close an
individual gadget by hovering over it and then clicking the X when its
tool handle pops up. But for a more comprehensive approach that, among
other things, allows you to see all the currently running gadgets and
quickly remove selected ones, do this:
1. | Click Start and type in gadgets. A series of gadget-related tasks appears.
|
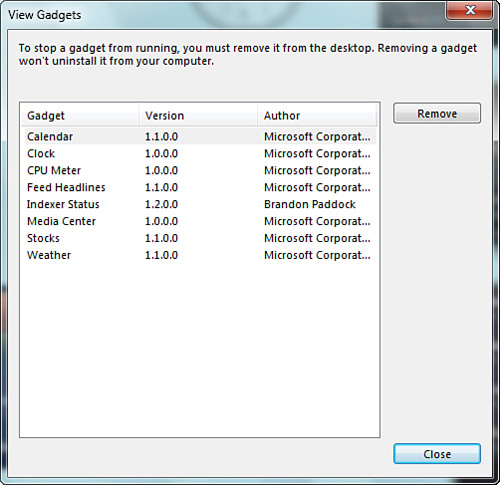
2. | Click View List of Running Gadgets. You’ll see the View Gadgets dialog box, shown in Figure 9.

|
3. | Click the ones you want to stop running and click Remove. Close the box when you’re finished.
Tip The default gadget
location is C:\Program Files\Windows Sidebar\Gadgets. Shared gadgets are
located at C:\Program Files (x86)\Windows Sidebar\Shared Gadgets. |
|
Even after you remove a gadget, it’s not erased
from your computer. It’s still in the list of available gadgets, and
clicking the + (add) button at the top of the Sidebar will reveal it, if
you want to use it later. You can safely remove gadgets without fearing
that you’re obliterating them.
Tip
If you are interested in making your own gadgets go to Google and search for “make build Vista gadgets.” |
Installed gadgets do not
appear in the Control Panel’s Programs applet, so you can’t remove them
from your hard disk that way. You must right-click a gadget in the
Desktop Gadget Gallery and choose Uninstall to remove it from your
drive.