|
Windows Azure offers a tremendous opportunity to move
a lot of data from your Microsoft SharePoint servers into the cloud.
Suppose, for example, that you need to use large-sized graphics or
videos in a SharePoint solution, but you don’t want to take up valuable
terabytes of data storage on your server. You can move these files into Windows Azure and then consume these large
files as needed in your SharePoint solutions. You can also archive
older, historical files in Windows Azure to again relieve valuable
resources from your servers. Although many different scenarios exist for
using BLOB storage, the core reason is similar across many of these
scenarios: the ability to move non-essential or large files to the cloud
to either optimize resource usage or make those files more broadly
available.
You’ll start by creating
an ASP.NET application that will upload documents to BLOB storage.
You’ll then integrate the ASP.NET application via SharePoint by using
IFRAME. Lastly, you’ll create a Windows Communication Foundation (WCF)
service that enables you to request information from BLOB storage via
the REST API and then use the image and image metadata in SharePoint.
1. Creating the Application
In this first exercise, you will use Microsoft Visual Studio 2010 to create the application.
1.1. Create an ASP.NET Application to Populate BLOB Storage
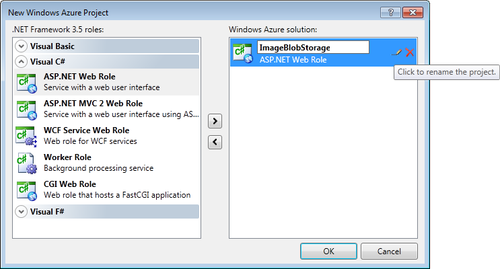
Click File New | Cloud, and select Windows Azure Cloud Service. Provide a name for your cloud project (for example, AzureImageMgr). Click ASP.NET Web Role and add it to the Cloud Service Solution pane. Rename the service (for example, ImageBlobStorage), by clicking the small pencil icon and click OK.

Open the Default.aspx page in Split view. In this example, you’ll create a simple UI that allows you to add, view, and delete images to Windows Azure BLOB storage. The types of controls that you’ll use in this exercise are listed in the following table. | Control Type | Variable Name |
|---|
| Label | filePathlabel | | FileUpload | imageUploadControl | | Label | imageNameLabel | | Textbox | imageNameBox | | Label | categoryLabel | | DropDownList | dropdwnCategory | | LinkButton | lnkbtnSubmitImage | | LinkButton | lnkbtnClearFields | | Label | lblDataGrd | | GridView | imageList |
You
can drag and drop these controls from the Toolbox onto the design
surface, or you can use the code snippet shown in the next step. Replace the main ASP UI code with the following: <%@ Page Title="Home Page" Language="C#" MasterPageFile="~/Site.master"
AutoEventWireup="true"
CodeBehind="Default.aspx.cs" Inherits="ImageBlobStorage._Default" %>
<asp:Content ID="HeaderContent" runat="server" ContentPlaceHolderID="HeadContent">
<style type="text/css">
.style1
{
color: #000066;
font-family: Calibri;
}
.style2
{
font-size: small;
font-family: Calibri;
color: #000066;
}
.style3
{
font-size: x-small;
color: #666666;
font-family: Calibri;
}
.style4
{
color: #000066;
}
</style>
</asp:Content>
<asp:Content ID="BodyContent" runat="server" ContentPlaceHolderID="MainContent">
<table>
<tr>
<td class="style4">
<strong>My Images</strong></td>
<td class="style1">
</td>
</tr>
<tr>
<td class="style2"><strong>Submit</strong></td>
<td class="style3">Click Browse, provide a name and select a category for your
image.</td>
</tr>
<tr><td>
<asp:Label ID="filePathLabel" Text="Image Path:"
AssociatedControlID="imageUploadControl"
runat="server" style="font-family: Calibri; color: #000066;" /></td>
<td><asp:FileUpload ID="imageUploadControl" runat="server"
style="font-family: Calibri" /></td></tr>
<tr><td>
<asp:Label ID="imageNameLabel" Text="Image Name:"
AssociatedControlID="imageNameBox"
runat="server" style="font-family: Calibri; color: #000066;" /></td>
<td><asp:TextBox ID="imageNameBox" runat="server" Width="220px" /></td></tr>
<tr><td>
<asp:Label ID="categoryLabel" Text="Category:" AssociatedControlID=
"dropdwnCategory"
runat="server" style="font-family: Calibri; color: #000066;" /></td>
<td>
<asp:DropDownList ID="dropdwnCategory" runat="server" Width="220px">
<asp:ListItem>Technical</asp:ListItem>
<asp:ListItem>Marketing</asp:ListItem>
<asp:ListItem>Business</asp:ListItem>
<asp:ListItem>Sales</asp:ListItem>
<asp:ListItem>Travel</asp:ListItem>
<asp:ListItem>Personal</asp:ListItem>
</asp:DropDownList>
</td></tr>
<tr><td>
</td>
<td>
<asp:LinkButton ID="lnkbtnSubmitImage" runat="server" Font-Names="Calibri"
onclick="lnkbtnSubmitImage_Click">Submit Image</asp:LinkButton>
|
<asp:LinkButton ID="lnkbtnClearFields" runat="server" Font-Names="Calibri"
onclick="lnkbtnClearFields_Click">Clear Fields</asp:LinkButton>
</td></tr>
<tr>
<td class="style2"><strong>View & Delete</strong></td>
<td class="style3">Click Delete to delete a specific image.</td>
</tr>
<tr><td>
<asp:Label ID="lblDataGrd" runat="server" Text="Image List:"
style="color: #000066; font-family: Calibri"></asp:Label>
</td>
<td><asp:GridView ID="imageList" AutoGenerateColumns="false" DataKeyNames="FileUri"
runat="server" OnRowCommand="RowCommandHandler" Font-Names="Calibri"
Font-Size="Small" Width="296px">
<AlternatingRowStyle BackColor="#99CCFF" Font-Names="Calibri"
Font-Size="Small" />
<Columns>
<asp:ButtonField HeaderText="Delete" Text="Delete"
CommandName="DeleteImage" />
<asp:HyperLinkField HeaderText="Link & Title" DataTextField="ImageName"
DataNavigateUrlFields="FileUri" />
<asp:BoundField DataField="Category" HeaderText="Category" />
<asp:BoundField DataField="DateSubmitted" HeaderText="Date Submitted" />
</Columns>
<HeaderStyle BackColor="#000099" Font-Bold="True" ForeColor="White" />
</asp:GridView>
</td></tr>
</table>
</asp:Content>
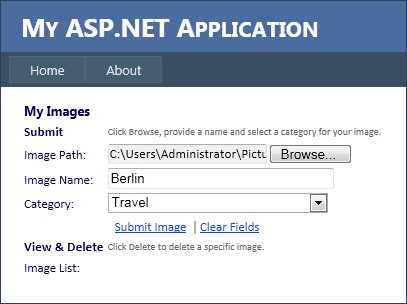
When it is done, your UI should look something like the one shown in the following graphic.

Right-click the project, select Add, and then select Class. Provide a name for the class (for example, ImageInfo), and then click OK. Add the code in bold text as shown here: using System;
using System.Collections.Generic;
using System.Linq;
using System.Web;
namespace ImageBlobStorage
{
public class ImageInfo
{
public Uri FileUri { get; set; }
public string ImageName { get; set; }
public string Category { get; set; }
public string DateSubmitted { get; set; }
}
}
Right-click the Global.asax.cs file and amend the code as per the bolded code shown here: using System;
using System.Collections.Generic;
using System.Linq;
using System.Web;
using System.Web.Security;
using System.Web.SessionState;
using Microsoft.WindowsAzure;
using Microsoft.WindowsAzure.ServiceRuntime;
namespace ImageBlobStorage
{
public class Global : System.Web.HttpApplication
{
void Application_Start(object sender, EventArgs e)
{
CloudStorageAccount.SetConfigurationSettingPublisher(
(configName, configSettingPublisher) =>
{
var connectionString = RoleEnvironment.GetConfigurationSettingValue
(configName);
configSettingPublisher(connectionString);
});
}
...
}
}
This code snippet only shows the
part of the code that you should amend. The other events are default
event handlers that you can leave empty for this exercise. When the application invokes, the Application_Start method is called. That method uses the SetConfigurationSettingPublisher method to set the global configuration setting publisher for your storage account. In
the main cloud service project file, right-click References and select
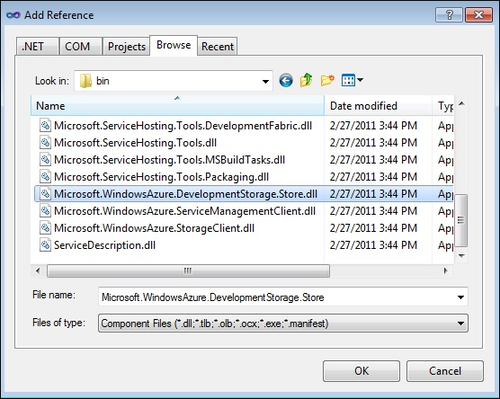
Add Reference. Click the Browse tab, and select Browse. Navigate to the Windows Azure SDK folder (for example, c:\Program Files\Windows Azure SDK\1.4\bin), and add Microsoft.WindowsAzure.DevelopmentStorage.Store.dll and Microsoft.WindowsAzure.StorageClient.dll to the project.

Right-click the Default.aspx file, and select View Code. In the ASPX UI code-behind, add the bold code as shown in the following snippet: using System;
using System.Collections.Generic;
using System.Linq;
using System.Web;
using System.Web.UI;
using System.Web.UI.WebControls;
using Microsoft.WindowsAzure.StorageClient;
using Microsoft.WindowsAzure;
namespace ImageBlobStorage
{
public partial class _Default : System.Web.UI.Page
{
CloudBlobContainer azureBlobContainer = null;
CloudStorageAccount azureStorageAcct = null;
CloudBlobClient azureBlobClient = null;
BlobContainerPermissions azureBlobPermissions = null;
string submissionDateTime = "";
protected void Page_Load(object sender, EventArgs e)
{
SetUpBlobStorageAcct();
azureBlobContainer =
azureBlobClient.GetContainerReference("imagefiles");
azureBlobContainer.CreateIfNotExist();
azureBlobPermissions = new BlobContainerPermissions();
azureBlobPermissions.PublicAccess =
BlobContainerPublicAccessType.Container;
azureBlobContainer.SetPermissions(azureBlobPermissions);
UpdateImageList();
}
private void SetUpBlobStorageAcct()
{
azureStorageAcct =
CloudStorageAccount.Parse(RoleEnvironment.GetConfigurationSettingValue("DataConnection
String"));
azureBlobClient = azureStorageAcct.CreateCloudBlobClient();
}
private void UpdateImageList()
{
var azureBlobs = azureBlobContainer.ListBlobs();
var listOfBriefs = new List<ImageInfo>();
foreach (var blobItem in azureBlobs)
{
var azureBlobRecord = azureBlobContainer.
GetBlobReference(blobItem.Uri.ToString());
azureBlobRecord.FetchAttributes();
listOfBriefs.Add(new ImageInfo()
{
FileUri = blobItem.Uri,
ImageName = azureBlobRecord.Metadata["ImageName"],
Category = azureBlobRecord.Metadata["Category"],
DateSubmitted = azureBlobRecord.Metadata["DateSubmitted"]
});
}
imageList.DataSource = listOfBriefs;
imageList.DataBind();
}
protected void RowCommandHandler(object sender, GridViewCommandEventArgs e)
{
if (e.CommandName == "DeleteImage")
{
var blobIndex = Convert.ToInt32(e.CommandArgument);
var blobName = (Uri)imageList.DataKeys[blobIndex].Value;
var blobContainer = azureBlobClient.
GetContainerReference("imagefiles");
var blob = blobContainer.GetBlobReference(blobName.ToString());
blob.DeleteIfExists();
}
UpdateImageList();
}
protected void lnkbtnSubmitImage_Click(object sender, EventArgs e)
{
submissionDateTime = GetCurrentDateTime();
string videoFileExtension = System.IO.Path.GetExtension(
imageUploadControl.FileName);
var videoFilePrefix = imageNameBox.Text;
var blob = azureBlobContainer.GetBlobReference(videoFilePrefix +
videoFileExtension);
var blobName = blob.Attributes.Properties.ToString();
blob.UploadFromStream(imageUploadControl.FileContent);
blob.Metadata["ImageName"] = imageNameBox.Text;
blob.Metadata["Category"] = dropdwnCategory.SelectedItem.ToString();
blob.Metadata["DateSubmitted"] = submissionDateTime;
blob.SetMetadata();
blob.Properties.ContentType =
imageUploadControl.PostedFile.ContentType;
blob.SetProperties();
UpdateImageList();
ClearTextboxFields();
}
private string GetCurrentDateTime()
{
DateTime currentTime = DateTime.Now;
string currentTimeString = currentTime.ToShortDateString();
return currentTimeString;
}
protected void lnkbtnClearFields_Click(object sender, EventArgs e)
{
ClearTextboxFields();
}
private void ClearTextboxFields()
{
imageNameBox.Text = "";
}
}
}
There is quite a bit of code here, but it essentially accomplishes three main things: It sets up the BLOB storage instance (in which you will store the images that are uploaded to Windows Azure). It handles uploading the images to the new BLOB container that is created. It updates the ASP.NET application UI to reflect any updates to the BLOB container.
The class-level variables create instances of the main objects you’ll
need to set up the connection to your BLOB storage. That is, you need to
have a reference object for the container (CloudBlobContainer) and storage account (CloudStorageAccount). You also need a reference to a client that will access the BLOB (CloudBlobClient), which further encapsulates the permissions for your BLOB storage (BlobContainerPermissions). Connecting to your storage : it involves calling the SetUpBlobStorageAcct helper method to set up the BLOB client, calling the GetContainerReference method to load the imagefiles container, setting the permissions with PublicAccess
(which should only be used in demos unless you have a specific reason
for enabling public access on your BLOB containers), and then calling
the UpdateImageList method, which we’ll discuss in a bit. The following code invokes when the lnkstnSubmitImage link button is clicked. Here, you’re first calling the GetCurrentDateTime method (a helper method that returns the current date and time as a DateTime object), and then you’re getting a reference to your BLOB container and uploading the content that is associated with the imageUploadControl object. You also set some properties and metadata on the BLOB object, such as the ImageName, Category, and DateSubmitted—information that is also derived from the UI controls (for instance, from the Text property in the imageNameBox Textbox control): ...
protected void lnkbtnSubmitImage_Click(object sender, EventArgs e)
{
submissionDateTime = GetCurrentDateTime();
string videoFileExtension =
System.IO.Path.GetExtension(imageUploadControl.FileName);
var videoFilePrefix = imageNameBox.Text;
var blob = azureBlobContainer.GetBlobReference(
videoFilePrefix + videoFileExtension);
var blobName = blob.Attributes.Properties.ToString();
blob.UploadFromStream(imageUploadControl.FileContent);
blob.Metadata["ImageName"] = imageNameBox.Text;
blob.Metadata["Category"] = dropdwnCategory.SelectedItem.ToString();
blob.Metadata["DateSubmitted"] = submissionDateTime;
blob.SetMetadata();
blob.Properties.ContentType = imageUploadControl.PostedFile.ContentType;
blob.SetProperties();
UpdateImageList();
ClearTextboxFields();
}
...
After you upload the image to BLOB storage, the call to UpdateImageList
refreshes the UI to include the new image you’ve uploaded in the
datagrid. To do this, you’re using the in-memory object you’ve created (ImageInfo) and populating a List collection by querying what’s in the BLOB container and then binding that to the datagrid control (imageList). The part of the code that accomplishes this is shown in the following code. In the code, note that listOfBriefs
is the list collection that will be populated and data bound (by using
the collection of items in the BLOB container). To populate the list
collection, you use the GetBlobReference to get a reference to the BLOB (and then transpose this into a URI) and FetchAttributes
to get the properties and metadata of the BLOB. This information is
then used to further populate items within the list collection: ...
private void UpdateImageList()
{
var azureBlobs = azureBlobContainer.ListBlobs();
var listOfBriefs = new List<ImageInfo>();
foreach (var blobItem in azureBlobs)
{
var azureBlobRecord = azureBlobContainer.GetBlobReference(
blobItem.Uri.ToString());
azureBlobRecord.FetchAttributes();
listOfBriefs.Add(new ImageInfo()
{
FileUri = blobItem.Uri,
ImageName = azureBlobRecord.Metadata["ImageName"],
Category = azureBlobRecord.Metadata["Category"],
DateSubmitted = azureBlobRecord.Metadata["DateSubmitted"]
});
}
imageList.DataSource = listOfBriefs;
imageList.DataBind();
}
...
Before you can run the application, you need to configure two settings. Right-click the web role (for example, ImageBlobStorage)
and select Properties. In the Settings dialog box, you’ll need to add
two settings, as shown in the following figure. The setting names,
types, and values are also shown in the following table. Note that you
don’t need to type the setting values; you can simply click the Browse
button in the value field and select Use The Windows Azure Storage Emulator to use the local development storage environment. If you wanted to use a cloud-hosted BLOB storage source, then you’d need to add the explicit data connection string. | Setting Name | Setting Type | Setting Value |
|---|
| DiagnosticsConnectionString | Connection String | UseDevelopmentStorage=true | | DataConnectionString | Connection String | UseDevelopmentStorage=true |

When
you’re finished, click Save and then press F5. When your application is
built, you should see something similar to the graphic shown next.
Click Browse to find an image from your local machine, enter a name in
the Image Name field, and select a category from the drop-down list.

You can now click Submit Image. The image will be uploaded to your Windows Azure BLOB storage (in your local development storage environment) as a binary object. To
validate that the image has indeed been uploaded, check that it now
appears as a record data-bound to the datagrid control in your ASP.NET application.

If you point to the image name (in this example, Berlin)
in the Link & Title column, you should see a link that points to
the image as it resides in the local development storage (for instance, http://127.0.0.1:10000/devstoreaccount1/imagefiles/Berlin.jpg). If you click the link, it will invoke the image in the browser; an example is shown here.

|