4. Displaying the Remote Web Access Home Page
As with LAN connections through Windows Home Server,
before you can connect to a computer via the Internet, you need to log
on to Windows Home Server’s Remote Web Access Home page.
If you configured a Windows Home Server domain, you have two choices:
Log on to the Windows Home Server Dashboard,
click Server Settings, click the Remote Web Access tab, and then click
the link in the Domain Name section.
Run Internet Explorer and enter the address https://domain, where domain is the domain name you configured; if you signed up for a subdomain, remember to use the address https://subdomain.homeserver.com, where subdomain is the subdomain you registered with Microsoft.
If you don’t have a subdomain, you need to use your router’s external IP address. Launch Internet Explorer and enter https://RouterIP (where RouterIP
is the external IP address of your router. (If you see a message
telling you that the website’s security certificate is invalid, you can
ignore the error and continue loading the page.)
Note
Whether you use a subdomain or an IP address, note that you use https as the protocol instead of http.
Windows Home Server redirects you to the Remote Web Access logon page at https://Address/Remote/logon (where Address is your domain or your router’s external IP address).
Type the username and password of your Windows Home
Server account, and then press Enter or click the Go arrow. Windows Home
Server redirects you to the Windows Home Server Web Site Remote Access
page (see Figure 4) at https://Address/remote.

5. Connecting to a Network Computer
After
you’re logged on to Remote Web Access, connecting to a network computer
running the Remote Desktop service is as easy as clicking a client’s
Connect button in the Computers section, or clicking the Computers link
and then clicking the computer in the list.
Tip
If you’re using Firefox, remember that you can’t
connect to a network computer unless you install the IE Tab add-on
(available from ietab.mozdev.org).
Note
If you connect to the Windows Home Server machine, you end up at the Dashboard, not the Windows Home Server desktop.
6. Working with Windows Home Server Shares in the Web Browser
Besides connecting to Remote Desktop hosts and to
Windows Home Server, you can use Remote Web Access to work with the
server’s shared folders via the Internet. You can access the built-in
shares and any nonuser shares that you’ve created. Within each shared
folder, you can create subfolders, rename and delete files, upload files
from your computer to the server, and download files from the server
share to your computer.
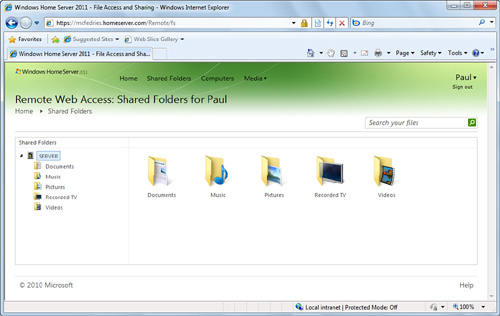
When you log on to Remote Web Access, click Shared Folders. As you can see in Figure 5,
this displays a file interface for the available shares, with a tree
view on the left and a contents view on the right. Select a shared
folder, and you see the file management interface shown in Figure 6.
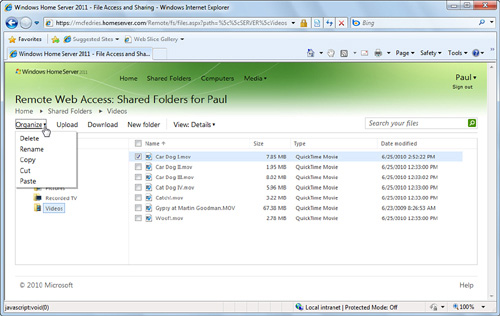
Here’s a summary of the actions you can perform in this page:
Select items—
Use the check boxes to select files and subfolders, or click the Select
All check box (the one at the top of the file list) to select all the
files shown in the current page.
Create a subfolder—
Navigate to the folder in which you want the subfolder created, and
click the New Folder button to open the Add a Folder dialog box. Type
the folder name, and then click OK.
Rename a file or folder—
Select the file or folder, and then select Organize, Rename to open the
Type a New File Name dialog box. Type the new name, and then click OK.
Upload items from your computer to the server— Click Upload to display the Upload page, shown in Figure 7.
Click Browse to open the Choose File to Upload dialog box, select the
file or folder, and then click Open to add the item to the Upload page.
Repeat for other items you want to send to the share, and then click
Upload.

Download items from the server share to your computer—
Select the items you want to download, and then click the Download
button. If you selected multiple items, Windows Home Server asks whether
you want the selected items downloaded as a self-extracting executable
file or as a compressed ZIP file. Click the option you prefer, and then
click OK. Windows Home Server inserts the selected items into a
compressed file named either share.exe or share.zip (where share
is the name of the shared folder) and then displays the File Download
dialog box. Click Save, use the Save As dialog box to choose a download
location (and, optionally, rename the download files), and then click
Save.
Note
Windows Home Server imposes a 30-minute limit on creating the ZIP file, so don’t try to cram too much data into the download.
Delete a file or folder—
Select the objects you want to work with, and then select Organize,
Delete. When Windows Home Server asks you to confirm the deletion, click
Yes.
7. Enabling Drag-and-Drop Uploading
The
Remote Web Access Upload page is a decent-enough interface for
uploading, but we’re used to dragging and dropping files in Windows, and
the web browser is mouse-oriented, so it would be nice to be able to
upload files using drag-and-drop. Happily, that functionality is built
in to Windows Home Server 2011, but it’s turned off by default. To
enable it, follow these steps:
1. | Click the Upload button to open the Upload Files page.
|
2. | Click Install the Easy File Upload Tool. Windows 7 and Vista prompt you for your User Account Control credentials.
|
3. | Enter your User Account Control credentials.
|
You now see an upload area in the Upload page, and
you can drag files (up to 2GB in size) from Windows Explorer and drop
them in the area. Each time you drop a file, Windows Home Server adds it
to the list, as shown in Figure 8 (which also shows an image file about to be dropped in the upload area). When you’re done, click Upload.