Hardware devices communicate with the Windows Server 2003 operating system by means of a software driver. Devices and their drivers, if not installed automatically through Plug and Play, can be configured through the Device Manager.
Devices and Drivers
The easiest way to think about devices and their associated drivers is to divide the devices into two logical categories: Plug-and-Play (PnP) and non-Plug-and-Play (downlevel) devices. Most devices manufactured since 1997 are PnP devices, and most PnP drivers for devices are included on the Windows Server 2003 installation CD. When a device is initially detected by Windows Server 2003, and if an acceptable driver is found for that device, the device will be installed and such resources as interrupt requests (IRQs) and direct memory access (DMA) will be allocated for use by the device. The device will then be listed in the categorized listing of devices in Device Manager.
If the PnP driver is not on the Windows Server 2003 Installation CD, you will need the vendor-supplied drivers available when the Windows Server 2003 initially detects, identifies and attempts to install the device. For devices that Windows Server 2003 can identify, you will be prompted for a driver. If the request for the driver is bypassed, Windows Server 2003 will indicate the identified, non-configured device with a yellow warning icon in Device Manager. This icon, as shown in Figure 1, is also used if there are duplicate devices on the system or if there are conflicts between the resource demands of drivers, which is extremely rare for newer computer systems and devices.
Figure 1. Device Manager warning icon
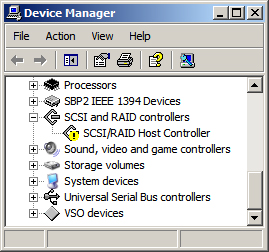
If a device cannot be identified by Windows Server 2003, no request for a driver will be issued, and the unknown device will be identified with a yellow question mark in Device Manager. For a non-configured or non-identified device, you must install the appropriate driver manually for the device to function properly.
Using Device Manager
Device Manager provides a view, similar to Windows Explorer, of the hardware that is installed on your computer. You can use Device Manager to update the drivers for hardware devices and modify settings related to devices. Device Manager is accessible through the Control Panel by selecting System, the Hardware tab on the Systems Properties dialog box, and then Device Manager to access the Device Manager Properties page, or as part of the Computer Management console, accessible from Administrative Tools. Table 1 describes the tasks for which Device Manager can be used.
Tip
|
You can use Device Manager to manage devices only on a local computer. On a remote computer, Device Manager will work only in read-only mode. |
A list of devices, drivers, and system configuration can be printed through the Print command on the Action menu in Device Manager or output to a comma-separated-values (CSV) file using the Driverquery command-line utility, the parameters for which are listed in Table 2.
Users, Administrators, and Device Installation
As with most installation tasks, administrators have the ability to install any device and its associated drivers. Users, on the other hand, have very limited ability to install devices on the computer. By default, users can install only PnP devices, with the following considerations:
If any of these conditions is not met, the user cannot install the device unless delegated additional administrative authority.
Tip
Driver Signing Options
Device drivers and operating system files included with Windows 2000 or higher have a Microsoft digital signature. The digital signature indicates that a particular driver or file was not altered or overwritten by another program’s installation process. Device drivers provided by vendors outside of Windows 2000 or higher may or may not be signed.
You can control how the computer responds to these unsigned driver files during their installation. These settings are configurable through Control Panel by selecting System, the Hardware tab on the Systems Properties dialog box, and then Driver Signing to access the Driver Signing Options Properties page on an individual computer. The options for unsigned driver installation behavior are:
-
Ignore To allow all device drivers to be installed on the computer, regardless of whether they have a digital signature. This option is available only if you are logged on as an administrator or as a member of the Administrators group.
-
Warn To display a warning message, allowing you to allow or deny driver installation, whenever an installation program or Windows attempts to install a device driver without a digital signature. This is the default behavior.
-
Block To prevent an installation program or Windows from installing device drivers without a digital signature.
Group Policy is an effective tool for simultaneously changing the Driver Signing Options setting on multiple computers. To prohibit a user from changing the setting on his or her computer, you must deny access to the Hardware Properties pages in Control Panel and disable the MMC snap-in for Device Manager in the Computer Management console. These settings will not change the user’s ability to install PnP devices.
Practice: Installing Device Drivers
In this practice, you will install a network adapter, change the Driver Signing Options, and then return the computer to its default configuration.
Exercise 1: Install a Network Adapter
|
1.
|
Open the System Properties page from Control Panel, and then on the Hardware tab, click Add Hardware Wizard.
|
|
2.
|
Click Next and wait for the Hardware Wizard to scan your computer for new devices. If you have not added any devices, the wizard will ask whether the new device has been connected.
|
|
3.
|
Select Yes, I Have Already Connected The Hardware, and then click Next.
|
|
4.
|
From the Installed Hardware list, scroll to the bottom, select Add A New Hardware Device, and then click Next.
|
|
5.
|
Select the Install The Hardware That I Manually Select From A List (Advanced) option, and then click Next.
|
|
6.
|
From the Common Hardware Types list, select Network Adapters, and then click Next.
|
|
7.
|
Select Microsoft as the Manufacturer, and Microsoft Loopback Adapter as the Network Adapter, and then click Next.
|
|
8.
|
Click Next, and then Finish, to close the wizard.
|
Windows Server 2003 will now load the driver and install the device. The network adapter named Microsoft Loopback Adapter will appear in Device Manager under the Network Adapters category.
Exercise 2: Set Driver Signing Options
|
1.
|
|
|
2.
|
Select the Block option.
|
|
3.
|
Click OK.
|
You have now disallowed the installation of unsigned drivers.
Exercise 3: Return Computer to Default
|
1.
|
Open Device Manager. Right-click Microsoft Loopback Adapter and choose Uninstall from the shortcut menu.
|
|
2.
|
Click OK to confirm the device’s removal.
|
|
3.
|
Close Device Manager.
|
|
4.
|
Open the Driver Signing Properties page again, and select Warn.
|
|
5.
|
Select Make This Action The System Default.
|
|
6.
|
Click OK twice.
|
You have returned your computer to its default configuration.


