1. Viewing the Routing Table with route print
The route command displays and controls information in the local IP routing table on Windows systems. The route print -4 command enables you to view the IPv4 routing table.
Tip
You can also enter route print -6 to show only IPv6 information or enter route print to show both IPv4 and IPv6 information.
The following text shows a partial output of the route print command:
C:\>route print
======================================================================
Interface List
 10 ...00 03 ff 62 13 d7 ...... Intel 21140-Based PCI Fast Ethernet
Adapter
  1 ........................... Software Loopback Interface 1
======================================================================

IPv4 Route Table
======================================================================
Active Routes:
Network Destination  Netmask         Gateway      Interface    Metric
          0.0.0.0    0.0.0.0         192.168.1.1  192.168.1.5  276
        127.0.0.0    255.0.0.0       On-link      127.0.0.1    306
        127.0.0.1    255.255.255.255 On-link      127.0.0.1    306
  127.255.255.255    255.255.255.255 On-link      127.0.0.1    306
      192.168.1.0    255.255.255.0   On-link      192.168.1.5  276
      192.168.1.5    255.255.255.255 On-link      192.168.1.5  276
    192.168.1.255    255.255.255.255 On-link      192.168.1.5  276
        224.0.0.0    240.0.0.0       On-link      127.0.0.1    306
        224.0.0.0    240.0.0.0       On-link      192.168.1.5  276
  255.255.255.255    255.255.255.255 On-link      127.0.0.1    306
  255.255.255.255    255.255.255.255 On-link      192.168.1.5  276
======================================================================
Persistent Routes:
  Network Address          Netmask  Gateway Address  Metric
          0.0.0.0          0.0.0.0      192.168.1.1  Default
======================================================================
The route print command has the following sections.
| route print Section | Comments |
|---|---|
| Interface list | Lists all the physical and virtual network interface cards on the system. |
| IPv4 Route table | Lists the routes known by the system and the path to the default gateway for unknown routes. |
| IPv4 Persistent Routes | Persistent routes are stored in the system and remain even after reboots. The persistent route shown in the output is from the default gateway configured on the NIC. |
The meat of the route print output is in the routing table. It has five columns, as explained in the following table.
2. Adding Routes to the Routing Table with route add
You can add additional routes to a routing table for any system, even if the system is not a router.
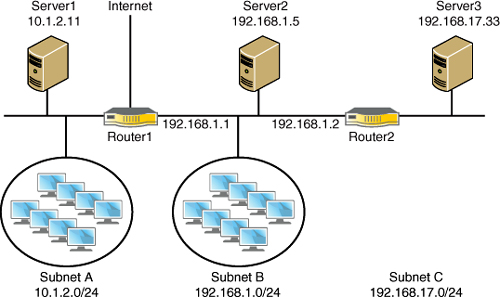
Consider Figure 1, which shows a network with three subnets separated by two routers. Server2 is in Subnet B and is configured with a default gateway of 192.168.1.1. Because Server2 is in the 192.168.1.0/24 network, the routing table lists all traffic destined for this network with a gateway of On-link, and all unknown traffic uses the gateway of 192.168.1.1.
Figure 1. Network with three subnets
Note
The /24 in the address indicates the subnet mask is 255.255.255.0. More specifically, it indicates the first 24 bits of the IP address are a 1 and the last 8 bits are a 0.
Note
The output from the route print command shown earlier is from Server2.
Server2’s default gateway is192.168.1.1 (Router1). Any traffic that is not on the 192.168.1.0/24 subnet is routed to the default gateway. This gives Server2 a path to the 10.1.2.0/24 subnet and the Internet. However, Server2 doesn’t have a path to Subnet C unless an additional route is added.
You can add routes to other networks using the route add command. The basic syntax is
route [-p] add network-destination mask network-mask gateway [metric
metric]
The following table shows some common uses of the route add command. These examples add two additional routes to the routing table on Server2 (shown in Figure 22-1). One route goes to the 192.168.17.0 subnet, and the second route goes to Server3 (at 192.168.17.33).
If you ran the route print -4 command after adding the persistent route, it should look similar to the following listing:
IPv4 Route Table
======================================================================
Active Routes:
Network Destination Netmask Gateway Interface Metric
0.0.0.0 0.0.0.0 192.168.1.1 192.168.1.5 276
127.0.0.0 255.0.0.0 On-link 127.0.0.1 306
127.0.0.1 255.255.255.255 On-link 127.0.0.1 306
127.255.255.255 255.255.255.255 On-link 127.0.0.1 306
192.168.1.0 255.255.255.0 On-link 192.168.1.5 276
192.168.1.5 255.255.255.255 On-link 192.168.1.5 276
192.168.1.255 255.255.255.255 On-link 192.168.1.5 276
192.168.17.0    255.255.255.0
192.168.1.2      192.168.1.5     21
192.168.17.33  255.255.255.255
192.168.1.2      192.168.1.5     21
224.0.0.0 240.0.0.0 On-link 127.0.0.1 306
224.0.0.0 240.0.0.0 On-link 192.168.1.5 276
255.255.255.255 255.255.255.255 On-link 127.0.0.1 306
255.255.255.255 255.255.255.255 On-link 192.168.1.5 276
======================================================================
Persistent Routes:
Network Address Netmask Gateway Address Metric
0.0.0.0 0.0.0.0 192.168.1.1 Default
192.168.17.0 255.255.255.0 192.168.1.2 1
======================================================================
The routes that were added from the previous examples are bold in this listing. The metric of 21 was assigned automatically when a metric was not provided in the route add command, and a metric of 1 was assigned in the persistent route.


