1. Understanding Print Servers
Print servers are computers (or sometimes network appliances) that manage the communications between printers and the client computers generating the print jobs.
Generally, there are two approaches to print servers. The Microsoft approach is to use a Windows computer as an “intelligent” print server that handles communication between the printers and the client computers (reducing strain on the clients), and maintains a common print queue for all clients. Microsoft print servers also make it easy to find printers on the network by name (NetBIOS, DNS, or Active Directory) and install the appropriate printer drivers.
In contrast, other operating systems, such as Linux, and printers with built-in network interfaces use a relatively “dumb” print server called the Line Printer Daemon (LPD), which acts strictly as an interface between the network and the printer. Each client maintains its own printer queue and performs all preprint processing, increasing the amount of time the computer is partially or completely unavailable for other tasks.
These two approaches aren’t in opposition to each other and, in fact, the best way to connect a printer to a Windows print server is via a network connection to a printer, which usually runs the LPD service. The Windows print server connects to the printer using the traditional Line Printer Remote (LPR) service (the client-side equivalent of LPD) or via the higher-performance standard TCP/IP printer port, and shares the printer on the network. The Windows print server holds the printer queue and sends each print job to LPD, which passes the job to the printer.
UNDER THE HOOD: Printer Terminology
Although the term printer is usually used to refer to both the physical device and its software interface, strictly speaking, a printer is a device that does the actual printing, and a logical printer is the software interface (printer driver) for the printer. You can have one logical printer associated with a single printer, or you can have several logical printers associated with a single printer. In the latter arrangement, the logical printers can be configured at different priority levels so that one logical printer handles normal printing and another handles print jobs that should be printed during off-peak hours. For a printer that supports both PostScript (PS) and Printer Control Language (PCL), two logical printers allow users to choose which type of printing to do.
A single logical printer can also be associated with multiple physical printers in a printer pool, as long as all the printers work with the same driver. Printer pools distribute the printing load more evenly, increasing performance. Because the physical printers in the pools are interchangeable, printer pools also make it possible for an administrator to add or remove physical printers without affecting the users’ configurations.
2. Selecting Printers
Choosing the right printers for an organization is a lot like choosing the right car. There are certain practical matters to look at such as up-front cost, cost of consumables (gas, ink, or toner), and suitability to the task at hand (for example, hauling lumber or printing brochures).
Color laser printers have become affordable for most businesses, but the cost of color toner remains very high. However, if you have a property sales office and need to print hundreds of high-quality color photos daily, a color laser printer is not an extravagance. A printer that will produce beautiful color at a rate of 20 or more pages per minute can be had for well under $1,000.
On the other hand, if you need lots of black-and-white pages and only occasional color, a black-and-white laser printer plus a color inkjet printer might be the most economical option. Color ink cartridges for inkjet printers are expensive, but they last a long time if used infrequently. And inkjet printers themselves are so low in cost they’re practically disposable (as reprehensible as that is from an environmental point of view).
Look for printers with built-in network interfaces because they print faster, require less processing power on the print server, and can be flexibly located anywhere there’s a network cable. Printers with a USB connection can be used if print volumes are low (or for backup printers), but steer clear of printers using parallel port connections—they can drastically slow a print server.
REAL WORLD: Other Ways That Printers Are Like Cars
In our office, we have three printers:
-
A standard, small-business-size, black-and-white laser printer (the sensible sedan)
-
A multifunction color inkjet copier/scanner/printer/fax (the efficient hybrid)
-
A very fast color laser printer the size of a small file cabinet (the impractical but cool sports car)
Printers are undoubtedly essential to your business, but there’s no reason you can’t have some fun at the same time.
3. Planning Printer Placement
In a very small office, there’s no need to spend time planning printer deployment. The printers go wherever there’s room for them. However, in a larger organization you’ll need to establish printer-naming and location-naming conventions, evaluate whether to upgrade or migrate existing print servers, and prepare for print server failures.
3.1. Naming Printers
An effective printer-naming convention is important to ensure that users can easily identify printers on the network. When creating a printer-naming convention, consider the following:
-
The printer name can be any length up to 220 characters, which is plenty of room for any scheme you devise. Of course, the name should also be as short as possible without sacrificing clarity.
-
The share name is the name that all clients see when they browse for a printer, use the Add Printer Wizard, or use the Net Use command. The share name can be up to 80 characters long, but again it should be shorter for readability. Some older applications cannot print to printers with fully qualified printer share names (the computer name and printer share name combined) that exceed 31 characters, or to print servers where the default printer’s share name exceeds 31 characters. Clients using other operating systems might also have trouble with names longer than 31 characters or names containing spaces or other special characters. But whether you have to deal with such applications or not, shorter is generally better.
3.2. Naming Printer Locations
In small organizations, finding printers is easy—just stand up and look around or ask the person sitting next to you. This doesn’t work as well in larger organizations where printers have varying capabilities and might be widely scattered. Under these circumstances, users need to be able to browse or search for printers based on the criteria they want, including printer features and printer location.
Location names are similar in form to domain names and use the name/name/name… syntax. They start with the most general location name and become progressively more specific. Each part name can have a maximum of 32 characters and can contain any characters except the forward slash (/), which Windows reserves as a delimiter.
Keep the naming convention simple and easy to understand. End users are usually interested in the answer to only one question: “Where’s my printout?”
Design/ArtStudio/HPOfficeJetE809 is one example of a clear location name, as is Marketing/DirectMail/RicohProofing.
4. Installing Printers
Before a Windows print server can share a printer on the network, it must first connect to the printer and install the necessary drivers. The following sections walk you through adding printers that are attached directly to the print server via a USB or parallel port interface, as well as connecting to printers with built-in network adapters.
4.1. Adding and Sharing a Network Printer
To add a network printer to your Windows SBS 2011 network, follow the instructions provided by the manufacturer of the printer. If the specific instructions are long gone, make sure you have the drivers you need (you can download them from the manufacturer’s website, if necessary) and follow these steps:
-
Make the physical connection between the printer and a network jack using a network cable.
-
Turn the printer on. (If the printer is already on, turn it off and then on again.)
-
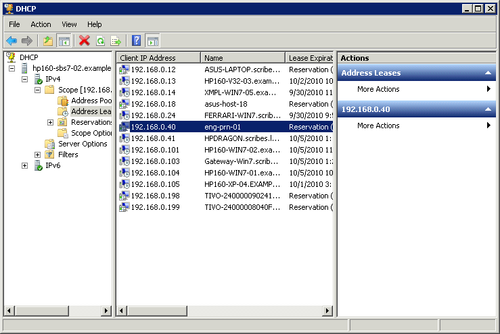
From the computer running Windows SBS 2011, select DHCP from the Administrative Tools menu.
-
In the DHCP task pane, expand IPv4, expand Scope, and then expand Address Leases under your domain name. Locate the DHCP address assigned to the new printer (shown in Figure 1), and make a note of it.
Figure 1. Locating the assigned TCP/IP address for a network printer


-
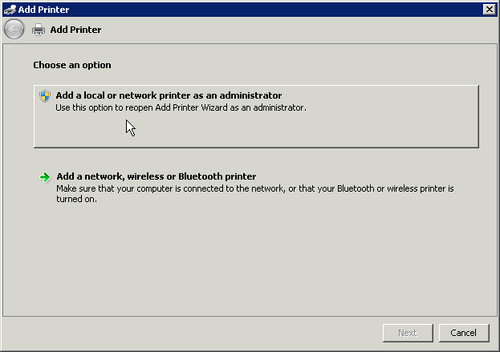
In the Add Printer dialog box, select Add A Local Or Network Printer As An Administrator (shown in Figure 2).
Figure 2. Choosing the Add Printer option


-
In the next dialog box, under What Kind Of Printer Do You Want To Install, select Add A Local Printer.
-
In the Choose A Printer Port dialog box, select Create A New Port and select Standard TCP/IP Port from the drop-down list. Click Next.
-
In the Type A Printer Hostname Or IP Address dialog box, type in the IP address you noted in step 4. The Port Name is automatically filled in. (See Figure 3.) Click Next.
Figure 3. Entering the printer IP address

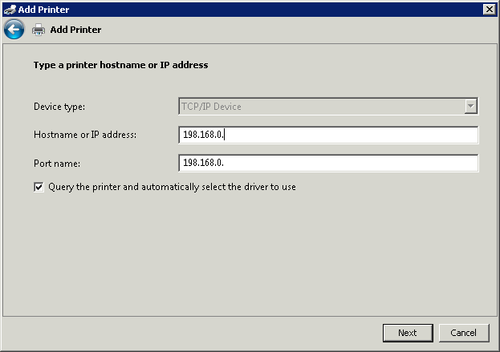
Note:
To query the printer and automatically select the driver to use, leave the check box selected. If Windows SBS 2011 already has built-in drivers for the printer, you won’t need to provide additional ones.
-
Windows SBS 2011 contacts the printer and displays the Install The Printer Driver dialog box. Choose the manufacturer name from the list on the left and the printer model from the list on the right. Click Next.
Note:
A designation (MS) next to the printer name indicates that the driver is part of Windows SBS 2011. If your printer needs multiple drivers (such as Postscript in addition to PCL), click Have Disk and point to the location of the drivers.
-
In the Type A Printer Name dialog box, accept or revise the printer name. The printer will be set as the default printer unless you clear the check box. Click Next.
-
In the Printer Sharing dialog box, accept or revise the share name. Add a location and comments if wanted. Click Next.
-
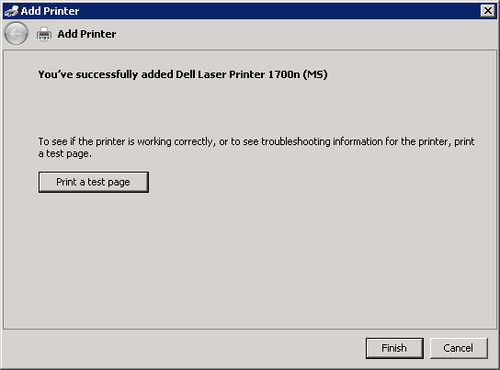
The successful installation is announced (as shown in Figure 4). Print a test page to confirm that all is well. Click Finish.
Figure 4. The successful installation is declared
1.1. Showing a Shared Printer in Windows SBS Console
Even after a network printer is successfully installed and shared, it still might not appear in the Devices list under the Network tab of Windows SBS Console. If that’s the case, follow these steps:
-
Open Windows SBS Console, click Network and then click Devices.
-
In the Tasks Pane, click Refresh This View. If the printer is still not listed, click List A Shared Printer In This Console.
-
In the Show Shared Printer In The Console dialog box, provide the network path for the shared printer or click Browse to locate the printer.
-
When the \\computer\share path is displayed as shown in Figure 5, click OK.
Figure 5. Entering a shared printer’s network address
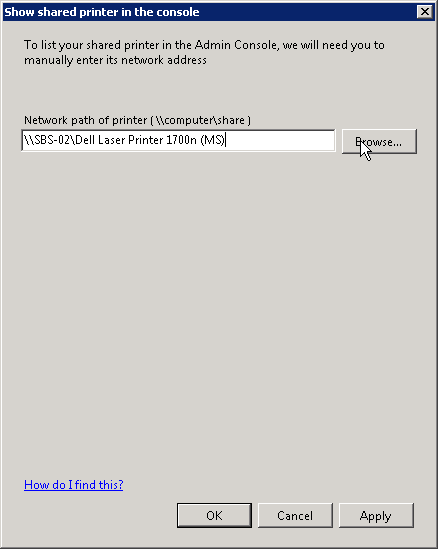


Now you can manage this printer from the Windows SBS Console. Right-click the printer name to view printer jobs. Or select Printer Properties to view and modify printer settings.
4.2. Sharing Locally Connected Printers
If you’re using a USB or IEEE 1394 (FireWire) connection to the printer, as soon as you plug the printer into the server, Windows automatically detects, installs, and shares the printer on the network, and also publishes it in Active Directory (although you might be prompted for drivers).
4.2.1. Sharing a Printer Connected to a Windows Vista Computer
From the computer running Windows Vista, click Start and then follow these steps:
-
Select Control Panel and then click Printers or Hardware And Sound\Printers.
-
Right-click the printer you want to share and select Properties.
-
On the Sharing tab, click Change Sharing Options.
-
Click Share This Printer as shown in Figure 6, and select the check boxes for Render Print Jobs On Client Computers and List In The Directory.
Figure 6. Sharing a local printer with other users
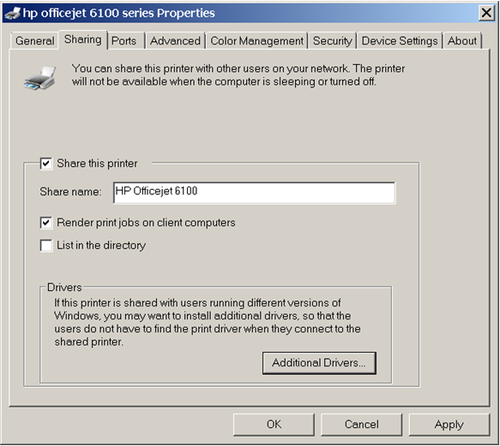


-
Click Print Test Page to verify that the printer is correctly attached.
On the Windows SBS Console, click Network and then Devices. The printer appears in the Printers list.
4.2.2. Sharing a Printer Connected to a Windows XP Computer
From the computer running Windows XP, click Start and then follow these steps:
-
In the task pane, click Add A Printer to start the Add A Printer Wizard. Follow the instructions to complete the wizard.
-
In the details pane, right-click the printer and select Properties.
-
On the Sharing tab, click Share This Printer, and then click List In The Directory. Verify that Render Print Jobs On Client Computers is selected.
-
Click the General tab. In the Location area, type the physical location of the printer.
-
Click Apply.
On the server, open the SBS Console. Click Network and then click Devices. Confirm that the printer is included in the Printers list.
4.2.3. Sharing a Printer Connected to a Windows 7 Computer
From the computer running Windows 7, click Start and then follow these steps:
-
Right-click the printer you want to share and select Properties.
-
On the Sharing tab, click Change Sharing Options.
-
Click Share This Printer, and select the check boxes for Render Print Jobs On Client Computers.
-
Click the General tab. In the Location text box, enter a description of the printer’s location. Add any notes in the Comment section. Click Apply.
-
On the Windows SBS Console navigation bar, click Network and then click Devices. The printer will appear in the Printers list.


