Selecting Files with Check Boxes
You learn about quite a few substantive changes to the
Windows file system: metadata, the Windows Search engine, grouping,
stacking, filtering, and search folders, previous versions, and
transactional NTFS. All of these are fairly sophisticated and useful
innovations. However, sometimes it’s the small, incremental changes that
make your life with a new operating system easier and more efficient.
In this section, you learn about one of my favorites of Vista’s many
small but quite useful tweaks: a change that affects the way you select
files.
When you need to select multiple, noncontiguous
objects, the easiest method is to hold down the Ctrl key and click each
item you want to select. However, when I use this technique to select
more than a few files, I always end up
accidentally selecting one or more files that I don’t want. It’s not a
big deal to deselect these extra files, but it’s one of those small
drains on productivity that bugs me (and many other users).
Windows
Vista introduces a new file-selection technique that promises to
eliminate accidental selections. It’s called Use Check Boxes to Select
Items, and you activate it by following these steps:
1. | Select
Organize, Folder and Search Options to open the Folder and Search
Options dialog box. (You can also open this dialog box by selecting
Start, Control Panel, Appearance and Personalization, Folder Options.)
|
2. | Click the View tab.
|
3. | Activate the Use Check Boxes to Select Items check box.
|
4. | Click OK.
|
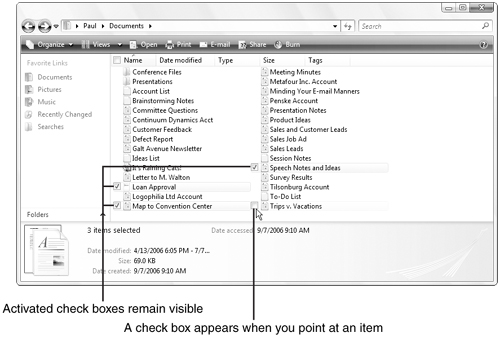
As you can see in Figure 1,
when you turn on this feature, Explorer creates a column to the left of
the folder contents. When you point at a file or folder, a check box
appears in this column, and you select an item by activating its check
box. You don’t need to hold down Ctrl or use the keyboard at all. Just
activate the check boxes for the files and folders you want to select.
Bonus technique: You can also select all the items in the folder quickly
by clicking the check box that appears in the Name column.
Understanding Size on Disk
The Windows Explorer Details pane shows you how
many objects you’ve selected and the total size of the selected
objects. However, it doesn’t take into account any objects that
might be inside a selected subfolder. To include subfolders,
right-click the selection and then click Properties. Windows Vista
counts all the files, calculates the total size as well as the total
size on the disk, and then displays this data in the property sheet that
appears.
What’s the difference between the Size and Size
on Disk values? Windows Vista stores files in discrete chunks of hard
disk space called clusters, which
have a fixed size. This size depends on the file system and the size of
the partition, but 4KB is typical. The important thing to remember is
that Windows Vista always uses full clusters to store all or part of a
file. For example, suppose that you have two files, one that’s 2KB and
another that’s 5KB. The 2KB file will be stored in an entire 4KB
cluster. For the 5KB file, the first 4KB of the file will take up a
whole cluster, and the remaining 1KB will be stored in its own 4KB
cluster. Therefore, the total size of these files is 7KB, but they take
up 12KB on the hard disk.
Resolving File Transfer Conflicts
When you move or copy a file into the destination folder, it sometimes
happens that a file with the same name already resides in that folder.
In previous versions of Windows, you’d see a dialog box asking whether
you want to replace the existing file, and you’d click Yes or No, as
appropriate. Unfortunately, Windows didn’t give you much information to
go on to help you make the choice. Windows Vista takes a step in the
right direction by displaying the Copy File (or Move File) dialog box,
instead. Figure 2 shows an example of the Copy File dialog box.
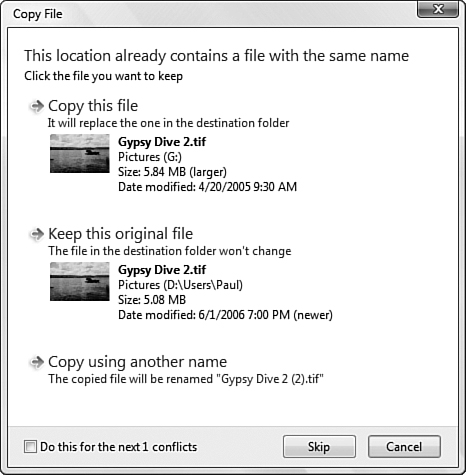
This
dialog box gives you much more data: You see thumbnails for both
versions, you get the dates and times when the files were last modified,
the file extensions (so you can figure out the type), and file sizes.
You also get three choices for resolving the conflict:
| Copy (or Move) This File | The file you are copying (or moving) will replace the existing file. |
| Keep This Original File | The file will not be copied (or moved), so the original remains in the destination folder. |
| Copy (or Move) Using Another Name | The existing file remains as is, and the file being copied or moved is placed in the folder with (2) appended to the filename. |
If Windows Vista detects multiple conflicts (as shown in Figure 3.8),
you can also click Skip to avoid copying or moving a file. If you want
to resolve the conflict in the same way with each file, be sure to
activate the Do This for the Next X Conflicts check box to save time.
Expert Drag-and-Drop Techniques
You’ll use the drag-and-drop technique
throughout your Windows career. To make drag and drop even easier and
more powerful, here are a few pointers to bear in mind:
| “Lassoing” multiple files | If
the objects you want to select are displayed in a block within the
folder list, you can select them by dragging a box around the objects.
This is known as lassoing the objects. |
| Drag-and-scroll | Most
drag-and-drop operations involve dragging an object from the contents
area and dropping it on a folder in the Folders list (be sure to display
the Folders list first). If you can’t see the destination in the
Folders list, drag the pointer to the bottom of the Folders list.
Windows Explorer will scroll the list up. To scroll the list down, drag
the object to the top of the Folders list. |
| Drag-and-open | If
the destination is a subfolder within an unopened folder branch, drag
the object and hover the pointer over the unopened folder. After a
second or two, Windows Explorer opens the folder branch. |
| Inter-window dragging | You can drag an object outside of the window and then drop it on a different location, such as the desktop.
|
Tip
You
can’t drop an object on a running program’s taskbar icon, but you can
do the next best thing. Drag the mouse over the appropriate taskbar
button and wait a second or two. Windows will then bring that
application’s window to the foreground, and you can then drop the object
within the window.
| Drag between Explorers | Windows
Vista lets you open two or more copies of Windows Explorer. If you have
to use several drag-and-drop operations to get some objects to a
particular destination, open a second copy of Windows Explorer and
display the destination in this new window. You can then drag from the
first window and drop into the second window. |
| Canceling drag-and-drop | To
cancel a drag-and-drop operation, either press Esc or click the right
mouse button. If you’re right-dragging, click the left mouse button to
cancel. |
Taking Advantage of the Send To Command
For certain destinations, Windows Vista offers
an easier method for copying or moving files or folders: the Send To
command. To use this command, select the objects you want to work with
and then run one of the following techniques:
Display the Classic menus and select File, Send To
Right-click the selection and then click Send To in the shortcut menu
Either way, you see a submenu of potential destinations, as shown in Figure 3.
Note that the items in this menu (except the disk drives) are taken
from the following folder that contains shortcut files for each item:
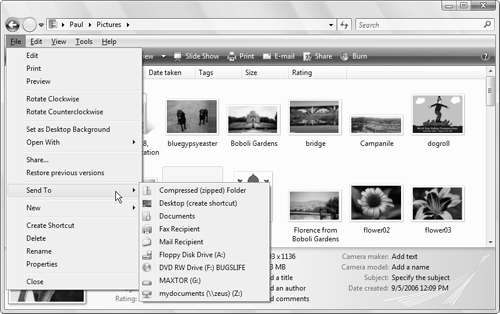
%UserProfile%\appdata\roaming\Microsoft\Windows\SendTo
This means that you can customize the Send To menu by adding, renaming, and deleting the shortcut files in your SendTo folder.
Note
The user profile folder for a user is the following:
Here, %SystemDrive% is the drive on which Vista is installed (such as C:), and User is the person’s username. Windows Vista stores the user profile folder for the current user in the %UserProfile% environment variable.
Click the destination you want and Windows Vista sends the object there. What do I mean by send? I suppose that drop
would be a better word because the Send To command acts like the drop
part of drag-and-drop. Therefore, Send To follows the same rules as
drag-and-drop:
If the Send To destination is on a different disk drive, the object is copied.
If the Send To destination is on the same disk drive, the object is moved.
Tip
As with a drag-and-drop operation, you can
force the Send To command to copy or move an object. To force a move,
hold down Shift when you select the Send To command. To force a copy,
hold down Ctrl when you select the Send To command. To force a shortcut,
hold down Shift and Ctrl when you select the Send To command.
The Recycle Bin: Deleting and Recovering Files and Folders
In my conversations with Windows users, I’ve
noticed an interesting trend that has become more prominent in recent
years: People don’t delete files as often as they used to. I’m sure that
the reason for this is the absolutely huge hard disks that are offered
these days. Even entry-level systems come equipped with 40GB or 80GB
disks, and hard disks with capacities of several hundred gigabytes are
no longer a big deal. Unless someone’s working with digital video files,
even a power user isn’t going to put a dent in these massive disks any
time soon. So, why bother deleting anything?
Although
it’s always a good idea to remove files and folders you don’t need (it
makes your system easier to navigate, it speeds up defragmenting, and so
on), avoiding deletions does have one advantage: You can never delete
something important by accident.
Just in case you do, however, Windows Vista’s
Recycle Bin can bail you out. The Recycle Bin icon on the Windows Vista
desktop is actually a front-end for a collection of hidden folders named
Recycled that exist on each hard disk partition. The idea is that when
you delete a file or folder, Windows Vista doesn’t actually remove the
object from your system. Instead, the object moves to the Recycled
folder on the same drive. If you delete an object by accident, you can
go to the Recycle Bin and return the object to its original spot. Note,
however, that the Recycle Bin can hold only so much data. When it gets
full, it permanently deletes its oldest objects to make room for newer
ones.
Tip
If you’re absolutely sure that you don’t need
an object, you can permanently delete it from your system (that is,
bypass the Recycle Bin) by highlighting it and pressing Shift+Delete.
It’s important to note that Windows Vista
bypasses the Recycle Bin and permanently deletes an object under the
following circumstances:
You delete the object from a floppy disk or any removable drive.
You delete the object from the DOS prompt.
You delete the object from a network drive.
Setting Some Recycle Bin Options
The Recycle Bin has a few properties you can
set to control how it works. To view these properties, right-click the
desktop’s Recycle Bin icon and then click Properties. Windows Vista
displays the property sheet shown in Figure 4.
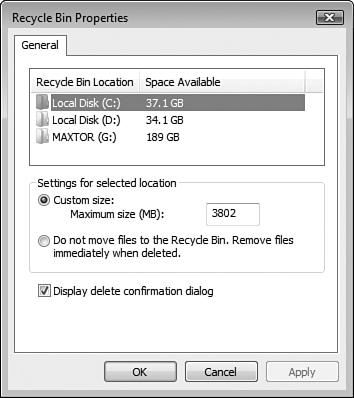
Here’s a rundown of the various controls:
| Recycle Bin Location | Choose
the Recycle Bin you want to configure: the one for your user folder or
you see an icon for each of the hard drive partitions on your computer. |
| Custom Size | Enter
the size of the Recycle Bin. The larger the size, the more disk space
the Recycle Bin takes up, but the more files it will save. |
| Do Not Move Files to the Recycle Bin | If you activate this option, all deletions are permanent. |
| Display Delete Confirmation Dialog | If you don’t want Windows Vista to ask for confirmation when you delete an object, deactivate this check box. |
Tip
You
can clean out your Recycle Bin at any time by right-clicking the
desktop’s Recycle Bin icon and then clicking Empty Recycle Bin. The
Recycle Bin contents can also be purged using Windows Vista’s Disk
Cleanup utility.
Click OK to put the new settings into effect.
Recovering a File or Folder
If you accidentally delete the wrong file or folder, you can return it to its rightful place by using the following method:
1. | Open the desktop’s Recycle Bin icon, or open any Recycled folder in Windows Explorer.
|
2. | Select the object.
|
3. | Click Restore This Item in the taskbar. (You can also right-click the file and then click Restore.)
|
Note
If
deleting the file or folder was the last action you performed in
Windows Explorer, you can recover the object by selecting the Edit, Undo
Delete command (or by pressing Ctrl+Z). Note, too, that Windows Vista
enables you to undo the 10 most recent actions.
File Maintenance Using the Open and Save As Dialog Boxes
One of the best-kept secrets of Windows Vista is
the fact that you can perform many of these file maintenance operations
within two of Windows Vista’s standard dialog boxes:
| Open | In most applications, you display this dialog box by selecting the File, Open command, or by pressing Ctrl+O. |
| Save As | You
usually display this dialog box by selecting File, Save As. Or, if
you’re working with a new, unsaved file, by selecting File, Save, or by
pressing Ctrl+S. |
Here are three techniques you can use within these dialog boxes:
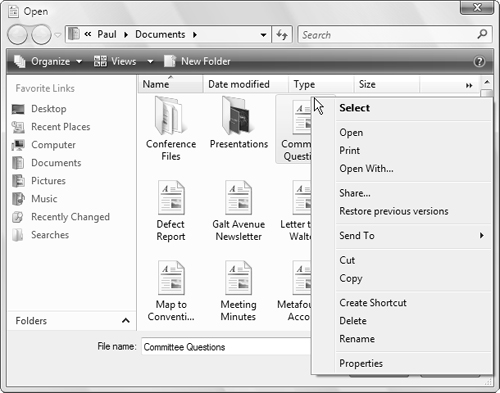
To perform maintenance on a particular file or folder, right-click the object to display a shortcut menu like the one shown in Figure 5.
To create a new object, right-click an empty section of the file list, and then click New to get the New menu.
To create a new folder within the current folder, click the New Folder button.