Microsoft has spent a lot of
time rethinking document storage and has incorporated into Vista some
substantial changes in the way we view, navigate, and use folders.For now, let’s
take a tour of the new interface features that you’ll find in Vista’s
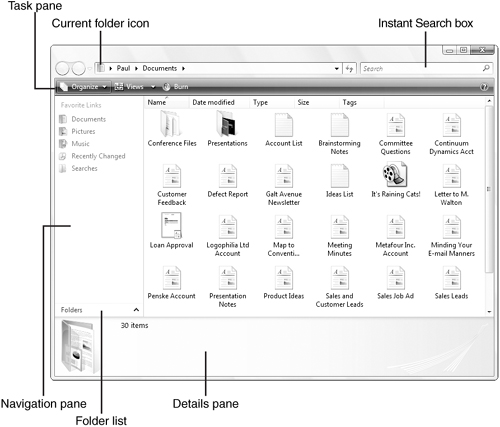
folder windows. Figure 1
shows a typical example of the species, the Documents window (formerly
My Documents; click Start, Documents to open your version of this
window).
Folder Navigation
One of the most fundamental and possibly
far-reaching of Vista’s innovations is doing away with—or, technically,
hiding—the old drive-and-folder-path method of navigating the contents
of your computer. You could go your entire Vista career and never have
to view or type a backslash. Instead, Vista implements drives and
folders as hierarchies that you navigate up, down, and even across. As
you can see in Figure 1,
the address bar doesn’t show any drive letters or backslashes. Instead,
you get a hierarchical path to the current folder. The path in Figure 1 has three items, separated by right-pointing arrows:
Current folder icon—
This icon represents the current folder. You’ll see a bit later that
you can use this icon to navigate to your computer drives, your network,
the Control Panel, your user folder, and more.
Paul—
This represents the second level of the sample hierarchy. In the
example, this level represents all the folders and files associated with
the account of a user named Paul.
Documents—
This represents the third level of the sample hierarchy. In the
example, this level represents all the folders and files that reside in
the user Paul’s Documents folder.
Tip
If you miss the old pathname way of looking at
folders, you can still see the drive letters and backslashes in Vista.
Either right-click the path and click Edit Address, or press Alt+D. To
return to the hierarchical path, press Esc.
This is a sensible and straightforward way to
view the hierarchy, which is already a big improvement over previous
versions of Windows. However, the real value here lies in the navigation
features of the Address bar, and you can get a hint of these features
from the nickname that many people have applied to the new Address bar:
the breadcrumb bar.
Breadcrumbing
refers to a navigation feature that displays a list of the places a
person has visited or the route a person has taken. The term comes from
the fairy tale of Hansel and Gretel, who threw down bits of bread to
help find their way out of the forest. This feature is common on
websites where the content is organized as a hierarchy or as a sequence
of pages.
Vista introduces breadcrumb navigation to
Windows not only by using the address bar to show you the hierarchical
path you’ve taken to get to the current folder, but also by adding
interactivity to the breadcrumb path:
You can navigate back to any part of the
hierarchy by clicking the folder name in the address bar. For example,
in the path shown in Figure 1, you could jump immediately to the top-level hierarchy by clicking the Desktop icon on the far left of the path.
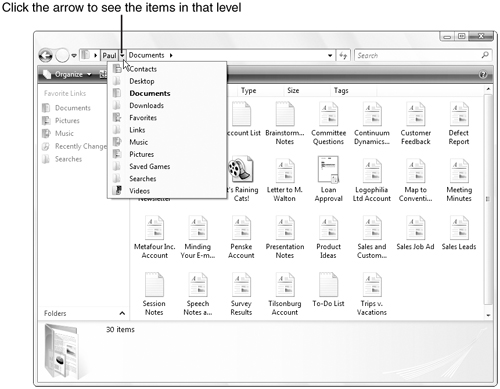
You
can navigate “sideways” to any part of any level by clicking the
right-pointing arrow to the right of the level you want to work with. In
Figure 2,
for example, you see that clicking the Paul arrow displays a list of
the other navigable items that are in the Paul folder, such as
Downloads, Music, and Pictures. Clicking an item in this list opens that
folder.
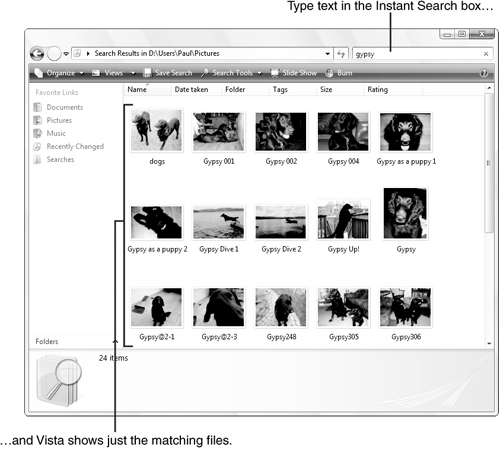
Instant Search
The
next major change to the folder window interface in Windows Vista is
the Instant Search box, which appears to the right of the address bar in
all folder windows. Search is everywhere in Vista .
For folder windows, however, the Instant Search box gives you a quick
way to search for files within the current folder. Most of us nowadays
have folders that contain hundreds or even thousands of documents. To
knock such folders down to size in Vista, you need only type all or part
of a filename, and Vista filters the folder contents to show just the
matching files, as shown in Figure 3. Vista also matches those files that have metadata—such as the author or tags—that match your text.
Instant Search is a nice addition to the folder
interface, but it’s probably not going to be much of a productivity
booster because it does not search
within document text, and that’s how most of us find the files we need.
Of course, that might change when we all get into the habit of adding
tags and other metadata to all our documents.
The Task Pane
The
Task pane resides just below the Address bar. This pane contains
task-related buttons, and its configuration depends on the type of
folder you’re viewing. For example, in the Pictures folder, there are
buttons related to images, such as Burn and Slide Show (see Figure 4). However, all folder windows have the following two buttons:
Organize—
This button drops down a menu that enables you to perform basic file
tasks (such as renaming, moving, copying, and deleting). It also
includes a Layout command that displays a submenu of commands for
configuring the folder window’s layout by toggling the Details pane,
Preview pane, and Navigation pane (discussed in the next three
sections), and the menu bar (see the following Tip sidebar).
Views— This button drops down a slider that enables you to change the folder view .
Tip
Yes, the “classic” menus (as they’re now
called) are still available. If you want to use them only occasionally,
press Alt to display the menu bar. (Press Alt again to hide the menu
bar.) If you want the menus to remain onscreen in the active Windows
Explorer window, click Organize, Layout, Menu Bar. (Repeat the command
to hide the Classic menus.) If you want the menus to appear by default
in all Windows Explorer windows, click Organize, Folder and Search
Options, display the View tab, and activate the Always Show Menus check
box.
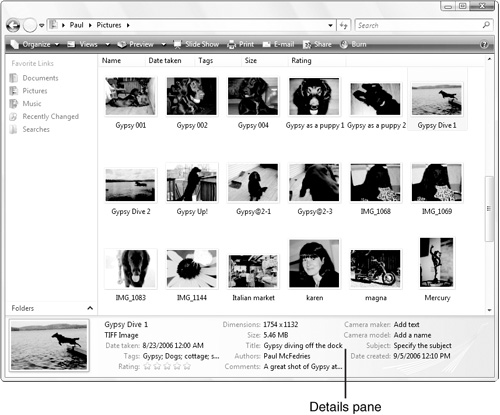
The Details Pane
The Details pane resides at the bottom of the
folder window, and it gives you information about the current folder (if
no files are selected), the currently selected file or folder, or the
current multiobject selection. If a document is selected (see Figure 3.4), the Details pane shows the following data:
A thumbnail of the document— Vista’s document thumbnails are much more informative than XP’s. Here are some examples:
Image— The thumbnail shows a scaled-down version of the image.
Video— The thumbnail shows the first frame.
Word 2007 document— The thumbnail shows the first page.
PowerPoint 2007 presentation— The thumbnail shows the first slide.
Excel 2007 workbook— The thumbnail shows the first worksheet.
The document’s metadata—
This includes the title, rating, and tags, as well as metadata specific
to the document type, such as Genre for a music file and Camera Model
for a digital photo. Some of this data is editable.
The size of the Details pane is also configurable. You can use two methods:
Click and drag the top edge of the Details pane up or down.
Right-click an empty part of the Details pane, click Size, and then click Small, Medium, or Large.
The Preview Pane
The Preview pane offers yet another thumbnail
view of the selected object. (It should be apparent to you by now that
Vista is big on thumbnails.) As with the thumbnail in the Details pane,
the Preview pane shows you the actual content from file types that
support this feature, including images, videos, text files, and Office
documents. Figure 5
shows the opening text from a text document previewed in the Preview
pane. To display the Preview pane, select Organize, Layout, Preview
Pane.

The Navigation Pane
The Navigation pane appears on the left side of
each folder window and the Favorite Links section offers access to a few
common folders. The top three icons—Documents, Pictures, and Music—are
links to those folders. The other two links in the Navigation pane are
special folders related to searching. For now, here’s a summary of what these two folders represent:
Recently Changed— Items from your user folder that you have created or modified in the past 30 days.
Searches—
A collection of search folders, including Recently Changed, Important
E-mail, and Favorite Music. Any searches that you save also appear in
this folder.
Tip
The Favorite Links section is fully
customizable. For example, you can add a link to one of your own
favorite folders by clicking-and-dragging that folder and dropping it
inside the Favorite Links section. You can also rename links
(right-click a link and then click Rename) and remove links you don’t
use (right-click a link and click Remove Link).
Tip
What happened to the Folders list? It’s still
around, but it’s hidden from view by default. However, it’s easy enough
to get at it: click Folders at the bottom of the Navigation pane.
Live Folder Icons
Do you ever wonder what’s inside a folder? In
previous versions of Windows, the only way to find out was to open the
folder and look at the files. With Vista, however, that extra step isn’t
always necessary. That’s because Vista introduces a new feature called
Live Icons; each folder icon is an open folder filled not with generic
“documents,” but with actual folder content. For example, if you have a
folder that you use to store PowerPoint presentations, that folder’s
icon will show the first slides from several of those presentation
files. Figure 6 shows an example.