WMP offers many ways to add media to your
media library. These methods include ripping music from CDs to your
computer, purchasing media from online stores, and adding media items
already stored on your computer to the library.
Note
For
best results when ripping music, make sure your computer is connected
to the Internet. When connected to the Internet, WMP retrieves media
information for inserted CDs and stores it in the ripped media files.
If the media information is incorrect or missing, you can add it or
edit it after ripping. In addition, the filenames of the ripped music
files can be set to use this media information in different ways. To do
this, click the Burn Options icon (the drop-down arrow located in the
upper-right corner) on the Burn tab and select More Burn Options. In
the Options dialog box, you can change the rip music location by
clicking Change in the Rip Music to This Location section. You can
change the ripped music filename by clicking File Name in this same
section and formatting the filename as desired. I choose to use Track
Number followed by the Song Title with a space as the separator. I use
this because it results in a very neat Music folder when organized. |
Ripping Songs from CDs onto Your Computer
The process of copying music from a CD to your computer and converting it to a format that WMP understands is known as ripping. Songs ripped using WMP automatically appear in the media library for playing.
To rip music to your computer, complete the following steps:
1. | Click the Organize menu on the WMP main window and select Options. The Options dialog box appears.
|
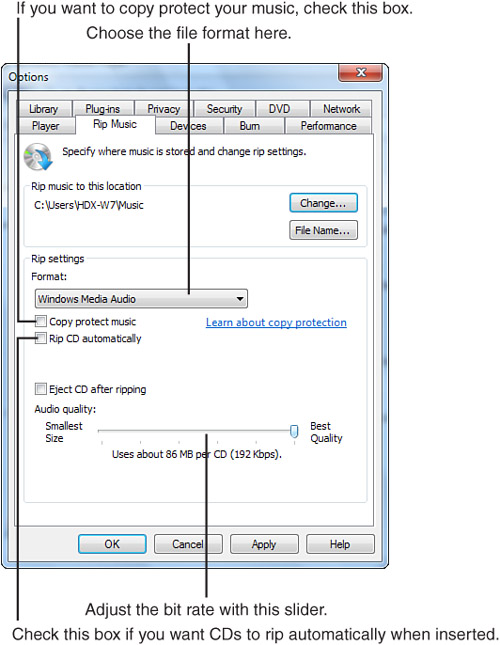
2. | Select the Rip Music tab, shown in Figure 1.
|
3. | Choose
the desired format and bit rate for the file by adjusting the Audio
Quality slider. Also select the desired options from the Format
drop-down list.
|
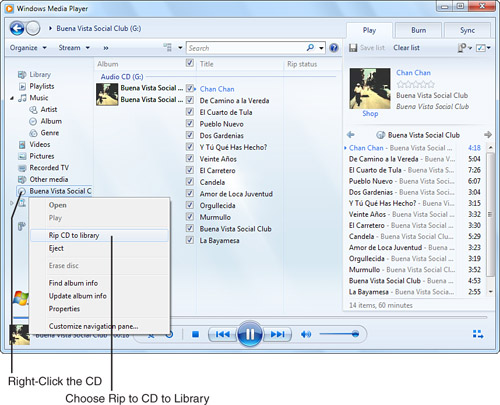
4. | Insert a CD into the CD-ROM drive and right-click the desired audio disc in the Navigation pane, as shown in Figure 2. Select Rip CD to Library.
|
5. | After
WMP has started ripping the CD, you may choose to uncheck songs that
you do not want WMP to rip to your computer. You can also stop or start
by clicking the Rip CD to Library option from the right-click context
menu of the CD/DVD drive entry in the Navigation pane, the Rip CD/Stop
Rip button that appears next to Create Playlist (when a disc is
inserted).
|
Note
WMP
12 can begin ripping automatically when you insert a new CD and the Rip
CD Automatically box is checked (disabled by default). Automatic
ripping options can be changed by clicking Organize, select Options,
and then open the Rip Music tab. |
Choosing a File Format
By
default, WMP 12 uses the Windows Media Audio format. This format offers
a balanced combination between sound quality and file size. Other
formats are available in the Format drop-down list on the Rip Music tab
of the Options dialog box:
Windows Media Audio Pro— Ideal for portable devices because of its higher sound quality at low bit rates
Windows Media Audio (Variable Bit Rate)— Results in smaller file size with the same audio quality
Windows Media Audio Lossless— Provides the best audio quality with the largest file size
MP3— Provides added flexibility with similar audio quality and a slightly larger file size than Windows Media Audio
WAV (Lossless)— Another lossless format, providing added flexibility with high audio quality and large file size
Adding Items from Your Computer to Your Library
By
default, WMP searches certain folders on your computer for media files
and automatically adds these files to your library. If your media does
not appear in the library automatically, it is located in a folder that
is not monitored by WMP. To change the folders that are monitored,
perform the following steps:
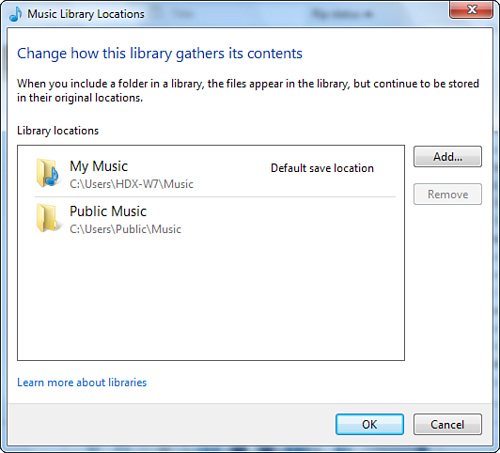
1. | Right-click
the Music entry in the Navigation pane and select Manage Music Library.
You may individually configure Music, Videos, Pictures, and Recorded TV.
|
2. | Make your appropriate selection (we’ve chosen Music for this example).
|
3. | As shown in Figure 3, you can Add or Remove monitored folders.
|
Tip
To add .m4a, .mp4, .m4p, or .aac
files from iTunes to your WMP library, you must first convert the files
to a compatible format such as Windows Media Audio or MP3. Many
software programs convert media files, such as Xilisoft Audio
Converter. To find one of these programs, search Google for "Audio Converter" and look for one that supports your desired source file type. |