Syncing Files to Your Portable Media Player
The
first step to synchronizing your files with your portable media player
is to choose a portable device. Many players will work with WMP, but
for the best experience, you should look for a device that is branded
Certified for Windows 7.
Windows
7 compatibility (that is, “Compatible with Windows 7”) carries the
assurance that vendor products meet with Microsoft standards (in this
case, Windows 7 Media Player) for easy installation and reliable
operation. When shopping for your compatible media player, look for the
Compatible with Windows 7 logo shown in Figure 3.

After
you have your device, open WMP and connect the device to your computer.
WMP gives you the option to choose between Automatic and Manual sync
methods when first setting up synchronization. For a description of
these methods, see the corresponding section that follows. If you
decide later to change the sync method then right-click the media
player entry in the Navigation pane and choose Properties. On the Sync
tab you can then select or clear the Start Sync When Device Connects
check box.
Tip
Due
to the healthy rivalry between Microsoft and Apple, iPod users cannot
directly synchronize media libraries and playlists using WMP. However,
compatibility plug-ins overcome this obstacle, enabling iPod synchrony
with WMP. For one such example, see www.mgtek.com/dopisp. |
Choosing What Syncs Automatically
If
your device is set to sync automatically, the items selected to sync
will be updated each time you connect your device to your computer. To
select the items that will be synchronized, follow these steps:
1. | Click the Sync Options icon on the Sync tab, and select Set Up Sync.
|
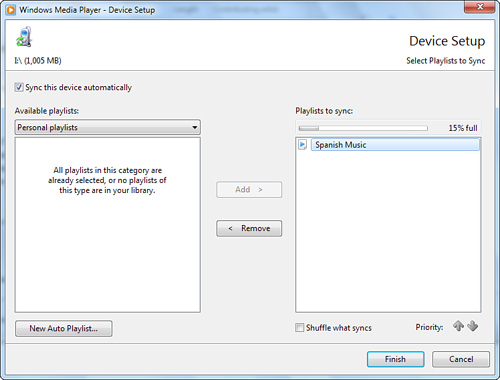
2. | In the Device Setup dialog box, shown in Figure 4,
you can choose the playlists that are synchronized with your device.
Using the available playlists, click Add to sync the selected playlist
with the device. To stop a playlist from synchronizing, select it in
the Playlists to Sync list and click Remove.

|
Tip
To
make sure your favorite playlists sync in the event that your device
runs out of storage space, use the priority arrows in the Device Setup
dialog box to set the priority of the selected playlist. WMP 12
defaults to manual mode when there is insufficient space to synchronize
playlists. |
Selecting Item to Sync Manually
If
your device is set to sync manually, each time you want to make changes
to the files on your device, you must create a list of files to sync.
To remove files from your device, navigate the device using
the Navigation pane to find your file. Right-click the file and choose
Delete. To set up a list of files to sync to the device, perform the
following:
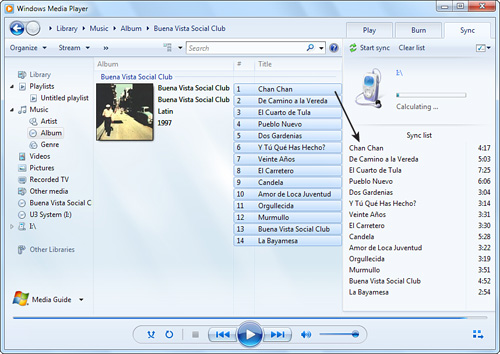
1. | Select the Sync tab and clear the Sync List by clicking the Clear List button, as shown in Figure 5.

|
2. | Find your media in your library and drag them to the List pane to add them to the Sync List, as shown in Figure 5.
To select multiple items, hold down the Ctrl key while selecting your
media. To remove items from the Sync List, right-click the item and
select Remove from List.
|
3. | After
you have set up your Sync List, make sure that all the items will fit
on your device by looking at the List pane just above the Sync List.
Remove any necessary items from the Sync List and click Start Sync.
|