3. Setting Up a Fixed IP Address
In
some cases, your ISP will require you to set your LAN adapter to a
fixed IP address. This might be required with either PPPoE or
“always-on” service. To set the address, follow these steps:
1. | Log
on as a Computer Administrator. Open the Network and Sharing Center
window, for example, from Start, Control Panel, View Network Status and
Tasks.
|
2. | Under
View Your Active Networks, click the connection name, for example,
Local Area Connection. In the Status window, select Properties to open
the Local Area Connection Properties dialog box.
|
3. | Select
the Networking tab, select the Internet Protocol (either Version 6 or
Version 4 depending on the IP provided by your ISP), and click the
Properties button.
|
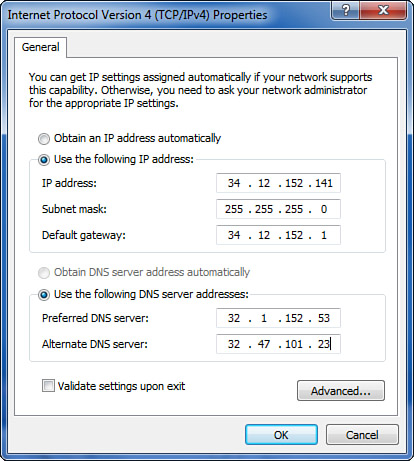
4. | Select
Use the Following IP Address, and enter the IP address, subnet mask,
and default gateway information provided by your ISP, as shown in Figure 3.

|
5. | Select Use the Following DNS Server Addresses, and enter the two DNS addresses provided by your ISP.
|
6. | Click OK to return to the Local Area Connection Properties dialog box.
|
Tip
If
you use your computer at work and at home, and have a fixed IP address
at home, leave the IP address and DNS settings set to Obtain
Automatically for work, and make the fixed IP address entries for home
on the Alternate Configuration tab that appears when Obtain
Automatically is selected. When you’re entering
TCP/IP dotted-decimal numbers such as 1.2.3.4, the spacebar advances
the cursor across the periods. This technique is much easier than using
the mouse to change fields. |
When
you have completed this procedure, return to the PPPoE setup steps, or,
if you have always-on service, open Internet Explorer to test-drive
your new connection.