Much of what you see in the Remote Web Access web pages is ASP.NET code found in text files that reside in the following folder:
%ProgramFiles%\Windows Server\Bin\WebApps\RemoteAccess
If you know ASP.NET, HTML,
and cascading stylesheets (CSS), you can customize the Remote Web Access
pages in any way you see fit. However, if you make changes to any of
these files, you must first take ownership of them. Here are the steps
to follow:
1. | Log on to Windows Home server and use Windows Explorer to display %ProgramFiles%\Windows Server\Bin\WebApps.
|
2. | Right-click the RemoteAccess folder, and then click Properties to open the folder’s property sheet.
|
3. | Display the Security tab.
|
4. | Click Advanced to open the Advanced Security Settings dialog box.
|
5. | Display the Owner tab.
|
6. | Click Edit.
|
7. | In the Change Owner To list, click Administrator.
|
8. | Activate the Replace Owner on Subcontainers and Objects check box.
|
9. | Click OK. Windows Home Server warns you that you need to reopen the property sheet to change the folder’s permissions.
|
10. | Click OK in the open dialog boxes.
|
11. | Right-click the folder, and then click Properties to open the folder’s property sheet.
|
12. | Display the Security tab.
|
13. | Click Edit.
|
14. | Click Add.
|
15. | Type administrator and then click OK.
|
16. | In the Group or User Names list, click Administrator.
|
17. | Click the Full Control check box in the Allow column.
|
18. | Click OK in the open dialog boxes.
|
I won’t go into the details of editing these files
here. However, the next three sections take you through a couple of
customizations that you can perform easily through the Windows Home
Server Dashboard.
Caution
Take some care when modifying the Remote Access files to avoid breaking Windows Home Server. Before modifying anything in the Inetpub folder, it’s a really good idea to make backups of the files so that you can restore the defaults should anything go awry.
Customizing the Logon Page
You can customize the Remote Web Access logon page by changing the following:
The page title, which appears in the browser title bar, the browser tab, and above the User Name and Password text boxes.
The logon logo, which is the small icon that appears to the left of the page title.
The logon background image, which is the image that appears behind the page title and the User Name and Password text boxes.
Here are the steps to follow:
1. | Open the Windows Home Server Dashboard.
|
2. | Click Server Settings to open the Server Settings dialog box.
|
3. | Select the Remote Web Access tab.
|
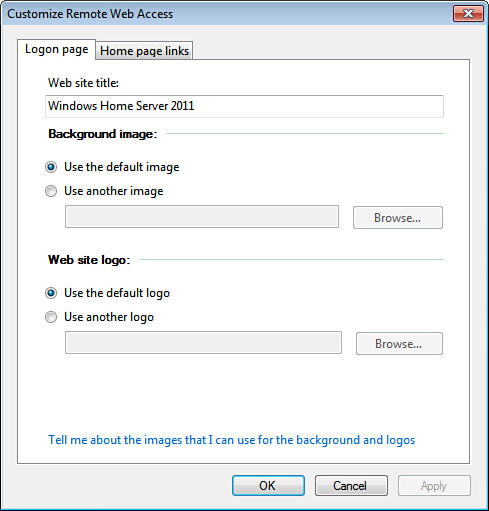
4. | In
the Web Site Settings section, click Customize to open the Customize
Remote Web Access dialog box with the Logon Page tab displayed, as shown
in Figure 1).
|
5. | Use the Web Site Title text box to type a new title.
|
6. | To
set the background, select the Use Another Image option, click Browse,
and then select the image. If possible, select an 800x500 Bitmap, GIF,
JPEG, or PNG image file.
|
7. | To
set the logo, select the Use Another Logo option, click Browse, and
then select the image. Ideally, choose a 32x32 image file.
|
8. | Click OK.
|
9. | Click OK.
|
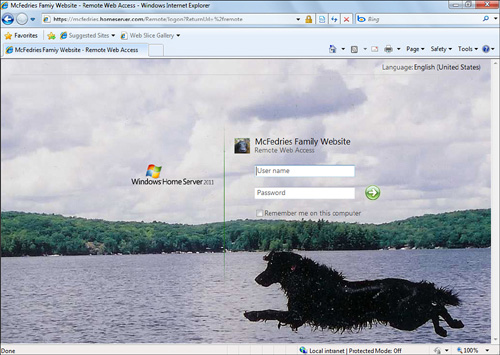
Figure 2 shows the Remote Web Access logon page with a new title, background, and logo.
Adding Web Page Links
The Remote Web Access Home page contains a Links
section that out of the box contains a few links to some Windows Home
Server 2011 resources. You can customize the Links box by adding your
own links, removing any existing links you don’t need, and rearranging
the links. Here’s how it works:
1. | Open the Windows Home Server Dashboard.
|
2. | Click Server Settings to open the Server Settings dialog box.
|
3. | Select the Remote Web Access tab.
|
4. | In the Web Site Settings section, click Customize to open the Customize Remote Web Access dialog box.
|
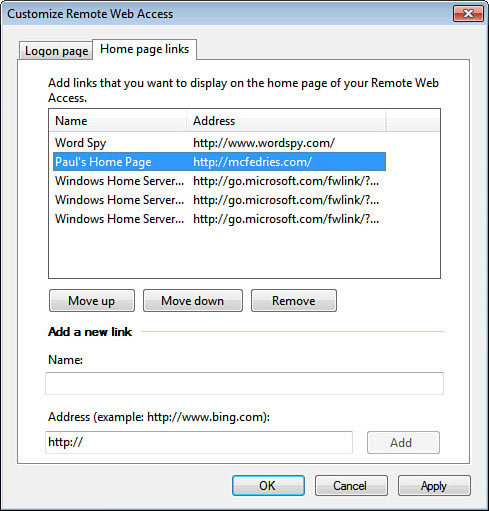
5. | Click the Home Page Links tab.
|
6. | To add a new link, type the link text in the Name text box, the link address in the Address text box, and then click Add.
|
7. | To delete a link, select it and then click Remove.
|
8. | To reorder the links, click each link you want to move and then click either Move Up or Move Down. Figure 3 shows a Home Page Links tab with some custom links added and reordered.
|
9. | Click OK.
|
10. | Click OK.
|
Figure 4 shows the Remote Web Access Home page with the customized Links box.