Home page
HOW TO
Windows
Office
Database
Application Server
Graphics
Mobile
Graphics
Adobe Flash Professional CS5 : Importing Graphics - Modifying a Bitmap Fill - Change the Center Point
1/18/2015 8:00:33 PM
-
Free product key for windows 10
-
Free Product Key for Microsoft office 365
-
Malwarebytes Premium 3.7.1 Serial Keys (LifeTime) 2019
Flash defaults to tiling a bitmap fill. Tiling is simply when an image is repeated in a grid until it fills the entire object. If you have applied a bitmap fill to a vector object, you can continue to edit its characteristics and placement. You can resize, skew, or rotate the fill or change its center point within the shape with the Gradient Transform tool. This tool allows you to dynamically make these changes when it is applied to any editable shape. As with most of the assets Flash stores in the Library, any change you make to the application of the fill does not affect the master object stored in the Library. In this way, bitmaps like video clips and sounds, behave similarly to symbols in that their master object is not affected. Although when you use a bitmap in your movie Flash refers to this as a copy, not an instance, because there are no built-in controls for bitmaps.
Change the Center Point
1. Create a shape on the Stage with a bitmap fill.
2. Click the
Gradient Transform
tool on the Tools panel.
The pointer changes to an arrow with a small gradient box in the right-hand corner.
Timesaver
Press F to quickly select the Gradient Transform tool.
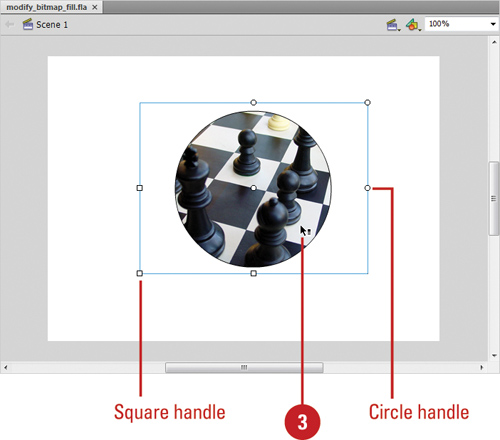
3. Click the shape to select it.
A bounding box appears on the tile.
4. Position the pointer over the white circle in the center of the bounding box.
The cursor becomes a Move icon.
5. Click and drag the center point to a new position.
The tile accommodates to the new position of the center point.
Modify the Orientation and Size of a Bitmap Fill
1. Create a shape on the Stage with a bitmap fill.
2. Click the
Gradient Transform
tool on the Tools panel.
The pointer changes to an arrow with a small gradient box in the right-hand corner.
3. Position the pointer over the shape, and then select it.
A bounding box appears on the tile.
4. Do one of the following:
Bottom-left-corner square.
Drag this to resize the fill proportionally.
Left-center square.
Drag this to resize width of fill.
Bottom-center square.
Drag this to resize height of fill.
Top-right-corner circle.
Drag this to rotate fill.
Top-center circle.
Drag this to skew fill horizontally.
Right-center circle.
Drag this to skew fill vertically.
Others
-
Adobe Flash Professional CS5 : Importing Graphics - Using Break Apart to Create Fill Patterns
-
Adobe Flash Professional CS5 : Importing Graphics - Setting Bitmap Compression
-
Adobe Dreamweaver CS5 : Working with Divs and AP Elements - Placing div Tags (part 3)
-
Adobe Dreamweaver CS5 : Working with Divs and AP Elements - Placing div Tags (part 2)
-
Adobe Dreamweaver CS5 : Working with Divs and AP Elements - Placing div Tags (part 1)
-
Adobe Dreamweaver CS5 : Working with Divs and AP Elements - Divs and AP Elements 101
-
Adobe Illustrator CS5 : Working with Paths (part 3) - Understanding how fills and strokes relate to paths
-
Adobe Illustrator CS5 : Working with Paths (part 2) - Understanding control handles and control handle lines
-
Adobe Illustrator CS5 : Working with Paths (part 1) - Understanding types of paths , Understanding anchor points
-
Microsoft OneNore 2010 : Distributing Your Notes - Emailing a Page
Top 10
-
Microsoft Visio 2013 : Adding Structure to Your Diagrams - Finding containers and lists in Visio (part 2) - Wireframes,Legends
-
Microsoft Visio 2013 : Adding Structure to Your Diagrams - Finding containers and lists in Visio (part 1) - Swimlanes
-
Microsoft Visio 2013 : Adding Structure to Your Diagrams - Formatting and sizing lists
-
Microsoft Visio 2013 : Adding Structure to Your Diagrams - Adding shapes to lists
-
Microsoft Visio 2013 : Adding Structure to Your Diagrams - Sizing containers
-
Microsoft Access 2010 : Control Properties and Why to Use Them (part 3) - The Other Properties of a Control
-
Microsoft Access 2010 : Control Properties and Why to Use Them (part 2) - The Data Properties of a Control
-
Microsoft Access 2010 : Control Properties and Why to Use Them (part 1) - The Format Properties of a Control
-
Microsoft Access 2010 : Form Properties and Why Should You Use Them - Working with the Properties Window
-
Microsoft Visio 2013 : Using the Organization Chart Wizard with new data
Technology FAQ
-
Is possible to just to use a wireless router to extend wireless access to wireless access points?
-
Ruby - Insert Struct to MySql
-
how to find my Symantec pcAnywhere serial number
-
About direct X / Open GL issue
-
How to determine eclipse version?
-
What SAN cert Exchange 2010 for UM, OA?
-
How do I populate a SQL Express table from Excel file?
-
code for express check out with Paypal.
-
Problem with Templated User Control
-
ShellExecute SW_HIDE
Cars & Motorbikes
Fashion
Gadgets
Technology
Girlstalkinsmack